Шлифмашины Einhell CE-CB 18/254 Li (2093301) - инструкция пользователя по применению, эксплуатации и установке на русском языке. Мы надеемся, она поможет вам решить возникшие у вас вопросы при эксплуатации техники.
Если остались вопросы, задайте их в комментариях после инструкции.
"Загружаем инструкцию", означает, что нужно подождать пока файл загрузится и можно будет его читать онлайн. Некоторые инструкции очень большие и время их появления зависит от вашей скорости интернета.


GB
- 19 -
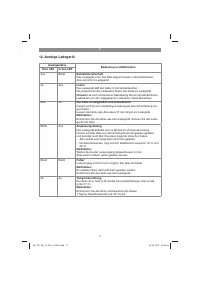
If the battery pack still fails to charge, send
•
the charging unit
•
and the battery pack
to our customer service center.
To ensure that the battery pack provides long ser-
vice, you should take care to recharge it promptly.
You must recharge the battery pack when you
notice that the power of the cordless hedge trim-
mer drops. Never fully discharge the battery pack.
This will cause it to develop a defect.
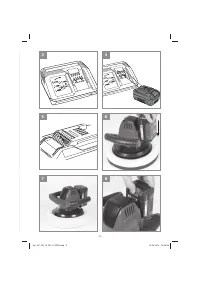
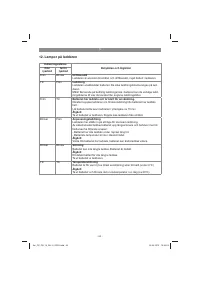
5.2 Battery capacity indicator (Fig. 5)
Press the switch for the battery capacity indicator.
The battery capacity indicator shows the charge
status of the battery using 3 LEDs.
All 3 LEDs are lit:
The battery is fully charged.
2 or 1 LED(s) are lit:
The battery has an adequate remaining charge.
1 LED
fl
ashes:
The battery is empty, recharge the battery.
All LEDs
fl
ash:
The battery pack has undergone exhaustive di-
scharge and is defective. Do not use or charge a
defective battery pack.
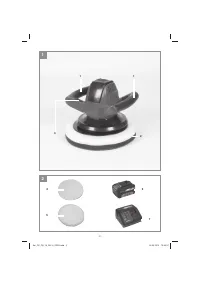
5.3 Installing the battery (Fig. 6-7)
Push the battery into the battery mount provided.
When the battery is positioned as in Fig. 7, make
sure that the pushlock button latches in place!
To remove the battery, press the pushlock button
and take out the battery (Fig. 8).
6. Operation
Warning!
Always remove the battery pack before making
adjustments to the equipment.
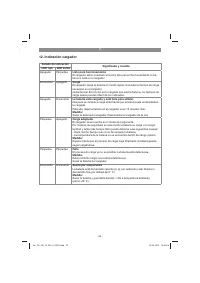
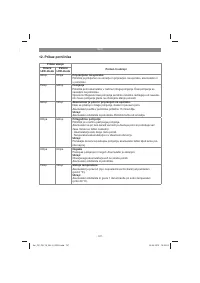
Please refer to the table in section 12 for the char-
ging time.
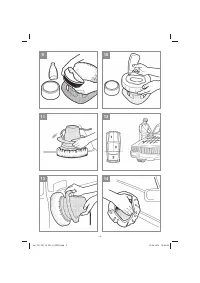
6.1 Mounting the polishing bonnet on the po-
lishing disk (Fig. 9)
1. Turn the car polishing machine upside down
so that the polishing disk is facing up.
2. Pull the textile polishing bonnet over the poli-
shing disk. Make sure that the textile polishing
bonnet is free of any foreign bodies.
6.2 Applying wax/polishing paste to the texti-
le polishing bonnet (Fig. 10)
Note:
Use only high-quality waxing and polishing
products and follow the processing instructions
issued by the manufacturer on the packaging.
Distribute the polishing agent evenly as far as the
edge of the textile polishing bonnet so that a uni-
form, thin coating is produced overall.
Note:
Applying too much polishing agent will only
make it more di
ffi
cult to remove the layer of poli-
shing agent later from the paintwork and will not
improve the results.
6.3 Switching on and applying the polishing
agent to the paintwork
Note: The paintwork you want to process must be
carefully cleaned and completely dry. Severely
oxidized paintwork requires the use of a special
cleaner.
Select a cleaner from the products available to
suit the state of the paintwork and the stress it is
exposed to.
1. Dab with the textile polishing bonnet on dif-
ferent positions of the paintwork you want to
polish. This will help to distribute any excess
polishing agent over the textile polishing
bonnet and/or over the paintwork you want to
polish.
2. Hold the handle of the equipment
fi
rmly in
both hands, place the polishing machine onto
the paintwork you want to polish (Fig. 11) and
switch on the equipment by pressing the On/
O
ff
switch (Fig. 1 / Item 3).
3. First work on the large level surfaces such
as the engine hood, boot lid and roof (Fig.
12), then on the smaller surfaces such as the
doors and mudguards (Fig. 13). Guide the
equipment smoothly over the paintwork, exer-
ting no pressure.
4. Switch
o
ff
the equipment with the On/O
ff
switch (Fig. 1 / Item 3) before you remove it
from the paintwork you are polishing.
5. For areas which are di
ffi
cult to reach, remove
the textile polishing bonnet from the polishing
disk and process these areas by hand (Fig.
14).
6.4 Polishing the paintwork with the synthetic
polishing bonnet
Note:
After the previously applied polishing agent
has dried completely on the paintwork, you can
begin with the polishing. Damp polish will be sme-
ared by the synthetic polishing bonnet.
1. Replace the textile polishing bonnet with the
Anl_CE_CB_18_254 Li_SPK9.indb 19
Anl_CE_CB_18_254 Li_SPK9.indb 19
25.04.2019 13:44:44
25.04.2019 13:44:44
Характеристики

Остались вопросы?Не нашли свой ответ в руководстве или возникли другие проблемы? Задайте свой вопрос в форме ниже с подробным описанием вашей ситуации, чтобы другие люди и специалисты смогли дать на него ответ. Если вы знаете как решить проблему другого человека, пожалуйста, подскажите ему :)


