Шлифмашины Bosch GEX 150 - инструкция пользователя по применению, эксплуатации и установке на русском языке. Мы надеемся, она поможет вам решить возникшие у вас вопросы при эксплуатации техники.
Если остались вопросы, задайте их в комментариях после инструкции.
"Загружаем инструкцию", означает, что нужно подождать пока файл загрузится и можно будет его читать онлайн. Некоторые инструкции очень большие и время их появления зависит от вашей скорости интернета.


English |
13
Bosch Power Tools
3 609 929 C83 | (30.4.14)
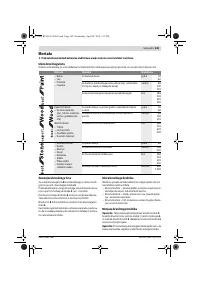
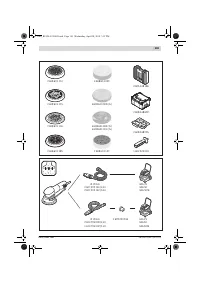
Replacing the Sanding Sheet
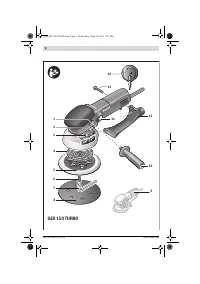
To remove the sanding sheet
8
, lift it from the side and pull it
off of the sanding plate
5
.
When attaching a new sanding sheet, remove any dust or de-
bris from the sanding plate
5
, e. g., with a brush.
The surface of the sanding plate
5
is fitted with Velcro backing
for quick and easy fastening of sanding sheets with Velcro ad-
hesion.
Press the sanding sheet
8
firmly against the bottom side of
the sanding plate
5
.
To ensure optimum dust extraction, pay attention that the
punched holes in the sanding sheet match with the holes in
the sanding plate.
Selection of the Sanding Plate
Depending on the application, the machine can be equipped
with sanding plates of different hardness:
– Sanding plate, extra soft: Suitable for polishing and sensi-
tive sanding, incl. on convex surfaces.
– Soft sanding plate: Suitable for all sanding applications
and general-purpose use.
– Hard sanding plate: Suitable for high sanding capacity on
flat surfaces.
Replacing the Sanding Plate
Note:
Replace a damaged sanding plate
5
immediately.
Pull off the sanding sheet or polishing tool. Completely un-
screw the screw
6
and take off the sanding plate
5
. Attach the
new sanding plate
5
and tighten the screw again.
Note:
When attaching the sanding plate, pay attention that
the toothing of the drive element engage into the openings of
the sanding plate.
Dust/Chip Extraction
Dusts from materials such as lead-containing coatings,
some wood types, minerals and metal can be harmful to
one’s health. Touching or breathing-in the dusts can cause
allergic reactions and/or lead to respiratory infections of
the user or bystanders.
Certain dusts, such as oak or beech dust, are considered
as carcinogenic, especially in connection with wood-treat-
ment additives (chromate, wood preservative). Materials
containing asbestos may only be worked by specialists.
– As far as possible, use a dust extraction system suitable
for the material.
– Provide for good ventilation of the working place.
– It is recommended to wear a P2 filter-class respirator.
Observe the relevant regulations in your country for the mate-
rials to be worked.
Prevent dust accumulation at the workplace.
Dusts can
easily ignite.
External Dust Extraction
Connect the vacuum hose (accessory) directly at the extrac-
tion outlet piece
12
.
Note:
The extraction outlet piece
12
is made of anti-static ma-
terial. When additionally using an anti-static vacuum hose (ac-
cessory), electrostatic charging of the machine, which can
occur in rare cases while sanding, is prevented.
For applications without dust extraction (e. g., polishing), the
extraction outlet piece
12
can be removed. For this, unscrew
the screw
13
with the Allen key
7
(accessory) and remove the
extraction outlet piece
12
from the housing.
The vacuum cleaner must be suitable for the material being
worked.
When vacuuming dry dust that is especially detrimental to
health or carcinogenic, use a special vacuum cleaner.
Auxiliary Handle
The auxiliary handle
10
enables convenient handling and op-
timal distribution of power, especially at high removal rates.
Screw the auxiliary handle
10
either at the right or the left side
of the housing into the thread
1
.
Operation
Starting Operation
Observe correct mains voltage! The voltage of the pow-
er source must agree with the voltage specified on the
nameplate of the machine. Power tools marked with
230 V can also be operated with 220 V.
Switching On and Off
To
start
the machine, push the On/Off switch
11
forwards.
To
lock
the On/Off switch
11
, press the On/Off switch
11
down at the front until it latches.
To
switch off
the power tool, release the On/Off switch
11
or,
if it is locked, briefly push down the back of the On/Off switch
11
and then release it.
To save energy, only switch the power tool on when using it.
Preselecting the Orbital Stroke Rate
With the thumbwheel for preselection of the orbital stroke
rate
14
, you can preselect the required orbital stroke rate,
even during operation.
The required stroke rate depends on the material and the
working conditions and can be determined through practical
testing.
The constant electronic control keeps the stroke rate almost
constant under no-load or load conditions and ensures a uni-
form working performance.
After longer periods of working at low stroke rate, allow the
machine to cool down by running it for approx. 3 minutes at
maximum stroke rate with no load.
1 – 2
Low stroke rate
3 – 4
Medium stroke rate
5 – 6
High stroke rate
OBJ_BUCH-522-005.book Page 13 Wednesday, April 30, 2014 3:07 PM
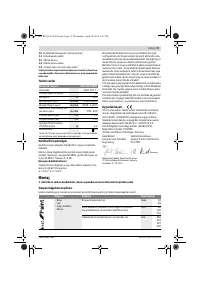
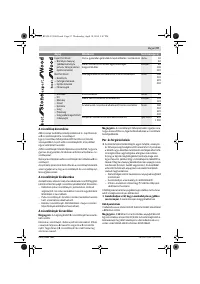
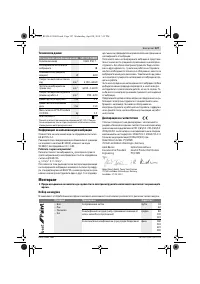
Характеристики

Остались вопросы?Не нашли свой ответ в руководстве или возникли другие проблемы? Задайте свой вопрос в форме ниже с подробным описанием вашей ситуации, чтобы другие люди и специалисты смогли дать на него ответ. Если вы знаете как решить проблему другого человека, пожалуйста, подскажите ему :)


