
Сабельные пилы Makita DJR187RTE - инструкция пользователя по применению, эксплуатации и установке на русском языке. Мы надеемся, она поможет вам решить возникшие у вас вопросы при эксплуатации техники.
Если остались вопросы, задайте их в комментариях после инструкции.
"Загружаем инструкцию", означает, что нужно подождать пока файл загрузится и можно будет его читать онлайн. Некоторые инструкции очень большие и время их появления зависит от вашей скорости интернета.


7 ENGLISH
•
For high speed
When the lock/speed change lever is depressed
from A side, the stroke speed is at “2”.
•
For low speed
When the lock/speed change lever is depressed
from B side, the stroke speed is at “1”.
When the lock/speed change lever is in
position, the
tool is locked and the switch trigger cannnot be pulled.
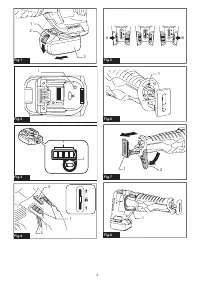
Lighting up the front lamp
►
Fig.6:
1.
Lamp
CAUTION:
Do not look in the light or see the
source of light directly.
Pull the switch trigger to light up the lamp. The lamp
keeps on lighting while the switch trigger is being pulled.
The lamp goes out approximately 10 seconds after
releasing the switch trigger.
NOTE:
Use a dry cloth to wipe the dirt off the lens of
the lamp. Be careful not to scratch the lens of lamp, or
it may lower the illumination.
NOTE:
When the tool is overheated, the lamp blinks
for one minute. In this case, cool down the tool before
another operation.
Adjusting the shoe
When the recipro saw blade loses its cutting efficiency
in one place along its cutting edge, reposition the shoe
to utilize a sharp, unused portion of its cutting edge.
This will help to lengthen the life of the recipro saw
blade.
The position of the shoe can be adjusted in five levels.
To reposition the shoe, open the shoe adjusting lever
and select the suitable position, then close the shoe
adjusting lever.
►
Fig.7:
1.
Shoe
2.
Shoe adjusting lever
NOTE:
The shoe cannot be adjusted without opening
the shoe adjusting lever fully.
Hook
CAUTION:
When hanging the tool, set the
lock/speed change lever in position to lock
the switch trigger. (See the section titled “Switch
action” .)
CAUTION:
Never hang the tool at high or
potentially unstable location.
►
Fig.8:
1.
Hook
The hook is convenient for hanging the tool temporarily.
To use the hook, simply lift up hook until it snaps into
the open position.
When not in use, always lower hook until it snaps into
the closed position.
ASSEMBLY
CAUTION:
Always be sure that the tool is
switched off and the battery cartridge is removed
before carrying out any work on the tool.
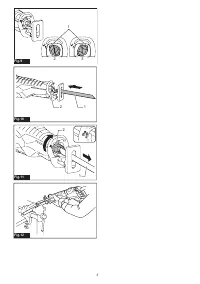
Installing or removing the recipro
saw blade
CAUTION:
Always clean out all chips or for-
eign matter adhering to the blade and around the
blade clamp.
Failure to do so may cause insufficient
tightening of the blade, resulting in a serious injury.
To install the recipro saw blade, always make sure that
the blade clamp lever (part of the blade clamp sleeve)
is in released position
on the insulation cover before
inserting the recipro saw blade. If the blade clamp lever
is in fixed position, rotate the blade clamp lever in the
direction of the arrow so that it can be locked at the
released positon .
►
Fig.9:
1.
Blade clamp lever
2.
Released position
3.
Fixed position
Insert the recipro saw blade into the blade clamp as far
as it will go. The blade clamp sleeve rotates and fixes
the recipro saw blade. Make sure that the recipro saw
blade cannot be extracted even though you try to pull
it out.
►
Fig.10:
1.
Recipro saw blade
2.
Blade clamp sleeve
CAUTION:
If you do not insert the recipro saw
blade deep enough, the recipro saw blade may be
ejected unexpectedly during operation.
This can
be extremely dangerous.
To remove the recipro saw blade, rotate the blade
clamp lever in the direction of the arrow fully. The reci
-
pro saw blade is removed and the blade clamp lever is
fixed at the released position
.
►
Fig.11:
1.
Recipro saw blade
2.
Blade clamp lever
CAUTION:
Keep hands and fingers away from
the lever during the switching operation. Failure
to do so may cause personal injuries.
NOTE:
If you remove the recipro saw blade without
rotating the blade clamp lever fully, the lever may not
be locked in the released position . In this case,
rotate the blade clamp lever fully again, then make
sure that the blade clamp lever locked at the released
position .
NOTE:
If the blade clamp lever is positioned inside
the tool, switch on the tool just a second to let the
blade out as shown in the figure. Remove the battery
cartridge from the tool before installing or removing
the recipro saw blade.
Характеристики

Остались вопросы?Не нашли свой ответ в руководстве или возникли другие проблемы? Задайте свой вопрос в форме ниже с подробным описанием вашей ситуации, чтобы другие люди и специалисты смогли дать на него ответ. Если вы знаете как решить проблему другого человека, пожалуйста, подскажите ему :)


