
Роботы-пылесосы VITEK 1807-VT-04 - инструкция пользователя по применению, эксплуатации и установке на русском языке. Мы надеемся, она поможет вам решить возникшие у вас вопросы при эксплуатации техники.
Если остались вопросы, задайте их в комментариях после инструкции.
"Загружаем инструкцию", означает, что нужно подождать пока файл загрузится и можно будет его читать онлайн. Некоторые инструкции очень большие и время их появления зависит от вашей скорости интернета.

15
ENGLISH
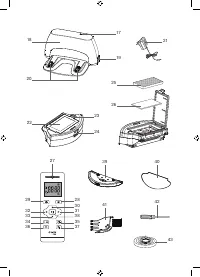
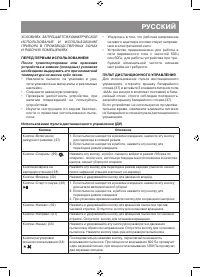
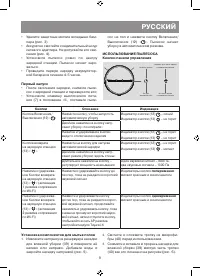
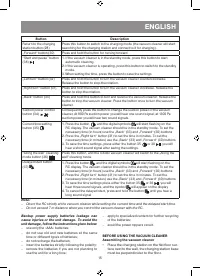
Button
Description
Return to the charging
station button (28)
Press this button to switch to the charging mode (the vacuum cleaner will start
searching for the charging station and connect to it for charging).
„Forward“ button (30)
Press and hold the button for moving forward.
“Start and pause” button
(38)
1. If the vacuum cleaner is in the standby mode, press this button to start
automatic cleaning.
2. If the vacuum cleaner is operating, press this button to switch to the standby
mode.
3. When setting the time, press the button to save the settings
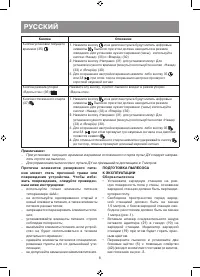
„Left turn“ button (32)
Press and hold the button to turn the vacuum cleaner counterclockwise.
Release the button to stop the rotation.
„Right turn“ button (31)
Press and hold the button to turn the vacuum cleaner clockwise. Release the
button to stop the rotation.
„Back“ button (33)
Press and hold this button to turn and reverse the vacuum cleaner. Release the
button to stop the vacuum cleaner. Press the button once to turn the vacuum
cleaner.
Suction power control
button (34)
Consequently press the button to change the suction power of the vacuum
cleaner. At 800 Pa suction power you will hear one sound signal, at 1300 Pa
suction power you will hear two sound signals.
Current time setting
button (35)
1. Press the button
, and the digital symbols
will start flashing on the
RC display. The vacuum cleaner should be in the standby mode. To set the
necessary time (in hours) use the „Back“ (33) and „Forward“ (30) buttons
2. Press the „Right turn“ button (31) to set the time in minutes. To set the
necessary time (in minutes) use the „Back“ (33) and „Forward“ (30) buttons
3. To save the time settings, press either the button 35
or 38
, you will
hear a short sound signal after saving the settings.
“Along the wall” cleaning
mode button (36)
Press this button, and the robotic vacuum cleaner will switch to the „Along the
wall“ cleaning mode
Delayed start button
(37)
1. Press the button
, and the digital symbols
will start flashing on the
RC display. The vacuum cleaner should be in the standby mode. To set the
necessary time (in hours) use the „Back“ (33) and „Forward“ (30) buttons
2. Press the „Right turn“ button (31) to set the time in minutes. To set the
necessary time (in minutes) use the „Back“ (33) and „Forward“ (30) buttons
3. To save the time settings press either the button 35
or 38
, you will
hear three sound signals, and the symbol
will appear on the display
4. To cancel the delayed start, press and hold the button
until you hear a
long sound signal
Note:
–
Direct the RC strictly at the vacuum cleaner while setting the current time and the delayed start time.
–
Do not exceed 7 m distance when you control the vacuum cleaner with the RC.
Backup power supply batteries leakage can
cause injuries or the unit damage. To avoid the
unit damage, follow the instructions given below:
–
use only the «AAA» batteries;
–
do not use old and new batteries at the same
time or different types of batteries;
–
do not recharge the batteries;
–
insert the batteries strictly following the polarity;
–
remove the batteries if you are not planning to
use the unit for a long time;
–
apply to specialized centers for further recycling
of the batteries;
–
avoid the power nippers circuit.
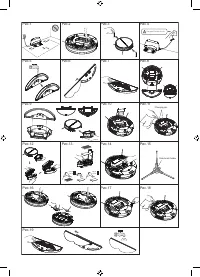
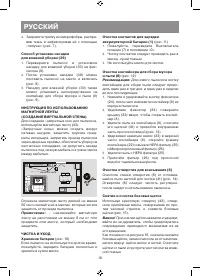
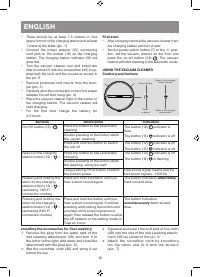
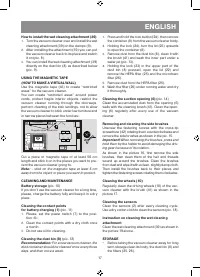
BEFORE USING THE VACUUM CLEANER
Assembling the vacuum cleaner
•
Place the charging station on the flat floor sur-
face next to the wall, the charging station base
must be perpendicular to the floor.
Содержание
- 7 Сохраните заводскую упаковку.; Использование пульта дистанционного управления (ДУ); Кнопка
- 9 Первый запуск; уборку в автоматическом режиме.; попеременно; Установка компонентов для мытья полов
- 10 CL; Не используйте масло для чистки.
- 11 ХРАНЕНИЕ; Выходное напряжение: 19 В; УТИЛИЗАЦИЯ
- 12 Срок службы устройства – 3 года


