
Реноваторы Makita TM30DWYE - инструкция пользователя по применению, эксплуатации и установке на русском языке. Мы надеемся, она поможет вам решить возникшие у вас вопросы при эксплуатации техники.
Если остались вопросы, задайте их в комментариях после инструкции.
"Загружаем инструкцию", означает, что нужно подождать пока файл загрузится и можно будет его читать онлайн. Некоторые инструкции очень большие и время их появления зависит от вашей скорости интернета.


8 ENGLISH
►
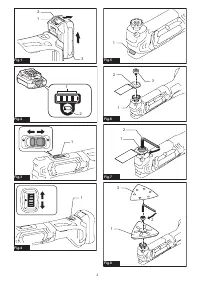
Fig.7:
1.
Application tool installation bolt
2.
Hex
wrench
3.
Tighten
To remove the application tool, loosen and remove the
application tool installation bolt using a hex wrench and
then take off the application tool.
When using the tool as a sander, set a sanding paper
on the sanding pad (hook and loop fitting).
Make sure that their shape and dust extraction holes
match each other when setting.
►
Fig.8:
1.
Sanding pad
2.
Tighten
3.
Sanding paper
To remove the sanding paper, raise its end and peel it
off.
When using application tools with a different type of
installation section, use a correct adapter (optional
accessory).
►
Fig.9:
1.
Application tool installation bolt
2.
Holes in
the application tool
3.
Adapter (required for
some application tools)
4.
Protrusions of the
tool flange
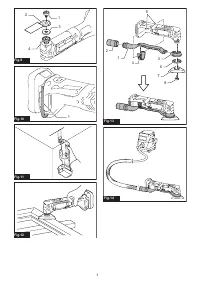
Hex wrench storage
►
Fig.10:
1.
Hex wrench
When not in use, store the hex wrench as shown in the
figure to keep it from being lost.
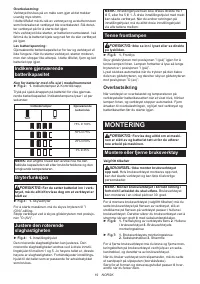
OPERATION
WARNING:
Before starting the tool and
during operation, keep your hand and face away
from the application tool.
CAUTION:
Do not apply excessive load to the
tool which may cause a motor lock and stop the
tool.
CAUTION:
Do not operate the tool with press-
ing the battery cartridge against the tool.
Cutting, sawing and scraping
CAUTION:
Do not move on the tool forcibly
in the direction (eg. towards either side) of tool
application with no cutting edge. It may damage
the tool.
►
Fig.11
Put the application tool on the workpiece.
And then move the tool forward so that the application
tool movement does not slow down.
NOTE:
Forcing or excessive pressure on the tool may
reduce efficiency.
NOTE:
Before cutting operation, it is recommended to
preset the orbital stroke rate 3 - 5.
Sanding
CAUTION:
Do not reuse a sanding paper used
for sanding metal to sand wood.
CAUTION:
Do not use a worn sanding paper
or sanding paper without grit.
Apply a sanding paper on the workpiece.
►
Fig.12
NOTE:
Using a test material sample to try is recom-
mendable to determine a correct orbital stroke rate
suitable for your work.
NOTE:
Use a sanding paper with the same grit until
sanding the whole workpiece is completed. Replacing
a sanding paper with different grit sanding paper may
not get a fine finish.
Dust extraction attachment
Optional accessory
CAUTION:
Do not use the dust extraction
attachment when sanding metal.
Sucking spark
and hot particle results in smoking and ignition.
►
Fig.13:
1.
Dust nozzle
2.
Joint
3.
Dust attachment
4.
Nozzle band
5.
Holes in the tool
6.
Felt
ring
7.
Sanding pad
8.
Application tool
installation bolt
1.
Install joint, dust nozzle and dust attachment.
2.
Install the nozzle band on the tool so that its pro
-
trusions fit in the holes in the tool to secure it.
3.
Put the felt ring and the sanding pad on the dust
attachment and then secure them with the application
tool installation bolt.
To perform cleaner operation, connect a vacuum
cleaner to the tool. Connect a hose of vacuum cleaner
to the dust extraction attachment (optional accessory).
►
Fig.14
MAINTENANCE
CAUTION:
Always be sure that the tool is
switched off and the battery cartridge is removed
before attempting to perform inspection or
maintenance.
NOTICE:
Never use gasoline, benzine, thinner,
alcohol or the like. Discoloration, deformation or
cracks may result.
To maintain product SAFETY and RELIABILITY,
repairs, any other maintenance or adjustment should
be performed by Makita Authorized or Factory Service
Centers, always using Makita replacement parts.
Содержание
- 46 ТЕХНИЧЕСКИЕ ХАРАКТЕРИСТИКИ; Назначение; Вибрация
- 47 МЕРЫ БЕЗОПАСНОСТИ; Сохраните брошюру с инструк
- 48 СОХРАНИТЕ ДАННЫЕ; Важные правила техники
- 49 ОПИСАНИЕ РАБОТЫ; Установка или снятие блока
- 50 Защита от перегрузки; СБОРКА
- 51 Хранение шестигранного ключа; ЭКСПЛУАТАЦИЯ; Резка, распиливание и зачистка; ОБСЛУЖИВАНИЕ
Характеристики

Остались вопросы?Не нашли свой ответ в руководстве или возникли другие проблемы? Задайте свой вопрос в форме ниже с подробным описанием вашей ситуации, чтобы другие люди и специалисты смогли дать на него ответ. Если вы знаете как решить проблему другого человека, пожалуйста, подскажите ему :)


