Пылесос Sencor SVC0741YL-EUE3 - инструкция пользователя по применению, эксплуатации и установке на русском языке. Мы надеемся, она поможет вам решить возникшие у вас вопросы при эксплуатации техники.
Если остались вопросы, задайте их в комментариях после инструкции.
"Загружаем инструкцию", означает, что нужно подождать пока файл загрузится и можно будет его читать онлайн. Некоторые инструкции очень большие и время их появления зависит от вашей скорости интернета.


- 5 -
Revision 01/2022
Copyright © 2022, Fast ČR, a.s.
• In order to remove the hand vacuum cleaner from the body of the
upright vacuum cleaner, press button
A3
and the top part of the hand
vacuum cleaner will be released. Hold the hand vacuum cleaner by
the handle
A8
and carefully remove it from the body of the upright
vacuum cleaner.
• Turn on the hand vacuum cleaner by pressing button
A4
.
• For more comfortable vacuum cleaning, e.g. of furniture, put the
multi-purpose crevice nozzle
A12
on to the hand vacuum cleaner.
Use the slider on the nozzle to control the extension and retraction of
the brush.
• When you have finished using it, turn off the vacuum cleaner using
button
A4
. Clean it according to the instructions contained in chapter
»Cleaning and maintenance«
, and insert it back into the body of
the upright vacuum cleaner. Allow it to recharge according to the
instructions in chapter
»Charging the vacuum cleaner«
.
Using the wiping attachment
• Attach the sleeve
A19
to the bottom surface of the attachment
A15
.
• Place the wiping attachment
A15
with the attached sleeve
A19
on the
floor. Remove the lid
A16
and pour water or a cleaning agent solution
into the tank
A17
. Put the lid
A16
back on.
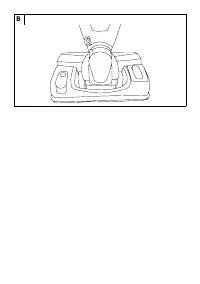
• Place the vacuum cleaner on to the wiping attachment
A15
so that
the tabs on the attachment
A15
are aligned with the holes on the
underside of the floor nozzle
A6
. The travel wheels should fit into the
body of the attachment
A15
– see fig B. Gently push on the vacuum
cleaner until you hear a click. This indicates the correct connection of
the attachment
A15
to the floor nozzle
A6
.
• In order to vacuum and wipe at the same time, set button
A18
to the
position »OPEN«. Some air will start flowing into the water tank, which
will gradually push water out through the wicks in the water tank
A17
into the sleeve
A19
. Turn on the vacuum cleaner, and while vacuuming
you will also wipe the floor at the same time.
Note:
Regularly check the water/solution level in the water tank
A17
, and fill it up as necessary.
• When no longer using the wiping attachment
A15
, turn off the vacuum
cleaner and set button
A18
to the position CLOSE. This will prevent air
from entering the water tank and the water will stop flowing out. Pull
the vacuum cleaner out in the upward direction.
Tip:
We recommend that you wet the wiping sleeve before
attaching it to the attachment. This will speed up the
wetting process and wiping will be more effective from the
very beginning.
. . . . . . . . . . . . . . . . . . . . . . . . . . . . . . . . . . . . . . . . . . . . . . . . . . . . . . . . . . . . . . . . . . . .
CLEANING AND MAINTENANCE
• Before cleaning, make sure that the vacuum cleaner is turned off and
the power adapter is disconnected from the power socket. In order
to extend the lifetime of the vacuum cleaner, we recommend you
perform cleaning and maintenance after every use.
Warning:
To prevent the risk of injury by electrical shock, do not
submerge the appliance, power cord or power plug in
water or any another liquid.
Dust container and filters
• Press button
A5
to release the dust container
A11
from the body of the
hand vacuum cleaner. Move the dust container
A11
over a waste bin.
Carefully pull filters
A9
and
A10
out of the dust container
A11
.
• Tip out all the contents of the dust container
A11
and rinse it out as
necessary under a current of cold running water. Allow it to dry and
check that the dust container
A11
is completely dry before reassembly.
• Pull the inner filter
A9
out of the outer filter
A10
. Remove dust and soils
from the outer filter
A10
rinse it out as necessary under a current of
cold running water. Allow it to dry and check that the outer filter
A10
is
completely dry before reassembly.
• Carefully remove any soils from the inner filter
A9
. If the inner filter
A9
is excessively soiled, rinse it under running water. Allow it to dry
naturally.
• Assemble the dust container
A11
and filters
A9
and
A10
in reverse
sequence.
Warning:
Before assembling the vacuum cleaner, make sure
that all its parts are completely dry. Prior to starting it,
make sure that all the filters are properly installed in
their place. Otherwise, this could damage the vacuum
cleaner.
When filters are soiled, their effectiveness is reduced,
so do not neglect their cleaning.
• It is recommended to replace the inner filter with a new one after
6 months of use. Spare filters are available at brick and mortar, and
online stores.
Floor nozzle
• If the rotary brush
A14
is soiled, turn the floor nozzle
A6
so that the
rotary brush
A14
is pointing upwards. On the left side of the nozzle
A6
there is a latch that secures the brush cover in place. Release the
latch, tilt open the cover and take out the brush
A14
.
• Remove all dirt and dust from the rotary brush
A14
and the internal
space of the floor nozzle
A6
. After cleaning, return the rotary brush
A14
back in its place. Tilt the cover back and secure in place.
• For cleaning the surface of the floor nozzle
A6
, use a dry or a lightly
dampened cloth. Then wipe everything so that it is thoroughly dry.
Outer surface of the vacuum cleaner
• Clean the outer surface of the vacuum cleaner using a dry or a lightly
dampened cloth. Then wipe everything so that it is thoroughly dry.
Warning:
Do not clean any part of the vacuum cleaner using
steel wool, abrasive cleaning products, petrol,
solvents or any other similar products.
Cleaning the wiping attachment
• Always empty out the tank
A17
after every use of the attachment
A15
. Wipe the attachment
A15
with a soft sponge lightly dampened in
warm water. Wipe dry using a clean wiping cloth.
• Remove the sleeve
A19
and wash it by hand in cold water. Allow it to
dry naturally.
Warning:
Under no circumstances submerge or wash the
attachment
A15
in water or any other liquid.
Storage
• When not using the vacuum cleaner for an extended period of time,
clean it according to the instructions provided above.
• Before storing it, check that the vacuum cleaner is perfectly clean
and dry.
• Store the vacuum cleaner in a dry, clean and well-ventilated location
not exposed to extreme temperatures and out of children's reach.
. . . . . . . . . . . . . . . . . . . . . . . . . . . . . . . . . . . . . . . . . . . . . . . . . . . . . . . . . . . . . . . . . . . .
Характеристики

Остались вопросы?Не нашли свой ответ в руководстве или возникли другие проблемы? Задайте свой вопрос в форме ниже с подробным описанием вашей ситуации, чтобы другие люди и специалисты смогли дать на него ответ. Если вы знаете как решить проблему другого человека, пожалуйста, подскажите ему :)


