Пылесос VITEK VT-8133 B - инструкция пользователя по применению, эксплуатации и установке на русском языке. Мы надеемся, она поможет вам решить возникшие у вас вопросы при эксплуатации техники.
Если остались вопросы, задайте их в комментариях после инструкции.
"Загружаем инструкцию", означает, что нужно подождать пока файл загрузится и можно будет его читать онлайн. Некоторые инструкции очень большие и время их появления зависит от вашей скорости интернета.


8
ENGLISH
•
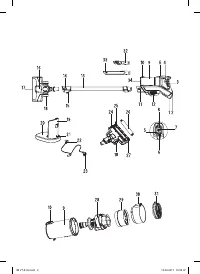
Remove the HEPA filter (31) from the
holder (30) by pulling the ledge on the HEPA
filter (pic. 13.1).
•
Turn the HEPA filter holder (30) (pic. 13.2)
counterclockwise and remove it.
•
Remove the separator (28) with the remov-
able part (29) from the dust bin (9) by pulling
it out of the dust bin (9) (pic. 13.3).
•
Clean the separator (28) and the HEPA fil-
ter (31) of garbage and dust, you can use the
attachment (32) to do it (pic. 14).
•
Turn the removable part (29) of the separator
counterclockwise (pic. 13.4).
•
Wash the dust bin (9), all the removable parts
(28, 29, 30) and the HEPA filter under warm
running water. Do not wash the removable
parts in the dishwasher (pic. 15).
Note:
–
Before assembling and installing, dry the
dust bin (9), all the removable parts (28,
29, 30) and the HEPA filter (31) thoroughly
(pic. 16).
–
Do not use heating units, including the haird-
ryer, to dry the removable parts.
–
Before assembling the dust bin (9) and install-
ing it to its place make sure that all removable
parts are clean and dry.
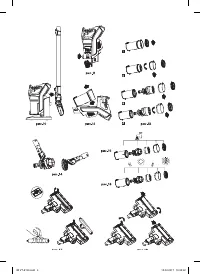
Assembling of the dust bin (9)
•
Match the marks on the separator (28) and the
removable part (29) of the separator, turn the
removable part (29) clockwise as far as it will go.
•
Insert the separator (28) with the removable
part (29) into the dust bin (9) matching the
ledge on the removable part (29) with the
groove on the inner side of the dust bin (9).
•
Matching the marks, insert the HEPA filter
holder (30) into the dust bin (9) and turn it
clockwise as far as it will go.
•
Install the HEPA filter (31) back to its place
matching the groove on the HEPA filter (31)
with the ledge on the filter holder (30).
•
Slightly press on the central part of the HEPA
filter (31) to install it properly.
•
Before installing the dust bin (9) make sure
that the coarse-mesh filter on the air inlet grid
of the vacuum cleaner is clean. If necessary,
clean the filter.
•
Install the assembled dust bin (9) back to its
place (
pic. 12
).
Attention!
Keep the dust bin (9), the separa-
tor (28) and the HEPA filter (31) clean because
the performance of the vacuum cleaner depends
on it; clean the dust bin (9), the separator (28)
and the HEPA filter (31) regularly.
Cleaning the electric brush (16) (pic. 17, 18)
Keep the electric brush (16) clean; as it becomes
dirty, disassemble the brush (16) and clean the
round brush (26).
•
Remove the electric brush (16) from the exten-
sion pipe (13) by pressing the lock button (14).
•
Press the lock (24) following the direction of
the arrow (pic. 17).
•
Lift the attachment assembly (25).
•
Remove the round brush (26) and remove
threads and hairs wound up around the
brush (26).
•
Clean the inner and outer surface of the elec-
tric brush (16) body of garbage and dust.
Assembling the electric brush (16) (pic. 18)
•
Insert the right part of the brush (26) into the
body.
•
Install the left part of the brush (26) to its place.
•
Move the lock (24) to the right, lower the attach-
ment assembly (25) and release the lock (24).
•
Make sure that the round brush (26) is fixed
properly.
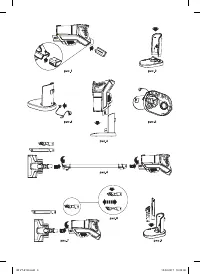
Cleaning the vacuum cleaner body
•
Wipe the vacuum cleaner body and the floor-
standing support (20) with a soft, slightly
damp cloth and then wipe them dry.
•
Never immerse the vacuum cleaner body, the
electric brush (16) and the power adapter (23)
into water or other liquids. Make sure that no
liquid gets inside the vacuum cleaner body
and the electric brush (16).
•
Do not use solvents or abrasives for clean-
ing the vacuum cleaner body and the remov-
able parts.
STORAGE
•
Before taking the vacuum cleaner away for
storage, clean the vacuum cleaner body, the
dust bin (9) and the electric brush (16).
•
For easy storing use the floor-standing sup-
port (20) with the attachments (32, 33), the
vacuum cleaner, the extension pipe (13) with
the electric brush (16) (pic. 10).
•
For long storage of the vacuum cleaner
detach the rechargeable battery (1), disas-
semble the support (20) and pack the parts.
•
Keep the vacuum cleaner away from children
in a dry cool place.
IM VT-8133.indd 8
10.02.2017 16:05:42


