Пылесос VITEK VT-8133 B - инструкция пользователя по применению, эксплуатации и установке на русском языке. Мы надеемся, она поможет вам решить возникшие у вас вопросы при эксплуатации техники.
Если остались вопросы, задайте их в комментариях после инструкции.
"Загружаем инструкцию", означает, что нужно подождать пока файл загрузится и можно будет его читать онлайн. Некоторые инструкции очень большие и время их появления зависит от вашей скорости интернета.


7
ENGLISH
or the crevice nozzle (33) straight to the air
inlet of the vacuum cleaner, without using the
extension pipe (13) (pic. 7).
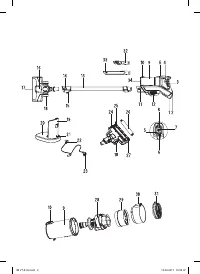
Electric brush (16)
Use the electric brush (16) for cleaning floors and
carpets with medium and low pile, the electric
brush (16) is perfect for removing pet hair from
carpets. The round brush is brought to rotation
by an electric motor built in the brush, its bristles
thoroughly comb out pet hair and sweep motes
out of the carpet pile.
During the operation the brush lighting (17) lights
up.
Notes:
–
Do not use the electric brush (16) if the pile
length exceeds 15 mm.
–
Do not run the brush (16) over electric wires.
–
Switch the vacuum cleaner off right after
cleaning with the brush (16).
Combined attachment (32)
This attachment (32) is intended for collecting
dust from the furniture upholstery or smooth sur-
faces, the pile prevents damage of polished fur-
niture surface.
To clean smooth surfaces, shift the brush for-
ward until locking (pic. 8).
Crevice nozzle (33)
The nozzle (33) is intended for cleaning radiators,
chinks, corners and spaces between cushions.
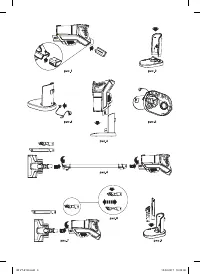
•
For easy storing of the attachments (32, 33)
the floor-standing support (20) is equipped
with storage places (pic. 9).
USING THE VACUUM CLEANER
Attention! Switch the vacuum cleaner on only
with the dust bin (9) and the HEPA filter (31)
installed in the dust bin. Always check if the dust
bin (9) is assembled and installed properly.
•
Use the floor-standing support (20) for easy
storing of the vacuum cleaner or battery (1)
charging. You can install the electric brush in
the storage place on the vertical stand (19),
having installed the storage bracket (15) on
the extension pipe (13) into the groove on the
vertical stand (19) (pic. 10).
•
During the operation or when carrying the vac-
uum cleaner hold the unit by the handle (3).
•
Press and hold down the ON button (4) to
switch the vacuum cleaner on; the operation/
charging indicator (7) will light up green.
•
During the vacuum cleaner operation you can
select the vacuum cleaner operating modes
by pressing the button (8) on the control
panel (5). The vacuum cleaner has two oper-
ation modes:
–
a charged battery (1) provides approxi-
mately 20 minutes of continuous vacuum
cleaner operation at maximal power;
–
the operation time at the low power level is
approximately 35-40 minutes.
Note:
–
During the vacuum cleaner operation the indi-
cator (7) (сontrol panel (5)) shows the battery
charging rate.
–
As the battery runs low, the number of green
segments on the operation/charging indica-
tor (7) decreases.
–
If the battery (1) is low, the first segment
of the operation/charging indicator (7) will
be flashing green. In this case it is recom-
mended to stop operation and put the vac-
uum cleaner on the base (20) for charging
the battery.
–
If the battery is fully discharged, then as you
press and hold the ON button (4) all the
segments of the indicator (7) will light up
and flash thrice before the indicator (7) goes
out. In this case you have to perform the full
recharging cycle of the battery (1).
•
Use the handle (3) for carrying the vacuum
cleaner.
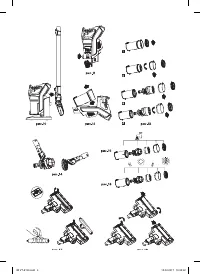
CLEANING AND CARE
Remove garbage and dust from the dust bin (9)
after each usage of the vacuum cleaner and
clean the dust bin (9), the separator (28) and the
HEPA filter (31) regularly.
•
If you use the unit with installed extension
pipe (13), remove the extension pipe (13) by
pressing the lock button (11) before removing
garbage and dust from the dust bin (9).
•
To remove garbage and dust, place the dust
bin (9) above the garbage bin, press the lid
lock button (10), remove garbage and dust
and close the lid until the lock button (10)
goes off (pic. 11).
Cleaning the dust bin (9) (pic. 13)
•
Before removing the dust bin (9) remove
dust and garbage from it as described
above.
•
Holding the dust bin (9), press the lock but-
ton (6) and remove the dust bin (9) (pic. 12).
IM VT-8133.indd 7
10.02.2017 16:05:42


