Пылесос VITEK VT-1886 B - инструкция пользователя по применению, эксплуатации и установке на русском языке. Мы надеемся, она поможет вам решить возникшие у вас вопросы при эксплуатации техники.
Если остались вопросы, задайте их в комментариях после инструкции.
"Загружаем инструкцию", означает, что нужно подождать пока файл загрузится и можно будет его читать онлайн. Некоторые инструкции очень большие и время их появления зависит от вашей скорости интернета.


7
ENGLISH
the ON/OFF button (1), then take the power
plug out of the socket.
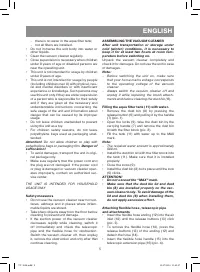
CLEANING AND CARE
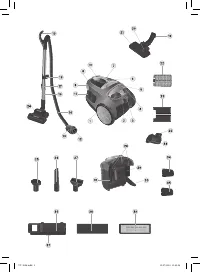
Cleaning the dust bin (8)
•
Switch the unit off and unplug it.
•
To remove the flexible hose (14), press the
release buttons (13) of the ending (12) and
detach the hose (14).
•
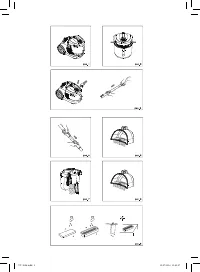
Remove the dust bin (8) by pressing the
release button (6) and pulling it by the handle
(7) (pic. 1).
•
Open the locks (9), take the dust bin by the
handle (7) and remove the dust bin lid with the
filter block (pic. 2).
•
Pour dirty water out of the tank (11), wash the
tank (11) thoroughly with warm water, then
dry (pic. 6).
•
Place the bin lid (30) over a garbage bin. Open
the lower lid (30) by pressing the lid release
button (31) (pic. 7). Remove accumulated
dust and garbage from the dust bin (8).
•
Open the locks (28), remove the upper lid of
the dust bin (8).
•
Remove the cyclonic filter (32), open the
cyclonic filter lid (33) and wash the filter (32)
with warm water, then dry thoroughly and
close the cyclonic filter lid (33).
•
Remove the foam filter (34) and the anti-foam
filter (35), wash and dry them.
•
Wash the dust bin (8) lid and the aqua
filter block (29) with warm water, then dry
them.
•
Install the foam filter (34) and then the anti-
foam filter (35) back to their places.
•
Install the cyclonic filter (32).
•
Put the dust bin (8) lid on the aqua filter block
(29). Cover the front part of the aqua filter
block (29) with the dust bin (8) lid, then lower
the lid and secure it by closing the locks (28).
•
Insert the aqua filter block (29) into the tank
(11), make sure it is installed properly and
close the locks (9).
Cleaning the HEPA Filter (39)
The HEPA Filter retains the finest dust particles
that can get back into the room during cleaning.
Note:
Take the dust bin (8) out before removing the
HEPA Filter (39).
•
Remove the HEPA Filter lid (36) by pulling it
upwards with the lock (37). Take the HEPA
Filter (39) with the foam filter (38) out.
•
Wash the HEPA Filter (39) and the foam filter
(38) under warm water jet and dry them thor-
oughly (pic. 8).
Note:
•
Wash the HEPA Filter (39), directing the water
jet to the outer side of the HEPA Filter.
•
Do not wash the filters (38, 39) in a dish wash-
ing machine.
•
Do not dry the filters (38, 39) with a hairdryer.
•
Insert the foam filter (38) into the HEPA Filter
(39), then install the filters (38, 39) back to
their places.
•
Install the HEPA Filter lid (36) back to its place,
pressing it until the lock (37) clicks.
AT TENTION!
Before inserting the dust bin (8) into the
body of the vacuum cleaner, make sure that
all the filters are dry.
Cleaning the outlet filters (23)
Clean the outlet filters (23) regularly.
•
Remove the outlet filter grid (22) by press-
ing the lock and pulling the grid (22) towards
yourself.
•
Remove the outlet filters (23) from the inner
side of the grid (22), wash them under warm
water jet, then dry them thoroughly.
•
Fix the outlet filters (23) on the inner side of
the grid (22).
•
Install the grid (22) back to its place.
Note:
–
Check the filters (23) regularly for dirt accu-
mulation and clean them if necessary.
Vacuum cleaner body
•
Clean the unit body with a soft, slightly damp
cloth and then wipe it dry.
•
Do not immerse the body of the vacuum
cleaner, the power cord and the power plug of
the unit into water or other liquids. Provide that
no water gets inside the vacuum cleaner body.
•
Never use solvents or abrasives to clean the
surface of the vacuum cleaner body.
STORAGE
•
Before taking the vacuum cleaner away for
long term storage, clean its body, the dust bin
(8) and all the filters (23, 32, 34, 35, 38, 39).
•
For easy storage use the attachment holder
(18) and the brush storage (3).
•
Keep the vacuum cleaner away from children
in a dry cool place.
VT-1886.indd 7
23.07.2014 11:42:58
Характеристики

Остались вопросы?Не нашли свой ответ в руководстве или возникли другие проблемы? Задайте свой вопрос в форме ниже с подробным описанием вашей ситуации, чтобы другие люди и специалисты смогли дать на него ответ. Если вы знаете как решить проблему другого человека, пожалуйста, подскажите ему :)


