Пылесос VITEK VT-1842 G/OG - инструкция пользователя по применению, эксплуатации и установке на русском языке. Мы надеемся, она поможет вам решить возникшие у вас вопросы при эксплуатации техники.
Если остались вопросы, задайте их в комментариях после инструкции.
"Загружаем инструкцию", означает, что нужно подождать пока файл загрузится и можно будет его читать онлайн. Некоторые инструкции очень большие и время их появления зависит от вашей скорости интернета.


6
ENGLISH
USING THE VACUUM CLEANER
Safety measures
•
Do not use the vacuum cleaner near hot sur-
faces, ashtrays and in places where inflam-
mable liquids are stored and used.
•
If the suction power of the vacuum cleaner
decreases rapidly while cleaning, switch it off
immediately and check the telescopic pipe
and the flexible hose for obstruction. Switch
the vacuum cleaner off, unplug it, remove the
obstruction and only after that you can con-
tinue cleaning.
Attention! Always switch the vacuum cleaner
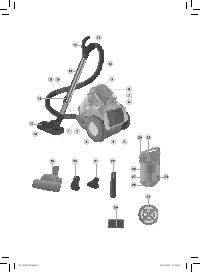
on only with the dust bin (9), inlet (25), outlet
(5) and protective (30) filters installed.
Always check if the dust bin (9) is assembled
properly and the filters (5, 25, 30) are
installed properly.
–
Before using the unit, unwind the power cord
to the required length and insert the power
plug into the mains socket. The yellow mark
on the power cord warns about the maximum
cord length. Do not unwind the power cord
further than the red mark.
–
Press the on/off button (1) to switch the vac-
uum cleaner on.
–
During the operation you can control the suc-
tion power using the manual control (14) on
the flexible hose handle (13).
–
After the unit operation switch the vacuum
cleaner off by pressing the on/off button (1)
and unplug the unit.
–
To wind the power cord, press and hold the
button (6), hold the winding cord with hand to
avoid its whipping and damage.
–
Between operations use the brush storage
(3).
–
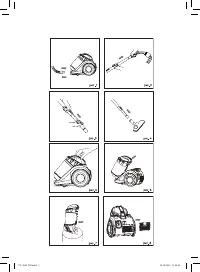
Use the handle (8) for carrying the vacuum
cleaner or the dust bin (9) (pic. 5).
AUTO SWITCH-OFF FUNCTION
The vacuum cleaner is equipped with auto
switch-off function in case of motor overheating.
•
In case of overheating of the motor, the auto-
matic thermal switch will be on, and the vac-
uum cleaner will be switched off.
•
In this case remove the power plug from the
mains socket immediately.
•
Check the telescopic pipe and flexible hose
for obstruction and remove the obstruction.
•
Let the vacuum cleaner cool down for ap-
proximately 20-30 minutes before switching
it on again.
•
Plug the unit into the mains, switch it on, if the
vacuum cleaner can not be switched on, this
may mean, that it is otherwise damaged. In
this case contact the authorized service cen-
ter for repair.
CLEANING AND CARE
Remove garbage and dust, disassemble and
clean the dust bin (9) after every usage of the
vacuum cleaner. The glowing indicator (2)
informs about the necessity to perform cleaning
of the dust bin (9).
Start cleaning only after removing dust and
garbage from the dust bin (9).
Removing of the dust bin (9) and removal of
dust and garbage from it
–
Switch the vacuum cleaner off pressing the
on/off button (1) and take the power plug out
of the socket.
–
Detach the flexible hose (12), having pressed
the locks of the flexible hose ending (11).
–
Holding the handle (8), push the lock (7) and
remove the dust bin (9) (pic. 6).
–
Place the dust bin over a garbage bin. Open
the lid (28) by pressing the lid lock (29) (pic.
7). Remove accumulated dust and garbage
from the dust bin (9).
Disassembling and cleaning of the dust bin (9)
–
Switch the vacuum cleaner off and unplug
it, take the dust bin (9) off, remove dust and
garbage from it.
–
Holding the dust bin (9) by the flask (27),
turn the lid (23) counterclockwise and take it
off (the lid (23) is taken off together with the
separator (26)).
–
Open the lid (23) by pulling the lock (24) up-
wards.
–
Remove the inlet filter (25).
–
Clean the inlet filter (25) from dust, then wash
it under warm water jet and dry it thoroughly.
–
Wash the separator (26) and the flask (27)
under warm water jet and dry them thor-
oughly.
Note: Before assembling the dust bin make sure
that all removable parts are clean and dry.
VT-1842_IM.indd 6
14.10.2013 11:38:55


