Пылесос VITEK VT-1825 R - инструкция пользователя по применению, эксплуатации и установке на русском языке. Мы надеемся, она поможет вам решить возникшие у вас вопросы при эксплуатации техники.
Если остались вопросы, задайте их в комментариях после инструкции.
"Загружаем инструкцию", означает, что нужно подождать пока файл загрузится и можно будет его читать онлайн. Некоторые инструкции очень большие и время их появления зависит от вашей скорости интернета.


6
Using the brush attachments
Turbo brush for floors/carpets (1)(drawings 11-12)
The turbo brush can be used to vacuum floors, rugs and car-
pets with long or short pile, and is ideal for picking up animal
fur. The cylindrical brush with hard bristles rotates under the
action of the air current and its bristles effectively remove ani-
mal fur and loose carpet and rug fibers.
Note: Never use the turbo brush to clean rugs with fringe and
pile of 15 mm or more, because the rotating brush can cause
damage to such rugs. Do not run the turbo brush over power
cords and turn off the vacuum cleaner immediately after you
are done using it.
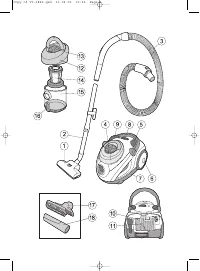
Universal brush attachment (17)
1. For cleaning furniture upholstery.
2. With attached brush: for cleaning furniture, curtains,
books, floor-lamps, shelves, and to remove dust from
plants.
Attachment for hard-to-reach places (18)
For cleaning radiators, crevices, corners and between sofa pil-
lows.
Note: Attachments (17) and (18) are located on the rear of the
vacuum cleaner.
USAGE INSTRUCTIONS
Before using the vacuum, pull the power cord out to the
desired length and insert the plug into an outlet. The yellow
mark on the power cord warns you when to stop pulling. Never
pull the power cord past the red mark.
Always make sure the dust container and filter unit are
attached before turning on the vacuum cleaner.
1. To turn the vacuum cleaner, press the ON/OFF button (5).
2. To rewind the power cord, press the power cord rewind
button (9) and guide the rewinding process with your hand
to prevent entanglement.
3. While using the vacuum, you can regulate the suction
power by moving the regulating handle (8) and mechanical
regulator located on the handle of the flexible hose.
SERVICING
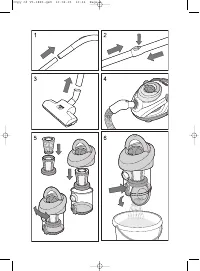
1. Removing the dust container (4) and emptying dust and
trash from it (drawing 6).
Turn off the vacuum cleaner and unplug it from the power
outlet.
Turn the self-cleaning handle of the HEPA-filter (13) clock-
wise/counterclockwise.
Lift the handle on the dust container and pull it off.
Press the fixation button of the lower lid (16) to remove
trash and then close it.
Set the dust container (4) in place and lightly press on it
from above on to snap it into place.
Note: We recommend emptying the dust container after every
use of the vacuum cleaner.
2. Dissembling the dust container (drawing 5).
Turn off the vacuum cleaner and unplug it from the power
outlet. Disconnect the dust container, empty dust and
trash from it and close the lower lid.
Turn the top lid of the dust container counterclockwise and
remove the lower part of the dust container.
Holding the lower part of the filter unit, turn it counter-
clockwise and disconnect it from the top lid.
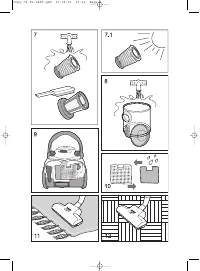
3. Cleaning the filter unit (drawing 7)
Always make sure the filter unit is clean, otherwise the vacuum
cleaner won't work properly. Clean the filter unit at least 2 or 3
times a year, or more often if it gets dirty quickly. Replace the
filter unit when you notice that it is no longer filtering effective-
ly.
Turn off the vacuum cleaner and unplug it from the power
outlet, disconnect the container, empty dust and trash
from it, open the filter unit and remove it.
Remove dust and trash from the mesh screen.
Rinse the filter unit under lukewarm water. Do not wash it in
a dishwasher.
Dry the filter unit. Never use a blow dryer to dry it.
Rinse the lower part of the dust container and dry it.
Wipe the outer and inner surfaces of the top lid with a
damp cloth.
Assemble the dust container:
-
Set the filter unit on the top lid of the container and turn it
counterclockwise until it snaps into place.
-
Align the arrows on the top lid and lower part of the con-
tainer and turn the lid clockwise.
-
Lift the handle on the dust container lid and attach it in the
vacuum cleaner.
-
Lightly press on the container to snap it into place.
4. Replacing the outgoing air filter (drawings 9-10).
Open the lid of the outgoing air filter (10).
Disconnect the filter and rinse it under running water, dry it
or replace it with a new one.
Close the lid of the outgoing air filter (10).
5. Cleaning the turbo brush
Remove the turbo brush from the telescoping tube and
remove pieces of thread and hairs from the cylindrical brush.
If the brushes do not rotate:
-
Use a flat screwdriver to remove the two small wheels.
-
Use a Philips screwdriver to remove the fastening screws.
-
Disconnect the cylindrical brush and the impeller of its
drive gear and remove hair, etc. from them.
-
Clean the bearings of the impeller and cylindrical brush.
-
Assemble the brush.
6. Vacuum cleaner housing
Wipe the housing with a damp cloth.
Do not allow water or other liquid to get inside the housing
of the vacuum cleaner.
Never use solvents or abrasive cleaning products to clean
the surface of the vacuum cleaner
TECHNICAL DATA
Power source:
220/230 V ~ 50 Hz
Power consumption:
1800 W
Suction power:
350 W
Dust container capacity:
1.5l
Noise level (dB):
< 84
Specifications subject to change without prior notice.
MINIMUM SERVICE LIFE - 5 YEARS
GUARANTEE
Details regarding guarantee conditions can be obtained from
the dealer from whom the appliance was purchased. The bill of
sale or receipt must be produced when making any claim
under the terms of this guarantee.
This product conforms to the EMC-
Requirements as laid down by the Council
Directive 89/336/EEC and to the Law Voltage
Regulation (73/23 EEC)
ENGLISH
Copy of Vt-1825.qxd 10.02.05 10:36 Page 6


