Пылесос VITEK VT-1820 R - инструкция пользователя по применению, эксплуатации и установке на русском языке. Мы надеемся, она поможет вам решить возникшие у вас вопросы при эксплуатации техники.
Если остались вопросы, задайте их в комментариях после инструкции.
"Загружаем инструкцию", означает, что нужно подождать пока файл загрузится и можно будет его читать онлайн. Некоторые инструкции очень большие и время их появления зависит от вашей скорости интернета.


•
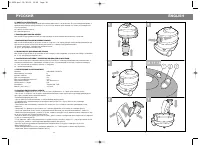
Adjust the power cable in a suitable length by pulling it outwards and insert the plug in the socket. After seeing the
red band on the power cable do not force to take it out more. (Figure 9-10)
ATTENTION:
Do not operate the pump.
SHAMPOOING AND WET VACUUMING
•
Make sure that the foam filter and foam filter cover is fitted. (Figure 5)
•
Empty dirt and waste liquid inside the container, remove dust bag if it is inside.
•
Fill the water tank with clean water and shampoo to the directions, mentioned on shampoo bottle. Place the water
tank on to the container. (Figure 13)
•
Attach the water tube connection adapter to the back of the appliance, pushing in to back side of the top section
group. Insert water tube filter group inside the water tank pushing firmly. (Figure 14)
•
Place the top section group right away and lock the clip locks. (Figure 12)
•
Make sure that suction hose and water tube connection adapter on the hose group are fitted. (Figure 4)
•
Fit the extension tubes In to the handgrip if necessary.
•
Fit the large or small wet cleaning head on to the extension tubes or directly on to the handgrip (Figure 3). For
shampooing the carpets, mats and floor use large wet cleaning head, for shampooing the armchairs, sofas, curtains,
car upholstery, etc use small wet cleaning head fitting it directly on to the handgrip,
•
Adjust the power cable in a suitable length by pulling it outwards and insert the plug in the socket. After seeing the
red band on the power cable do not force to take it out more. (Figure 9-10)
•
Press the pump switch and operate the water dispenser lever to inject water and shampoo mix on to the surface
to be treated (Figure 15-16). The appliance is specially designed for locking water dispenser lever in to place to
make operation easier using water spraying fixing button. (Figure 16)
•
The shampoo and water is extracted from the water tank by pump and sprayed through a nozzle on to the surface
to be cleaned. The shampoo penetrates the fibers, dissolving even the most stubborn dirt Wait at least three minutes
to allow the shampoo to soak in completely.
•
Press the on/off switch, which activates the extraction function, and pass over the surface while pump is not oper-
ating. For cleaning the upholstery or if it is desired, sucking up the dirt water and spraying the shampoo and water
mix functions can be made at the same time operating on/off switch and pump. If foam starts to come out of the
cleaning head, turn off the appliance immediately and empty the container, check the amount of the shampoo mixed
into water.
•
Once the container is full with dirt liquid, the float blocks the suction operation automatically and motor gets nois-
ier. At the time switch off the vacuum cleaner and pump IMMEDIATELY, pull out the plug, remove the suction nose
from the suction opening and empty the container.
•
For cleaning the hard floors like tiles, bricks, marble, ext. fit the squeeze attachment on to the large wet cleaning
head sliding it in to place from left to right (Figure 17). Proceed as described in this section dealing with spraying and
sucking liquids.
•
Using the crevice nozzle you can soak the block sinks and drains, water discharge from dish washer or washing
machine, spilling of liquids, refrigerators and freezers defrosting. Fit the crevice nozzle on to the handgrip and switch
on for vacuuming liquids.
VI. CLEANING AND MAINTENANCE
•
Always unplug the appliance before starting any maintenance operations.
•
Always empty, clean and dry the container after use.
•
After wet cleaning, always suck clean water without shampoo a few minutes for cleaning the accessories, exten-
sion tubes and hose group and than suck clean air for draying them.
•
To ensure perfect hygiene and length the working life of vacuum cleaner, never leave wet and dirt Inside the con-
tainer.
•
Before emptying dirt and waste liquid remove suction nose of hose group and lift top section group by pulling the
clip locks.
•
If it is used the foam filter can be washed warm, soapy water or running water. Dry it thoroughly before planning on
to float case. Don't wash foam filter at washing machine with hot water.
•
Clean and check the float valve inside the float case moves freely in it's housing. For checking the float, lift up the
top section group and shake it.
•
If your dust bag is cloth, you must wash it with warm water after emptying 2 times. Otherwise the dust closes the
pores and suction power decreases.
•
The cleaners of micro filter at the backside of the top section group should be checked periodically. Clean the fil-
ter if it is not clean. This filter loses its characteristics after a certain usage period and requires replacing. It must be
replaced with the new one after the dust bag is replaced or emptied 15 times. Change the micro filter after removing
the micro filter cover. (Figure 8)
SERVICE LIFE OF THE SHAMPOO, WET&DRY VACUUM CLEANER NOT LESS THAN 7 YEARS
J. LARGE WET CLEANING HEAD
It is used for sucking liquids on the carpets, mats, floors. Water and shampoo is sprayed through this accessory. For
floors it is used with squeegee attachment.
J1 - Squeegee Attachment
J2 - Spraying Nozzle
K. SMALL WET CLEANING HEAD
It is used for spraying and sucking liquids on the small areas like upholstery.
K1 - Spraying Nozzle
L. DUST BAG CONNECTION ELBOW
It is used to fix the dust bag to container. Paper or textile dust bag is inserted to this accessory and locked before
inserting this group in to file dust bag connection elbow neste inside the container.
L1 - Elbow Seal
L2 - Dust Bag Locking Clip
III. TECHNICAL FEATURES
Voltage
: 220-230V. 50-60 Hz.
Tank Capacity
:8 lt.
Water Tank Capacity
: 3.5 It.
Cord Rewind
: Automatic
Power Cord Length
:6m.
Weight (Gross-Net)
: 12/10kg.
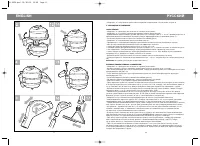
IV. ASSEMBLY INSTRUCTIONS
•
ATTENTION - While assembling and preparing the appliance for use, make sure that it is not plugged in.
•
Release the water tube connection adapter between water tank and backside of top section by pulling carefully.
•
Remove the water tank.
•
Release the top section group by pulling me clip locks outward (Figure 2).
•
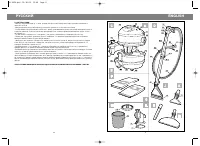
Lift up the top section group using the handle provided, take the attachments out of the container,
•
When unpacking, please check that all parts are included and that these are no damaged.
•
Make sure that foam filter and foam filter cover is fitted on the float case (Figure5).
•
For connecting the hose group to the top section group, locate the suction nose of the hose in to the suction open-
ing pressing the button. Push it as far as it will go (bayonet - joint). For removing the nose press the button and pull
it (Figure 4).
•
Attach the water tube top section connection adapter to the head of the appliance pushing and turning it in a
clockwise direction (Figure 4).
•
Fit the extension tubes, connecting one end to the hand grip and the other end to the wet cleaning head or dust-
ing brush pressing the fixing buttons (Figure 3).
•
For dry vacuuming place the paper or textile dust bag in to the container through dust bag connection elbow
(Figure 6-7).
•
Place the top section group right away on to container making sure that the notch is lined up above the suction inlet
and lock the clip locks (Figure 2).
•
Check the micro filter back side of the top section is fitted and locked (Figure 8).
V. OPERATING THE APPLIANCE
DRY VACUUMING
•
Make sure that the foam filter and foam filter cover is fitted.
•
Make sure that the container, extension tubes and hose group are dry and clean.
•
The paper or textile dust bag is fitted inside the container. For doing this, place the card board color of dust bag on
the connection elbow pressing it down firmly and lock it using locking clip. (Figure 6-7)
•
Place the top section group right away and lock the clip locks. (Figure 2)
•
Make sure that suction hose is fitted. (Figure 4)
•
Fit the cleaning accessories most suited to the type of operation to be performed, on to the extension tubes or
directly in to the handgrip.
•
For effective cleaning the following accessory can be used.
- Dusting brush for removing dust from carpets, mats and hard floor surfaces.
- Crevice nozzle for removing dust, crumbs, small particals from radiators, drawars, cobweb from corners.
- Directly extension tube for sucking earth, shavings, crumbs, fluff.
- Brush attachment and the extension tube for removing dust from shelves, books, lamp shades, frames, ornaments,
curtains, clothes, electronic equipment's, surfaces.
9
ENGLISH
8
ENGLISH
Vt-1820.qxd 28.10.03 13:09 Page 16


