Пылесос VITEK VT-1820 R - инструкция пользователя по применению, эксплуатации и установке на русском языке. Мы надеемся, она поможет вам решить возникшие у вас вопросы при эксплуатации техники.
Если остались вопросы, задайте их в комментариях после инструкции.
"Загружаем инструкцию", означает, что нужно подождать пока файл загрузится и можно будет его читать онлайн. Некоторые инструкции очень большие и время их появления зависит от вашей скорости интернета.
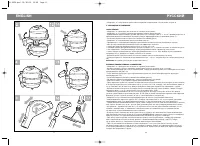
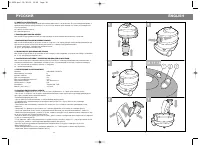

А2- кнопка для включения/отключения насоса;
АЗ- впускное отверстие;
А4- замок резервуара для воды;
А5- камера клапана - расположение двигателя;
А6- кнопка для сматывания шнура;
А7- микрофильтр.
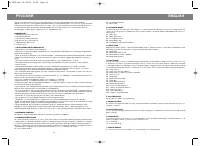
В. БЛОК КОНТЕЙНЕРОВ.
Блок контейнеров расположен в нижней части пылесоса и служит для сбора мусора и грязной воды. Это
блок прикреплен к блоку верхней секции с помощью зажимов. В задней части блока находится резервуар
для шампуня и чистой воды.
В 1-зажимы;
В2- резервуар для воды;
В3- передние колеса (малые);
В4- задние колеса (большие);
В5- гнездо крепления мешка для сбора пыли.
С. РЕЗЕРВУАР ДЛЯ ВОДЫ.
Резервуар для воды содержит шампунь и чистую воду. Во время работы насоса шампунь и вода
откачиваются из резервуара. Далее, поступая через шланг, вода разбрызгивается.
С1- резервуар для воды;
С2- фильтр;
СЗ- соединительный переходник трубки для воды;
С4- индикатор уровня воды.
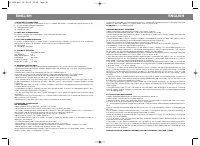
D. ШЛАНГИ.
В комплект входят всасывающий шланг с ручкой, трубка для воды и удлинительные трубки. Для того,
чтобы присоединить всасывающий шланг к блоку верхней секции, необходимо вставить наконечник
шланга в замок впускного отверстия. Удлинительные трубки присоединяются к ручке на шланге по мере
необходимости. На ручке расположен регулятор силы всасывания и разбрызгивания воды и шампуня.
Если необходимо. Вы можете установить режим непрерывного разбрызгивания с помощью
фиксирующей кнопки.
D 1- наконечник шланга;
D 2- кнопка фиксации наконечника шланга;
D З- переходник для подсоединения шланга для воды;
D 4- всасывающий шланг;
D 5- трубка для воды;
D 6- фиксирующие зажимы трубки для воды;
D 7- ручка;
D 8- регулятор уровня разбрызгивания воды;
D 9- кнопка непрерывного разбрызгивания воды;
D 10- регулятор силы всасывания;
D 11- кнопка-фиксатор для удлинительной трубки;
D 12- удлиннительная трубка;
D 13- крепеж для щетки;
D 14- крепеж для трубки.
Е. ЩЕТКА ДЛЯ СБОРА ПЫЛИ.
Щетка для сбора пыли используется при сухой уборке.
F. БУМАЖНЫЙ МЕШОК ДЛЯ СБОРА ПЫЛИ.
Используется при сухой уборке. Перед использованием он должен быть вставлен в крепление и затем
присоединен к контейнеру.
G. ТКАНЕВЫЙ МЕШОК ДЛЯ СБОРА ПЫЛИ.
Используется, как и бумажный мешок, при сухой уборке. Заполненный мешок можно вытряхивать и по
необходимости промывать холодной водой.
РУССКИЙ
The more you use the vacuum cleaner, the more you will be certain that you made right choice. Our main goal is to
give you more than the price. Your choice shows that we are achieving our goal. So thank you for choosing our prod-
uct. When you use your vacuum cleaner according to the instructions in this manual, you will be surprised how you
are doing everything easily. So that you will reach the promised performance.
CONTENTS
I. IMPORTANT SAFETY & USAGE INSTRUCTIONS
II. INTRODUCE THE APPLIANCE
III. TECHNICAL FEATURES
IV. ASSEMBLY INSTRUCTIONS AND PREPARATION FOR USE
V. OPERATING THE APPLIANCE
VI. CLEANINGS MAINTENANCE
I. IMPORTANT SAFETY & USAGE INSTRUCTION
•
Read this instruction carefully.
•
Before using the appliance, check that the power voltage corresponds to that indicated on the rating plate.
•
The appliance should only be connected to power outlets which are suitably with minimum 10 Amp fuse.
•
Always unplug the appliance when it is not being used or before carrying out any maintenance or cleaning
operation.
•
Never tug at the power cable or pull the appliance itself to unplug it from the mains.
•
Never squeeze or buckle the power cable or pull it over sharp edges.
•
Do not allow the appliance to pass over the cable as this may damage the insulating shield.
•
If the power supply cord is damaged, do not use the vacuum cleaner further on. The power cable could not be
repaired by the user. Only the service personnel of the manufacturer or your local Service Agents is allowed for this.
•
Never leave the appliance unattended and keep out of the reach of children or disabled or incapable persons.
•
Take particular care when cleaning stairs.
•
Do not attempt to use the appliance if it appears to be defective.
•
Never direct the hose or tube to people or animals.
•
The proper performance of the float valve must be continuously checked.
•
Never drop the appliance into water and never pour the water on the appliance.
•
Switch off Immediately in the event of leaking liquid.
•
Acids, acetone and solvents can damage and corrode appliance parts.
•
Use only original accessories and spare parts to ensure the perfect performance of your cleaner and to benefit
from the guarantee.
•
For repairs or spare parts, contact your local service agents.
•
Do not operate the pump while water tank is empty or it is not needed to inject water or shampoo. If pump works
without water, pump temperature in increased and control part cuts off the pump operation. Pump doesn't work in
30 minutes before cooling.
•
Always use the recommend shampoo by manufacturer.
•
Make sure that all textiles and surfaces to be cleaned are suitable for shampooing. Especially for delicate, hand
woven carpets test a small area first and wait for checking the result.
WARNING:
Never use the appliance to clean up flammable or explosive solvents, object soaked with such solvents,
explosive dusts, liquids such as petrol, oil, alcohol, thinners and objects that are hotter than 60°C.As this will cause
a serious explosion and fire hazard! The appliance must not be used in the vicinity of flammable substances and must
not he used to clean up health endangering dust.
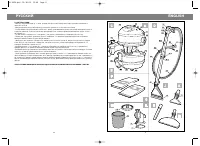
II. INTRODUCE THE APPLIANCE
Main parts of the appliance are shown as follows (Figure 1).
A. TOP SECTION GROUP
This group contains motor, pump, cord retrieval, switch and operating units. Backside of this group there is a micro
filter nested in main body. Beneath top section group is a case for float valve, which is surrounded by a foam filter for
protecting motor. If you open foam cover and remove the foam filter, you will see a large plastic float in a case. As the
container fills, this plastic float rises up and cuts off the vacuum action to tell you when the container needs empty-
ing.
A1 - On/Off Switch
A2 - Pump Switch
A3 - Suction Opening (Inlet)
A4 - Water Tube Connector
A5 - Float Case - Motor Housing
11
ENGLISH
6
Vt-1820.qxd 28.10.03 13:09 Page 12


