
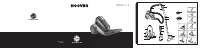
Пылесос Hoover RC1410 019 - инструкция пользователя по применению, эксплуатации и установке на русском языке. Мы надеемся, она поможет вам решить возникшие у вас вопросы при эксплуатации техники.
Если остались вопросы, задайте их в комментариях после инструкции.
"Загружаем инструкцию", означает, что нужно подождать пока файл загрузится и можно будет его читать онлайн. Некоторые инструкции очень большие и время их появления зависит от вашей скорости интернета.
ASSEMBLING YOUR CLEANER
Remove all components from the packaging.
1. Connect the hose to the cleaner main body, ensuring it clips and locks into position. To
release: simply press the button on the hose end and pull.
[1]
2. Connect the hose handle to the end of the extension tube upper
[2a]
, or accessories
if required.
[2b]
3.
Connect the extension tube lower to the carpet or floor nozzle
[3a]
or accessories if
required.
[3b]
4. The cleaning accessory tools can be stored after use on the underside of the extension
tube, using the accessory holder provided.
[4]
USING YOUR CLEANER
1. Extract power cord and plug it into the power supply. Do not pull the cord beyond the
red marker.
[5]
2. Adjust the telescopic tube to the desired height by moving the telescopic release button
up and raise or lower the handle to the most comfortable cleaning position.
[6]
3.
Carpet & Floor Nozzle. Press the floor type selector Pedal on the nozzle
[7]
to select the
ideal cleaning mode for the floor type.
Hard Floor
– Brushes are lowered to protect the floor.
Carpet –
Brushes are raised for the deepest clean.
4. Switch the cleaner on by pressing the on/off Pedal on the cleaner main body.
[8 ]
5. Adjust the suction regulator on the handle to the desired level.
[9]
6. Switch off at the end of use by pressing the on/off Pedal. Unplug and press the cord reel
pedal
[F]
to wind the power cord back into the cleaner.
ACCESSORIES
To obtain the best performance and energy efficiency
#1
it is recommended that the correct
nozzles are used for the main cleaning operations. These nozzles are indicated in the
diagrams by the letters
GP
,
HF
or
CA
.
A nozzle type
GP
can be used to clean both carpet and hard floor.
A nozzle type
HF
is suitable for use only on hard floor.
A nozzle of type
CA
is suitable for use only on carpet.
The other nozzles are accessories for specialist cleaning tasks and are recommended for
occasional use only.
It is important to note that this vacuum cleaner is supplied with an Energy Label as required
by European Regulation (EU) 665/2013.
If the label shows a red prohibition circle on the left covering the carpet symbol, then this
indicates that the vacuum cleaner is not suitable use for on carpets.
If the label shows a red prohibition circle on the right covering the hard floor symbol, then
this indicates that the vacuum cleaner is not suitable for use on hard floors.
#1 NOTE:
Dust pick up ability carpet, dust pick up ability hard floor, and energy efficiency is
in accordance with Commission Regulations (EU) 665/2013 and (EU) 666/2013.
All accessories can be fitted to the end of the hose handle or to the end of the fixed tube
(except for dusting brush).
The Crevice Nozzle and Furniture nozzle are stored on the tube, while the Dusting brush is
stored underneath the hose handle.
• Crevice Nozzle * –
For corners and hard to reach areas.
• Dusting Brush * –
For bookshelves, frames, keyboards and other delicate areas.
• Furniture Nozzle * –
For soft furnishings and fabrics.
• C&F
N
ozzle:
For carpet and hard floors.
• Parquet Nozzle* –
For parquet floors and other delicate floors.
• Grand Turbo Nozzle*
– Use the turbo nozzle for deep cleaning on carpets.
• Pet Hair Remover Mini Turbo Nozzle*
– Use the mini turbo nozzle on stairs or for deep
cleaning on textile surfaces and other hard to clean areas.
• Allergen Remover Mini Turbo Nozzle*
– Use the mini turbo nozzle on stairs or for deep
cleaning on textile surfaces and other hard to clean areas.
IMPORTANT:
Do not use mini turbo nozzles on rugs with long fringes, animal hides and
carpet pile deeper than 15mm. Do not keep the nozzle stationary while the brush is rotating.
Parking and Storage Section
The tube can be parked on back of the cleaner for storage or temporary storage while in
use.
[10]
2
*Certain Models Only ** Certain models only, nozzles may vary according to model
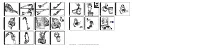
A. Dust Bin Assembly
B. Cleaner Main Body
C. On/Off Pedal
D. Park Slot
E. Dust Bin Release Button
F. Cord Reel Pedal
G. Dust Bin
H. Cyclone Body
I. Vortex Finder ( Metallic Red )
J. Dust Bin Lid
K. Dust Bin Flap Release Trigger
L. Dust Bin Lid Release Button
M. Hose
N. Hose Handle
O. Suction Regulator*
P. Accessory holder*
GETTING TO KNOW YOUR CLEANER
Q. Telescopic Tube
R. Carpet and Floor nozzle
(GP)**
Q1. Carpet Nozzle
(CA)**
Q2. Hard Floor Nozzle
(HF)**
S. Floor Type Selector Pedal
T. Exhaust Filter
U. Pre-motor Filter
V1. Dusting Brush*
V2. Crevice Tool*
V3. Furniture nozzle*
W. Pet Hair Remover Mini Turbo Nozzle*
X. Allergen Remover Mini Turbo Nozzle*
Y. Grand Turbo Nozzle*
Z1. Parquet Nozzle*
Z2. Parquet Extra Nozzle*
GB
Содержание
- 6 IMPORTANT INFORMATION; Hoover spares and Consumables; Hoover Service; Quality; Your Guarantee; ИНСТРУКЦИИ ПО ТЕХНИКЕ БЕЗОПАСНОСТИ; Статическое электричество:
- 7 Твердое напольное покрытие; Сервисная служба HOOVER:; ЗНАКОМСТВО С ВАШИМ ПЫЛЕСОСОМ
- 9 ВАЖНАЯ ИНФОРМАЦИЯ; Запасные части и расходные материалы компании Hoover; Требования к качеству продукции; Ваша гарантия; АНКЕТА ПОЛЬЗОВАТЕЛЯ


