Пылесос Hoover HF322HM011 - инструкция пользователя по применению, эксплуатации и установке на русском языке. Мы надеемся, она поможет вам решить возникшие у вас вопросы при эксплуатации техники.
Если остались вопросы, задайте их в комментариях после инструкции.
"Загружаем инструкцию", означает, что нужно подождать пока файл загрузится и можно будет его читать онлайн. Некоторые инструкции очень большие и время их появления зависит от вашей скорости интернета.
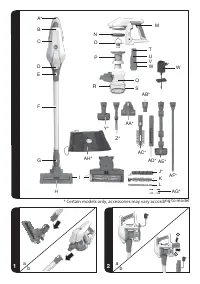
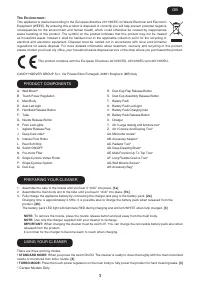


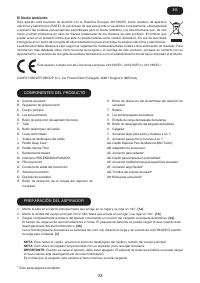


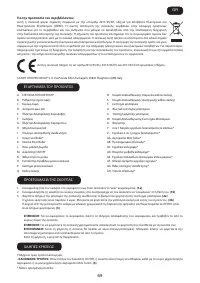


PRODUCT COMPONENTS
3
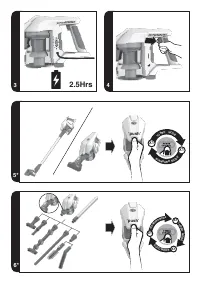
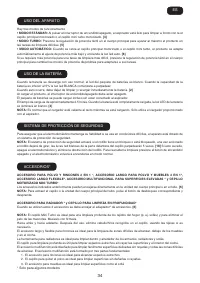
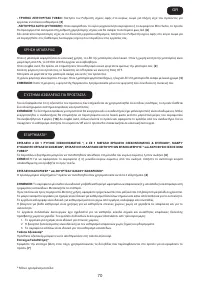
PREPARING yOUR CLEANER
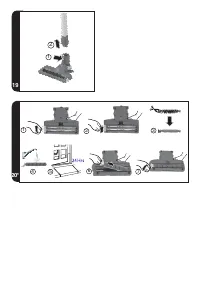
1. Assemble the tube to the nozzle until you hear it “click” into place.
[1a]
2. Assemble the main body unit to the tube until you hear it “click” into place.
[1b]
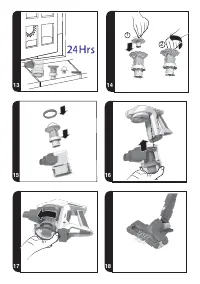
3. Fully charge the appliance battery by connecting the charger jack plug to the battery pack.
[2a]
Charging time is approximately 2.5Hrs. It is possible also to charge the battery pack when released from the
product.
[2b]
The battery pack LED light will illuminate RED during charging and will turn WHITE when fully charged.
[3]
NOTE:
To remove the nozzle, press the nozzle release button and pull away from the main body.
NOTE:
Use only the charger supplied with your cleaner to recharge.
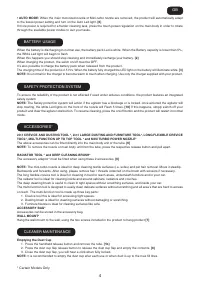
IMPORTANT:
When charging the cleaner must be swich off. you can charge the removable battery pack also when
released from the product.
It is normal for the charger to become warm to touch when charging.
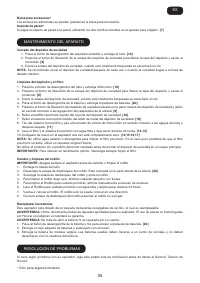
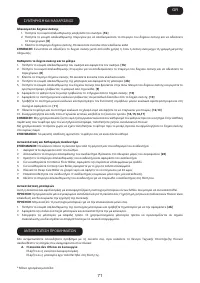
USING yOUR CLEANER
There are three working modes
•
STANDARD MODE:
When you press the swich On/Off, The cleaner is ready to clean thoroughly with the main motorized
nozzle or motorized mini turbo nozzle.
[4]
•
TURBO MODE:
Press the touch power regulation on the main body to fully power the product for hard cleaning tasks.
[5]
The Environment:
This appliance is marked according to the European directive 2011/65/EC on Waste Electrical and Electronic
Equipment (WEEE). By ensuring this product is disposed of correctly you will help prevent potential negative
consequences for the environment and human health, which could otherwise be caused by inappropriate
waste handling of this product. The symbol on the product indicates that this product may not be treated
as household waste. Instead it shall be handed over to the applicable collection point for the recycling of
electrical and electronic equipment. Disposal must be carried out in accordance with local environmental
regulations for waste disposal. For more detailed information about treatment, recovery and recycling of this product,
please contact your local city office, your household waste disposal service or the shop where you purchased the product.
This product complies with the European Directives 2014/35/EU, 2014/30/EU and 2011/65/EU.
CANDy HOOVER GROUP S.r.l. Via Privata Eden Fumagalli, 20861 Brugherio (MB) Italy
A. Wall Mount*
B. Touch Power Regulation
C. Main Body
D. Auto Led Light
E. Handheld Release Button
F. Tube
G. Nozzle Release Button
H. Front Led Lights
I. Agitator Release Flap
J. Deep Care roller*
K. Intense Floor Roller
L. Rear Soft Strip
M. Switch ON/OFF
N. Pre-motor Filter
O. Single Cyclone Vortex Finder
P. Single Cyclone System
Q. Dust Cup
R. Dust Cup Flap Release Button
S. Dust Cup Assembly Release Button
T. Battery Pack
U. Battery Pack Led Light
V. Battery Pack Charging Inlet
W. Battery Pack Release Button
X. Charger
y. 2in1 Large dusting and furniture tool*
Z. 2in1 Crevice And Dusting Tool*
AA. Mini-turbo nozzle*
AB. Accessory Adaptor*
AC. Radiator Tool*
AD. Deep Cleaning Brush*
AE. Multi-Function Up To Top Tool*
AF. Long Flexible Crevice Tool*
AG. Wall Mounts Screws*
AH. Accessory Bag*
* Certain Models Only
GB
Содержание
- 81 Установите насадку с одной стороны трубы до защелкивания.; ПРИМ; ЭКСПЛУАТАЦИЯ ПЫЛЕСОСА; Пылесос может работать в трех режимах; СТАНДАРТНЫЙ Р; движущейся насадки или движущейся мини турбощетки.; * Только у некоторых моделей
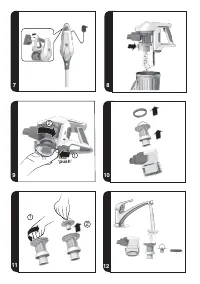
- 82 устройство для выполнения сложных задач очистки.; АВТОМАТИЧЕСКИЙ РЕЖИМ:; ИСПОЛЬЗОВАНИЕ БАТАРЕИ; зарядное устройство, поставляемое в комплекте с пылесосом.; СИСТЕМА ЗАЩИТЫ; и потяните отсоединяемые части в разные стороны.; НАСАДКА ДЛЯ ОЧИСТКИ РАДИАТОРОВ * и ЩЕТКА ДЛЯ ГЛУБОКОЙ ОЧИСТКИ*; Дополнительные аксессуары можно хранить в специальной сумке.
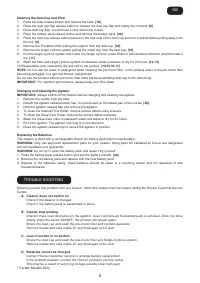
- 83 ТЕХНИЧЕСКОЕ ОБСЛУЖИВАНИЕ ПЫЛЕСОСА; Опорожнение контейнера для пыли; до максимальной отметки.; Очистка контейнера для сбора пыли и фильтра.; Нажмите кнопку отсоединения трубы и снимите трубу.; Замена аккумуляторной батареи; ПОИСК И УСТРАНЕНИЕ НЕИСПРАВНОСТЕЙ; Пылесос не включается; Проверьте, заряжен ли пылесос; Пылесос перестал работать
- 84 ЗАПАСНЫЕ ЧАСТИ И РАСХОДНЫЕ МАТЕРИАЛЫ
Характеристики

Остались вопросы?Не нашли свой ответ в руководстве или возникли другие проблемы? Задайте свой вопрос в форме ниже с подробным описанием вашей ситуации, чтобы другие люди и специалисты смогли дать на него ответ. Если вы знаете как решить проблему другого человека, пожалуйста, подскажите ему :)


