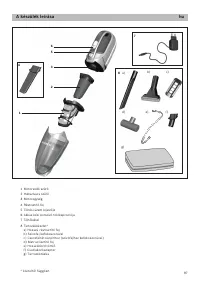
Пылесос Bosch BHN20L - инструкция пользователя по применению, эксплуатации и установке на русском языке. Мы надеемся, она поможет вам решить возникшие у вас вопросы при эксплуатации техники.
Если остались вопросы, задайте их в комментариях после инструкции.
"Загружаем инструкцию", означает, что нужно подождать пока файл загрузится и можно будет его читать онлайн. Некоторые инструкции очень большие и время их появления зависит от вашей скорости интернета.


4
9
en
C
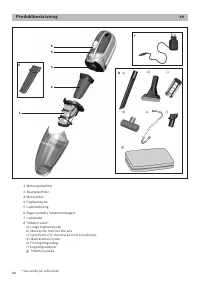
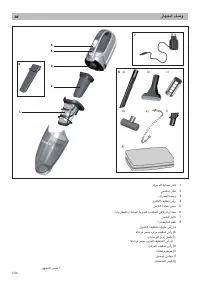
ongratulations on your purchas
e
of a Bosch vacuu
m
cl
e
an
e
r fro
m
th
e
BHN s
e
ri
e
s.
This instruction
m
anual d
e
scrib
e
s various BHN
m
od
e
ls
,
which
me
ans that so
me
of th
e
e
quip
me
nt f
e
atur
e
s and
functions d
e
scrib
e
d
m
ay not apply to your
m
od
e
l. You
should only us
e
g
e
nuin
e
Bosch acc
e
ssori
e
s
,
which
hav
e
b
ee
n sp
e
cially d
e
v
e
lop
e
d for your vacuu
m
cl
e
an
e
r
to achi
e
v
e
th
e
b
e
st possibl
e
vacuu
m
ing r
e
sults.
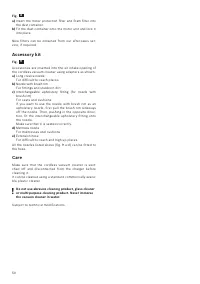
Charging
!
Caution:
B
e
for
e
using th
e
vacuu
m
cl
e
an
e
r for th
e
first ti
me,
fully charg
e
th
e
batt
e
ri
e
s.
To charg
e
th
e
applianc
e,
only us
e
th
e
charging cabl
e
includ
e
d with th
e
applianc
e
. Th
e
charging cabl
e
m
ust only b
e
conn
e
ct
e
d and op
e
rat
e
d as sp
e
cifi
e
d
on th
e
rating plat
e
. Do not charg
e
th
e
applianc
e
at
t
em
p
e
ratur
e
s b
e
low 0 °
C
or abov
e
4 0 °
C
.
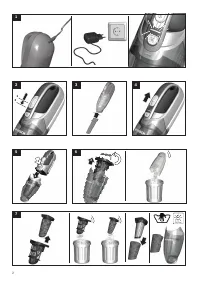
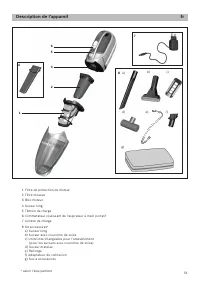
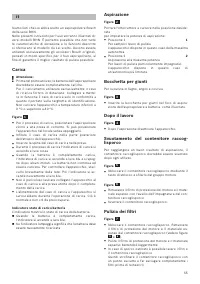
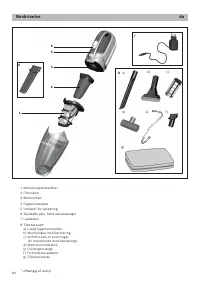
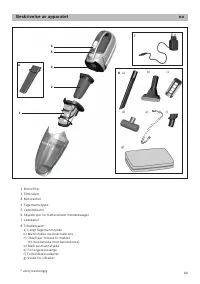
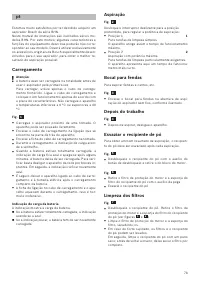
Fig.
1
To charg
e
th
e
vacuu
m
cl
e
an
e
r
,
plac
e
it n
e
ar to a so -
ck
e
t. Th
e
applianc
e
can b
e
l
e
ft standing any wh
e
r
e
in th
e
roo
m
.
Plug th
e
charging cabl
e
into th
e
conn
e
ction at th
e
r
e
ar of th
e
applianc
e
.
Plug th
e
charging cabl
e
plug into th
e
sock
e
t.
Th
e
charging indicator is lit up r
e
d wh
e
n th
e
appli-
anc
e
is charging.
Onc
e
th
e
batt
e
r y is fully charg
e
d
,
th
e
charging indi-
cator will light up blu
e
and will th
e
n go out aft
e
r a
f
e
w
m
inut
e
s. Th
e
batt
e
r y will stop charging. Discon-
n
e
ct th
e
applianc
e
fro
m
th
e
m
ains bri
e
fly to ch
e
ck.
Th
e
indicator will th
e
n light up blu
e
again.
It is saf
e
to l
e
av
e
th
e
applianc
e
conn
e
ct
e
d to th
e
charging cabl
e
and sock
e
t
e
v
e
n wh
e
n it is fully char-
g
e
d.
It is nor
m
al for th
e
pow
e
r adapt
e
r and vacuu
m
cl
e
a-
n
e
r to h
e
at up and this is not a caus
e
for conc
e
rn.
Batter y charging
s
tatu
s
indicator
Th
e
indicator shows th
e
charging status of th
e
batt
e
r y.
Onc
e
th
e
batt
e
ry is fully charg
e
d
,
th
e
indicator will
b
e
lit blu
e
.
Wh
e
n th
e
indicator flash
e
s
,
th
e
batt
e
ry
m
ust b
e
r
e
-
charg
e
d.
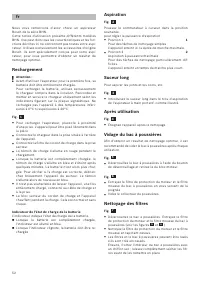
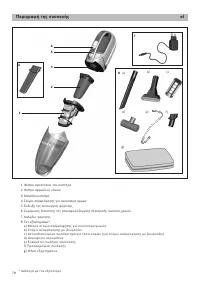
Vacuu
m
ing
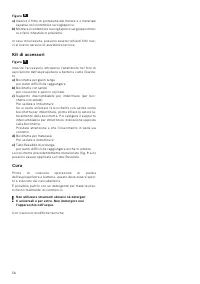
Fig.
2
Slid
e
th
e
sliding switch to th
e
r
e
quir
e
d
position to s
e
t th
e
suction pow
e
r:
Position 1
1
For si
m
pl
e
cl
e
aning tasks
Th
e
applianc
e
achi
e
v
e
s th
e
m
a xi
m
u
m
run ti
me
at
this s
e
tting.
Position 2
2
Ma xi
m
u
m
suction pow
e
r
For
e
sp
e
cially d
em
anding cl
e
aning tasks.
Th
e
applianc
e
achi
e
v
e
s a shor t
e
r run ti
me
at this s
e
t-
ting.
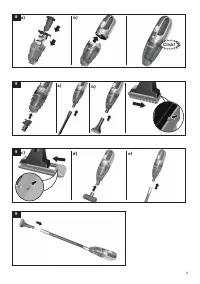
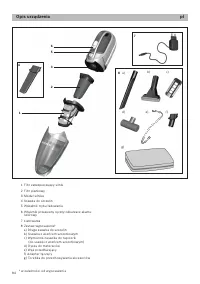
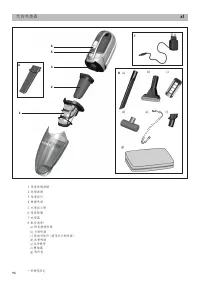
Crevice nozzle
For vacuu
m
ing cr
e
vic
e
s and corn
e
rs
,
e
tc.
Fig.
3
Ins
e
r t th
e
cr
e
vic
e
nozzl
e
into th
e
air intak
e
op
e
ning
of th
e
cordl
e
ss vacuu
m
cl
e
an
e
r as shown.
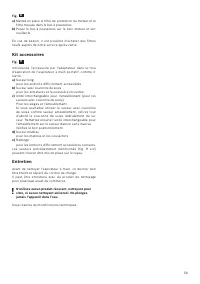
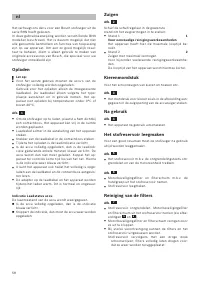
After u
s
ing the appliance
Fig.
4
Switch off th
e
applianc
e
aft
e
r vacuu
m
ing.
E
m
ptying the du
s
t container
In ord
e
r to achi
e
v
e
th
e
b
e
st possibl
e
vacuu
m
ing r
e
-
sults
,
th
e
dust contain
e
r should b
e
em
pti
e
d aft
e
r
e
v
e
r y
us
e
.
Fig.
5
Pr
e
ss th
e
r
e
l
e
as
e
button to unlock th
e
dust contai-
n
e
r and th
e
n r
em
ov
e
it fro
m
th
e
m
otor unit.
Fig.
6
Us
e
th
e
handl
e
to r
em
ov
e
th
e
m
otor prot
e
ction filt
e
r
and foa
m
filt
e
r fro
m
th
e
dust contain
e
r.
E
m
pty th
e
dust contain
e
r.
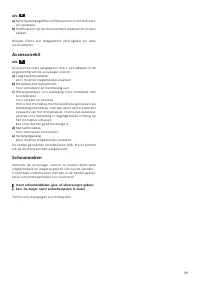
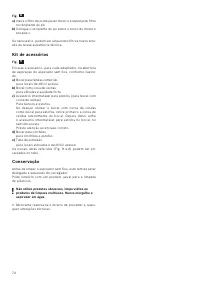
Cleaning the filter
Fig.
7
Unlock th
e
dust contain
e
r.
Rem
ov
e
th
e
m
otor pro-
t
e
ction filt
e
r and foa
m
filt
e
r fro
m
th
e
dust contain
e
r
(s
ee
fig.
5
and
6
)
C
l
e
an th
e
m
otor prot
e
ction filt
e
r and foa
m
filt
e
r by
tapping out th
e
dir t.
If th
e
filt
e
rs and th
e
dust contain
e
r ar
e
h
e
avily
soil
e
d
,
th
e
dir t can b
e
wash
e
d out.
Th
e
n wip
e
out th
e
dust contain
e
r with a dr y cloth; al-
low th
e
filt
e
rs to dr y co
m
pl
e
t
e
ly b
e
for
e
r
e
-ins
e
r ting
th
em
.
Характеристики

Остались вопросы?Не нашли свой ответ в руководстве или возникли другие проблемы? Задайте свой вопрос в форме ниже с подробным описанием вашей ситуации, чтобы другие люди и специалисты смогли дать на него ответ. Если вы знаете как решить проблему другого человека, пожалуйста, подскажите ему :)


