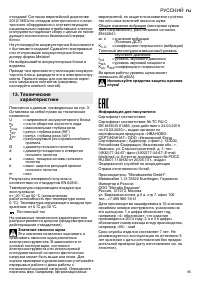
Пилы дисковые Metabo KS 18 LTX (601857890) - инструкция пользователя по применению, эксплуатации и установке на русском языке. Мы надеемся, она поможет вам решить возникшие у вас вопросы при эксплуатации техники.
Если остались вопросы, задайте их в комментариях после инструкции.
"Загружаем инструкцию", означает, что нужно подождать пока файл загрузится и можно будет его читать онлайн. Некоторые инструкции очень большие и время их появления зависит от вашей скорости интернета.


ENGLISH
en
13
Only send the battery pack if the housing is intact
and no fluid is leaking. Remove the battery pack
from the machine for sending. Prevent the contacts
from short-circuiting (e.g. by protecting them with
adhesive tape).
Reducing dust exposure:
Some of the dust created using this power tool
may contain chemicals known to cause
cancer, allergic reaction, respiratory disease, birth
defects or other reproductive harm. Some of these
substances include: lead (in paint containing lead),
mineral dust (from bricks, concrete etc.), additives
used for wood treatment (chromate, wood
preservatives), some wood types (such as oak or
beech dust), metals, asbestos.
The risk from exposure to such substances will
depend on how long you or bystanders are being
exposed.
Do not let particles enter the body.
Do the following to reduce exposure to these
substances: ensure good ventilation of the
workplace and wear appropriate protective
equipment, such as respirators able to filter
microscopically small particles.
Observe the relevant guidelines for your material,
staff, application and place of application (e.g.
occupational health and safety regulations,
disposal).
Collect the generated particles at the source, avoid
deposits in the surrounding area.
Use suitable accessories for special work. In this
way, fewer particles enter the environment in an
uncontrolled manner.
Use a suitable extraction unit.
Reduce dust exposure with the following measures:
- Do not direct the escaping particles and the
exhaust air stream at yourself or nearby persons
or on dust deposits.
- Use an extraction unit and/or air purifiers
- Ensure good ventilation of the workplace and
keep clean using a vacuum cleaner Sweeping or
blowing stirs up dust
- Vacuum or wash protective clothing Do not blow,
beat or brush.
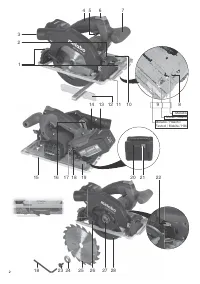
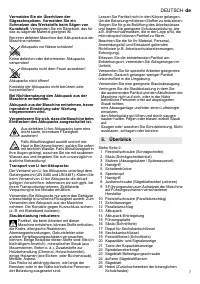
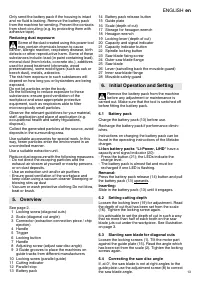
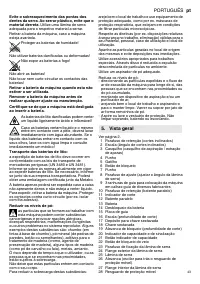
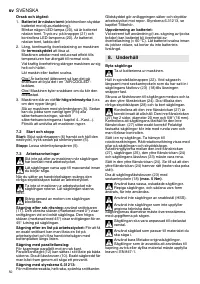
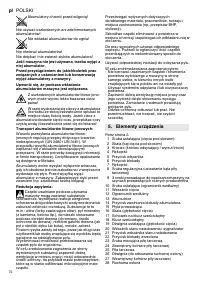
See page 2.
1 Locking screw (diagonal cuts)
2 Scale (diagonal cut angle)
3 Connector (extraction connection piece / chip
ejection)
4 Handle
5 Trigger
6 Locking button
7 Handle
8 Adjusting screw (adjust saw disc angle)
9 3 Guide grooves to place the machines on
guide tracks from different manufacturers
10 Locking screw (parallel guide)
11 Cutting indicator
12 Parallel stop
13 Battery pack
14 Battery pack release button
15 Guide plate
16 Scale (depth of cut)
17 Storage for hexagon wrench
18 Hexagon wrench
19 Locking lever (depth of cut)
20 Capacity and signal indicator
21 Capacity indicator button
22 Spindle locking button
23 Saw blade fixing screw
24 Outer saw blade flange
25 Saw blade
26 Lever (swivelling back the movable guard)
27 Inner saw blade flange
28 Movable safety guard
Remove the battery pack from the machine
before any adjustment or maintenance is
carried out. Make sure that the tool is switched off
before fitting the battery pack.
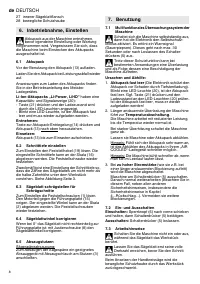
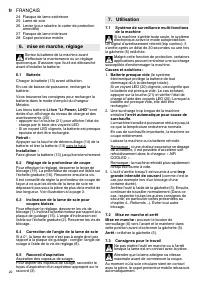
6.1 Battery pack
Charge the battery pack (13) before use.
Recharge the battery pack if performance dimin-
ishes.
Instructions on charging the battery pack can be
found in the operating instructions of the Metabo
charger.
Li-Ion battery packs “Li-Power, LiHD“
have a
capacity and signal indicator (20):
- Press the button (21); the LEDs indicate the
charge level.
- The battery pack is almost flat and must be
recharged if one LED is flashing.
Removal:
Press the battery pack release (14) button and pull
the battery pack (13) upwards.
Inserting:
Slide in the battery pack (13) until it engages.
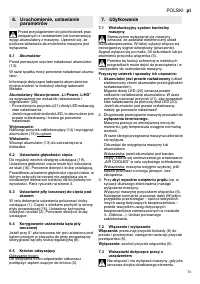
6.2 Setting cutting depth
Loosen the locking lever (19) for adjustment. Read
the depth of cut that has been set from the scale
(16). Tighten the locking screw again.
It is advisable to set the depth of cut in such a way
that no more than half of each tooth on the saw
blade juts out under the workpiece. See illustration
on page 3.
6.3 Slanting saw blade for diagonal cuts
Loosen the locking screws (1). Tilt the motor part
against the guide plate (15). Read the angle which
has been set from the scale (2). Tighten the locking
screws again.
6.4 Correcting the saw disc angle
If, at 0°, the saw blade is not at right angles to the
guide plate: use the adjustment screw (8) to correct
the saw blade angle.
5. Overview
6. Initial Operation and Setting
Содержание
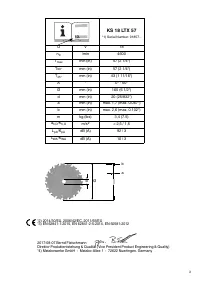
Характеристики

Остались вопросы?Не нашли свой ответ в руководстве или возникли другие проблемы? Задайте свой вопрос в форме ниже с подробным описанием вашей ситуации, чтобы другие люди и специалисты смогли дать на него ответ. Если вы знаете как решить проблему другого человека, пожалуйста, подскажите ему :)

