
Пилы дисковые Makita HS0600 - инструкция пользователя по применению, эксплуатации и установке на русском языке. Мы надеемся, она поможет вам решить возникшие у вас вопросы при эксплуатации техники.
Если остались вопросы, задайте их в комментариях после инструкции.
"Загружаем инструкцию", означает, что нужно подождать пока файл загрузится и можно будет его читать онлайн. Некоторые инструкции очень большие и время их появления зависит от вашей скорости интернета.


8 ENGLISH
4.
Always observe that the lower guard is cover-
ing the blade before placing the saw down on
bench or floor.
An unprotected, coasting blade
will cause the saw to walk backwards, cutting
whatever is in its path. Be aware of the time it
takes for the blade to stop after switch is released.
5.
To check lower guard, open lower guard by
hand, then release and watch guard closure.
Also check to see that retracting handle does
not touch tool housing.
Leaving blade exposed
is VERY DANGEROUS and can lead to serious
personal injury.
Additional safety warnings
1.
Use extra caution when cutting damp wood, pres-
sure treated lumber, or wood containing knots.
Maintain smooth advancement of tool without decrease
in blade speed to avoid overheating the blade tips.
2.
Do not attempt to remove cut material when
blade is moving. Wait until blade stops before
grasping cut material.
Blades coast after turn off.
3.
Avoid cutting nails. Inspect for and remove all
nails from lumber before cutting.
4.
Place the wider portion of the saw base on
that part of the workpiece which is solidly
supported, not on the section that will fall off
when the cut is made. If the workpiece is short
or small, clamp it down. DO NOT TRY TO HOLD
SHORT PIECES BY HAND!
►
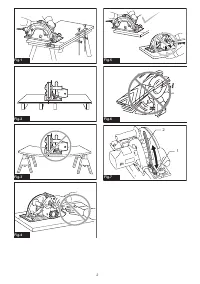
Fig.5
5.
Before setting the tool down after completing a
cut, be sure that the guard has closed and the
blade has come to a complete stop.
6.
Never attempt to saw with the circular saw
held upside down in a vise. This is extremely
dangerous and can lead to serious accidents.
►
Fig.6
7.
Some material contains chemicals which may be
toxic. Take caution to prevent dust inhalation and
skin contact. Follow material supplier safety data.
8.
Do not stop the blades by lateral pressure on
the saw blade.
9.
Do not use any abrasive wheels.
10.
Only use the saw blade with the diameter that
is marked on the tool or specified in the man
-
ual.
Use of an incorrectly sized blade may affect
the proper guarding of the blade or guard opera-
tion which could result in serious personal injury.
11.
Keep blade sharp and clean.
Gum and wood pitch
hardened on blades slows saw and increases poten-
tial for kickback. Keep blade clean by first removing
it from tool, then cleaning it with gum and pitch
remover, hot water or kerosene. Never use gasoline.
12.
Wear a dust mask and hearing protection when
use the tool.
13.
Always use the saw blade intended for cutting
the material that you are going to cut.
14.
Only use the saw blades that are marked with
a speed equal or higher than the speed marked
on the tool.
15.
(For European countries only)
Always use the blade which conforms to
EN847-1.
SAVE THESE INSTRUCTIONS.
WARNING:
DO NOT let comfort or familiarity with
product (gained from repeated use) replace strict adher-
ence to safety rules for the subject product. MISUSE or
failure to follow the safety rules stated in this instruc-
tion manual may cause serious personal injury.
FUNCTIONAL
DESCRIPTION
CAUTION:
Always be sure that the tool is
switched off and unplugged before adjusting or
checking function on the tool.
Adjusting depth of cut
CAUTION:
After adjusting the depth of cut,
always tighten the lever securely.
Loosen the lever on the depth guide and move the base
up or down. At the desired depth of cut, secure the base
by tightening the lever.
For cleaner, safer cuts, set cut depth so that no more
than one blade tooth projects below workpiece. Using
proper cut depth helps to reduce potential for danger-
ous KICKBACKS which can cause personal injury.
►
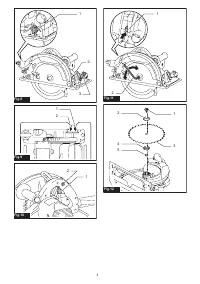
Fig.7:
1.
Lever
2.
Depth guide
Bevel cutting
CAUTION:
After adjusting the bevel angle,
always tighten the lever and clamping screw
securely.
Loosen the lever and clamping screw. Set for the
desired angle by tilting accordingly, then tighten the
lever and clamping screw securely.
►
Fig.8:
1.
Clamping screw
2.
Bevel scale plate
3.
Lever
Sighting
For straight cuts, align the 0° position on the front of the
base with your cutting line. For 45° bevel cuts, align the
45° position with it.
►
Fig.9:
1.
Cutting line (0° position)
2.
Cutting line
(45° position)
Switch action
WARNING:
Before plugging in the tool,
always check to see that the switch trigger actu-
ates properly and returns to the "OFF" position
when released.
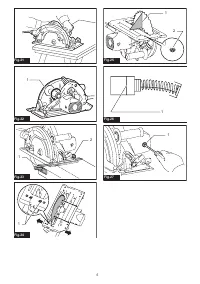
►
Fig.10:
1.
Switch trigger
2.
Lock-off button
For tool with lock-off button
To prevent the switch trigger from being accidentally
pulled, a lock-off button is provided. To start the tool,
press the lock-off button and pull the switch trigger.
Release the switch trigger to stop.
Содержание
- 48 ТЕХНИЧЕСКИЕ ХАРАКТЕРИСТИКИ
- 49 МЕРЫ БЕЗОПАСНОСТИ; Сохраните брошюру с инструк
- 51 СОХРАНИТЕ ДАННЫЕ; ОПИСАНИЕ РАБОТЫ; Регулировка глубины пропила
- 52 СБОРКА; Снятие или установка диска
- 53 Очистка ограждения диска; ЭКСПЛУАТАЦИЯ; Направляющая планка; ОБСЛУЖИВАНИЕ
- 54 Регулировка параллельности; ДОПОЛНИТЕЛЬНЫЕ
Характеристики

Остались вопросы?Не нашли свой ответ в руководстве или возникли другие проблемы? Задайте свой вопрос в форме ниже с подробным описанием вашей ситуации, чтобы другие люди и специалисты смогли дать на него ответ. Если вы знаете как решить проблему другого человека, пожалуйста, подскажите ему :)


