Philips HD3137/03 - Инструкция по эксплуатации
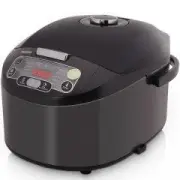
Мультиварка Philips HD3137/03 - инструкция пользователя по применению, эксплуатации и установке на русском языке. Мы надеемся, она поможет вам решить возникшие у вас вопросы при эксплуатации техники.
Если остались дополнительные вопросы — свяжитесь с нами через контактную форму.
English
1
Your multicooker
Congratulations on your purchase, and welcome to Philips!
To fully benefit from the suppor t that Philips offers, register your
product at www.philips.com/welcome.
2
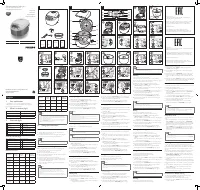
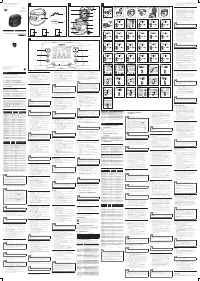
What’s in the box (fig.1)
Multicooker main unit
Measuring cup
Power cord
Steam basket
User manual
Recipe
Safety leaflet
Warranty card
3
Overview (fig.2)
a
Detachable steam vent cap
g
Heating element
b
Top lid
h
Power socket
c
Inner pot
i
Cooker handle
d
Lid release button
j
Water level indications
e
Control panel
k
Sealing ring
f
Main body
Controls overview (fig.3)
l
Cooking functions
q
Decrease button
m
Keep-warm button
r
Cooking time button
n
Menu button
s
Temperature button
o
Preset button
t
Star t/Cancel button
p
Increase button
u
Display
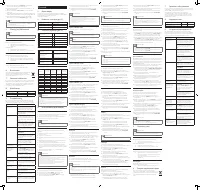
Functions overview
Functions
Default
cooking
time
Adjustable
cooking
time
Preset
time
Default
cooking
temperature
Rice/Grains
(рис/крупы)
40 min
/
1-24 hr
130-140
°C
Porridge
(каша)
10 min
5 min - 2 hr 1-24 hr
90-100°C
Plov
(плов)
35 min
/
1-24 hr
130-140
°C
Soup
(суп)
1 hr
20 min-4 hr 1-24 hr
100°C
Yogur t
(йогурт)
8 hr
6-12 hr
1-24 hr
40±3°C
Reheat
(разогреть)
25 min
5-60 min
/
85°C
Bake
(печь)
45 min
20 min -
2 hr
/
130°C
Steam/Boil
(варить/на
пару)
20 min
5 min - 2 hr 1-24 hr
100°C
Stew
(тушить)
1 hr
20 min -
10 hr
1-24 hr
90°C
Functions
Default
cooking
time
Adjustable
cooking
time
Preset
time
Default
cooking
temperature
Fr y
(жарить)
15 min
5-60 min
/
145-150°C
Slow cook
(томить)
5 hr
1-15 hr
1-24 hr
80°C
Roast
(запекать)
1 hr
/
1-24 hr
130
°C
Manual
(мультиовар)
2 hr
5 min - 10
hr
1-24 hr
100
°C
Note
•
The cooking temperature for the baking and manual functions is
adjustable. You can select temperature for the baking function between
40°C to 160°C, and select temperature for the manual function between
30°C to 160°C The step is 10°C.
•
After the cooking has star ted, you can press and hold the Star t/Cancel
button (
СТАРТ/ВЫКЛ
) to deactivate the cooking process and the
multicooker will enter the standby mode.
4
Using the multicooker
Before first use
1
Take out all the accessories from the inner pot. Remove the
packaging material of the inner pot.
2
Clean the par ts of the multicooker thoroughly before using it for
the first time (see chapter ‘Cleaning and Maintenance’).
Note
•
Make sure all par ts are completely dr y before you star t using the
multicooker.
Preparations before cooking
Before using the multicooker, you need to do the following steps:
1
Measure the grains using the measuring cup provided.
2
Wash the grains thoroughly.
3
Put the pre-washed grains in the inner pot.
4
Add water to the level indicated on the scale inside the inner pot
and smooth the grains surface.
5
Press the lid release button to open the lid (fig.4).
6
Wipe the outside of the inner pot dr y (fig.5), then put the inner
pot in the multicooker (fig.6). Check if the inner pot is in proper
contact with the heating element.
7
Close the lid of the multicooker (fig.7), and put the plug in the
power socket (fig.8).
Note
•
Make sure that the inner pot is proper contact with the heating element.
•
For details about the ratio of grains and water, see the recipe.
•
The level marked inside the inner pot is just an indication. You can
always adjust the water level for different types of grains and your own
preference.
•
Make sure that the outside of the inner pot is clean and dr y, and that
there is no foreign residue on the heating element or the magnetic switch.
Cooking rice/grains
1
Follow the steps in “Preparations before cooking”.
2
Press the menu button (
МЕНЮ
) until the rice/grains cooking
function (
рис / крупы
) is selected (fig.9).
3
Press the star t button (
СТАРТ / ВЫКЛ
) to star t cooking (fig.10).
4
When the cooking is finished, you will hear 4 beeps and the
selected cooking function light will be off.
5
The multicooker will be in keep-warm mode automatically.
»
The keep-warm indicator (
ПОДОГРЕВ
) lights up (fig.11).
Note
•
If the voltage is unstable at the area you live, it is possible that the
multicooker overflows.
•
After the cooking is finished, stir the rice and loosen it immediately to
release excessive moisture for fluffy rice.
•
Depending on the cooking conditions, the bottom por tion of the rice may
become slightly browned.
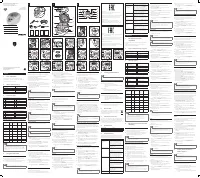
Cooking porridge
1
Follow steps 1 to 7 in “Preparations before cooking”.
Note
•
Do not exceed the maximum water level indicated in the inner pot, as this
may cause the multicooker to overflow.
Tip
•
Besides following the water level indications, you may also add rice and
water at 1:4 ratio for porridge cooking
2
Press the menu button (
МЕНЮ
) until the porridge function
(
каша
) is selected (fig.12).
»
To set a different cooking time, refer to chapter “Adjusting the
cooking time and temperature”.
3
Press the star t button (
СТАРТ/ВЫКЛ
) to star t cooking (fig.10).
4
When the cooking is finished, you will hear 4 beeps and the
selected cooking function light will be off.
5
The multicooker will be in keep warm mode automatically.
»
The keep-warm indicator (
ПОДОГРЕВ
) lights up (fig.11).
Making plov
1
Put food and ingredients into the inner pot.
2
Follow steps 6 and 7 in “Preparations before cooking”.
3
Press the menu button (
МЕНЮ
) until the plov function (
плов
) is
selected (fig.13).
4
Press the star t button (
СТАРТ / ВЫКЛ
) to star t cooking (fig.10).
5
When the cooking is finished, you will hear 4 beeps and the
selected cooking function light will be off.
6
The multicooker will be in keep-warm mode automatically.
»
The keep-warm indicator (
ПОДОГРЕВ
) lights up (fig.11).
Making soup
1
Put ingredients and water into the inner pot.
2
Follow steps 6 and 7 in “Preparations before cooking”.
3
Press the menu button (
МЕНЮ
) until the soup function (cуп) is
selected (fig.14).
»
To set a different cooking time, refer to chapter “Adjusting the
cooking time and temperature”.
Note
•
When removing the inner pot from the multicooker, use a kitchen glove
or a cloth, as the inner pot will be ver y hot.
Steaming
1
Pour some water into the inner pot.
2
Put the food to be steamed on a plate or in the steam tray.
3
If you are using a separate plate, put it into the steam tray (fig.22).
4
Put the steam tray into the inner pot (fig.23).
5
Follow steps 6 and 7 in “Preparations before cooking”.
6
Press the menu button (
МЕНЮ
) until the steaming function
(
варить / на пару
) is selected (fig.24).
»
To set a different cooking time, refer to chapter “Adjusting the
cooking time and temperature”.
7
Press the star t button (
СТАРТ/ВЫКЛ
) to star t cooking (fig.10).
8
When the cooking is finished, you will hear 4 beeps and the
selected cooking function light will be off.
9
The multicooker will be in keep warm mode automatically.
»
The keep-warm indicator (
ПОДОГРЕВ
) lights up (fig.11).
10
Open the lid and carefully take out the steamed food from the
plate or steam basket.
Note
•
The quantity of water depends on the amount of food in the steam tray.
Do not immerse the steam tray in water.
•
Use a kitchen glove or a cloth, as the plate and steam tray will be ver y hot.
Boiling
1
Put food and ingredients in the inner pot.
2
Follow steps 6 and 7 in “Preparations before cooking”.
3
Press the menu button (
МЕНЮ
) until the boiling function
(
варить / на пару
) is selected (fig.24).
»
To set a different cooking time, refer to chapter “Adjusting the
cooking time and temperature”.
4
Press the star t button (
СТАРТ/ВЫКЛ
) to star t cooking (fig.10).
5
When the cooking is finished, you will hear a few beeps and the
selected cooking function light will be off.
6
The multicooker will be in keep-warm mode automatically.
»
The keep-warm indicator (
ПОДОГРЕВ
) lights up (fig.11).
Stewing/Slow cooking
1
Put the food and ingredients in the inner pot.
2
Follow steps 6 and 7 in “Preparations before cooking”.
3
Press the menu button (
МЕНЮ
) until the stew/ragout function
(
тушить
) or the slow cooking function (
томить
) is selected
(fig.25).
»
To set a different cooking time, refer to chapter “Adjusting the
cooking time and temperature”.
4
Press the star t button (
СТАРТ/ВЫКЛ
) to star t cooking (fig.10).
5
When the cooking is finished, you will hear a few beeps and the
selected cooking function light will be off.
6
The multicooker will be in keep-warm mode automatically.
»
The keep-warm indicator (
ПОДОГРЕВ
) lights up (fig.11).
Frying
1
Put food and ingredients into the inner pot.
2
Follow step 6 in “Preparations before cooking”.
3
Put the plug in the power socket.
4
Press the menu button (
МЕНЮ
) until the fr ying function (
жарить
)
is selected (fig.26).
»
To set a different cooking time, refer to chapter “Adjusting the
cooking time and temperature”.
5
Press the star t button (
СТАРТ/ВЫКЛ
) to star t cooking (fig.10).
6
When the cooking is finished, you will hear 4 beeps and the
selected cooking function light will be off.
7
The multicooker will be in keep-warm mode automatically.
»
The keep-warm indicator (
ПОДОГРЕВ
) lights up (fig.11).
Note
•
Do not close the top lid when cooking in the fr y mode.
Roasting
1
Put food and ingredients into the inner pot.
2
Follow step 6 in “Preparations before cooking”.
4
Press the star t button (
СТАРТ/ВЫКЛ
) to star t cooking (fig.10).
5
When the cooking is finished, you will hear a few beeps and the
selected cooking function light will be off.
6
The multicooker will be in keep-warm mode automatically.
»
The keep-warm indicator (
ПОДОГРЕВ
) lights up (fig.11).
Making yogurt
1
Whisk the ingredients for the yogur t well and put them in a glass
container (fig.15).
2
Put the glass container in the inner pot (fig.16). Make sure that the
container is sealed.
3
Pour some water in the inner pot. Make sure that half of the
container is immersed in water.
4
Follow steps 6 and 7 in “Preparations before cooking”.
5
Press the menu button (
МЕНЮ
) until the yogur t function
(
йогурт
) is selected (fig.17).
»
To set a different cooking time, refer to chapter “Adjusting the
cooking time and temperature”.
6
Press the star t button (
СТАРТ / ВЫКЛ
) to star t cooking (fig.10).
7
When the cooking is finished, you will hear 4 beeps and the
selected cooking function light will be off.
»
The multicooker will enter the standby mode automatically.
Reheating
1
Loosen the cooled food and evenly distribute it in the inner pot
(fig.18).
2
Pour some water onto the food to prevent it from becoming too
dr y (fig.19). The quantity of the water depends on the amount of
food.
3
Follow steps 6 and 7 in “Preparations before cooking”.
4
Press the menu button (
МЕНЮ
) until the reheating function
(
разогреть
) is selected (fig.20).
»
To set a different cooking time, refer to chapter “Adjusting the
cooking time and temperature”.
5
Press the star t button (
СТАРТ / ВЫКЛ
) to star t cooking (fig.10).
6
When the cooking is finished, you will hear 4 beeps and the
selected cooking function light will be off.
7
The multicooker will be in keep warm mode automatically.
»
The keep-warm indicator (
ПОДОГРЕВ
) lights up (fig.11).
Baking
1
Put the food and ingredients in the inner pot.
2
Follow step 6 in “Preparations before cooking”.
3
Put the plug in the power socket.
Note
•
When baking cake, keep the lid closed during cooking. Baking cake at
130°C and by 45 minutes usually delivers best cooking result.
•
It’s recommended to open lid during cooking when the temperature is
above 130°C.
4
Press the menu button (
МЕНЮ
) until the baking function (
печь
)
is selected (fig.21).
»
To set a different cooking time and temperature, refer to
chapter “Adjusting the cooking time and temperature”.
5
Press the star t button (
СТАРТ / ВЫКЛ
) to star t cooking (fig.10).
6
When the baking is finished, you will hear 4 beeps and the
selected function light will be off.
7
The multicooker will be in keep-warm mode automatically.
»
The keep-warm indicator (
ПОДОГРЕВ
) lights up (fig.11).
3
Put the plug in the power socket.
4
Press the menu button (
МЕНЮ
) until the roasting function
(
запекать
) is selected (fig.27).
5
To set a different cooking time, refer to chapter “Adjusting the
cooking time”.
6
Press the star t button (
СТАРТ/ВЫКЛ
) to star t cooking (fig.10).
7
There are 2 stages of roasting. For the first stage, cooking time
is about 35 minutes, you will hear 5 beeps to remind to turn the
food.
8
Press the menu button (
МЕНЮ
) to continue the second stage, if it
beeps for 5 minutes without operation, the multicooker will enter
into keep warm mode until end of the cooking time.
Manual
You may use the manual mode to cook food with more control over
the cooking time and temperature.
1
Put food and ingredients into the inner pot.
2
Follow steps 6 and 7 in “Preparations before cooking”. Press the
menu button (
МЕНЮ
) until the manual function (
мультиовар
) is
selected (fig.28).
»
To set a different cooking time and temperature, refer to
chapter “Adjusting the cooking time and temperature”.
3
Press the star t button (
СТАРТ / ВЫКЛ
) to star t cooking (fig.10).
4
When the cooking is finished, you will hear 4 beeps and the
selected cooking function light will be off.
5
The multicooker will be in keep-warm mode automatically.
»
The keep-warm indicator (
ПОДОГРЕВ
) lights up (fig.11).
Note
•
If you cook food at a temperature below 70°C, please turn off the keep-
warm mode before star t cooking.
•
In manual (
мультиовар
) mode, when cooking at a temperature higher
than 130°C, the top lid must be opened during cooking.
Keep-warm mode
The multicooker provides you with easy control over the keep-warm
mode.
•
After you have selected the cooking function using the menu
button (
МЕНЮ
), if you press the star t button (
СТАРТ/ВЫКЛ
)
directly, the keep-warm indicator will light up. After the cooking is
finished, the multicooker will switch to keep-warm mode directly.
•
After you have selected the cooking function using the menu
button (
МЕНЮ
), if you press the keep-warm button first, and
then the star t button (
СТАРТ/ВЫКЛ
), the keep-warm indicator
will be off. After the cooking is finished, the multicooker will be in
standby mode.
Note
•
In standby mode, you can press the keep-warm button (
ПОДОГРЕВ
) to
enter keep-warm mode.
•
In keep-warm mode, you can press the keep-warm button (
ПОДОГРЕВ
)
to enter standby mode.
Adjusting the cooking time and temperature
You can adjust the cooking time for all functions except the rice/
grains , roast, and plov functions; and you can adjust the cooking
temperature for baking and manual functions. Refer to the “Functions
over view” table for the time and temperature regulation of each
function.
After you have selected the desired cooking function using the menu
button, the default cooking time will be displayed on the screen.
1
To set a different cooking time, press the cooking time button
(
ВРЕМЯ ПРИГОТОВЛЕНИЯ
) (fig.29), and the default cooking
time star ts flashing on the display.
2
Press the increase (
+
) or the decrease (
-
) button to set the hour
unit (fig.30).
3
After the hour unit is set, wait for a few seconds before the hour
unit is confirmed, and the minute unit star ts flashing on the display.
4
Press the increase (
+
) or the decrease (
-
) button to set the minute
unit.
5
To set a different cooking temperature, press the temperature
button (
ТЕMП.
) (fig.31), and the default temperature star ts
flashing on the display.
6
Press the increase (
+
) or the decrease (
-
) button to set the
desired cooking temperature (fig.32).
Preset time for delayed cooking
You can preset the delayed cooking time for all cooking modes
except the reheating, baking, and fr ying modes.
1
Follow steps 6 and 7 in “Preparations before cooking”.
2
Press the menu button (
МЕНЮ
) until your preferred cooking
function is selected.
Изготовитель:
“Филипс Консьюмер Лайфстайл Б.В.”, Туссендиепен 4,
9206 АД, Драхтен, Нидерланды
Импортер на территорию России и Таможенного Союза:
ООО “ФИЛИПС”, Российская Федерация, 123022 г.
Москва, ул. Сергея Макеева, д.13, тел. +7 495 961-1111
Сделано в Китае
Дата производства указана в серийном номере
устройства. Например, “XP1A1347000001” означает, что
изделие было произведено на 47-ой неделе 2013 года.
Өндіруші:
“Филипс Консьюмер Лайфстайл Б.В.”, Туссендиепен 4, 9206
АД, Драхтен, Нидерланды
Ресей және Кедендік Одақ территориясына импорттаушы:
“ФИЛИПС” ЖШҚ, Ресей Федерациясы, 123022 Мәскеу
қаласы, Сергей Макеев көшесі, 13-үй, тел. +7 495 961-1111
Қытайда жасап шығарылған
Өнімнің сериялық нөмірінен өндірілген күнін табуға
болады. Мысалы, «XP1A1347000001» өнімнің 2013 жылдың
47-ші аптасында шығарылғанын білдіреді.
Specifications are subject to change without notice
© 2014 Koninklijke Philips N.V.
All rights reserved.
Register your product and get support at
www.philips.com/welcome
Always there to help you
Question?
Contact
Philips
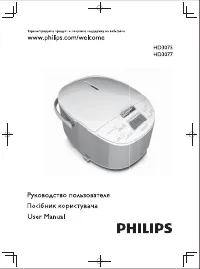
EN
User manual
RU
Руководство пользователя
HD3136
HD3137
Мультиварка
Мультипісіргіш
http://www.philips.com/welcome
User manual
http://www.philips.com/welcome
Recipe
http://www.philips.com/welcome
Safety leaflet
http://www.philips.com/welcome
Warranty
e
f
a
b
c
g
h
i
k
j
d
m
l
n
o
r
s
t
u
p
q
1
2
3
"Загрузка инструкции" означает, что нужно подождать пока файл загрузится и можно будет его читать онлайн. Некоторые инструкции очень большие и время их появления зависит от вашей скорости интернета.
Была ли эта инструкция полезной?
Об этой инструкции
- Бренд
- Philips
- Модель
- HD3137/03
- Тип документа
- Инструкция по эксплуатации
- Категория
- Мультиварка
- Язык(и)
- Русский
- Страницы
- 2
- Размер файла
- 2,8 MB
- Формат
Задать вопрос
Похожие инструкции
Популярные мультиварки Philips
Ещё модели: мультиварки Philips
 Philips HD3077/40 Инструкция по эксплуатации
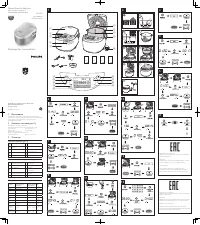 Philips HD3095 Инструкция по эксплуатации
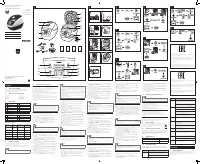 Philips HD3134 Инструкция по эксплуатации
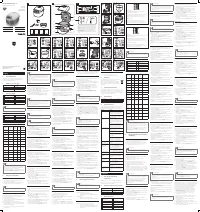 Philips HD3136 Инструкция по эксплуатации
 Philips HD3136/03 Инструкция по эксплуатации
- Philips HD3137 Инструкция по эксплуатации
 Philips HD3139 Инструкция по эксплуатации
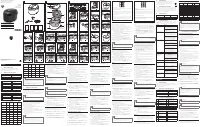 Philips HD3167 Инструкция по эксплуатации
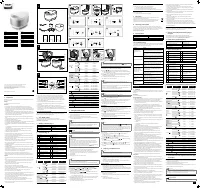 Philips HD4713/40 Инструкция по эксплуатации
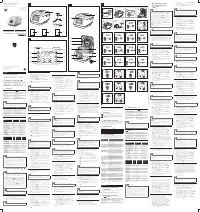 Philips HD4726 Инструкция по эксплуатации
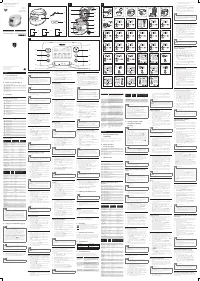 Philips HD4731 Инструкция по эксплуатации
- Philips HD4731/03 Инструкция по эксплуатации
 Philips HD4734 Инструкция по эксплуатации
- Philips HD4737 Инструкция по эксплуатации
- Philips HD4749 Инструкция по эксплуатации
- Philips HD4749/03 Инструкция по эксплуатации
 Philips HD9252/90 Инструкция по эксплуатации
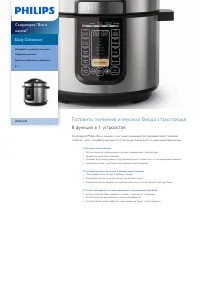 Philips HD2133/40 Инструкция по эксплуатации
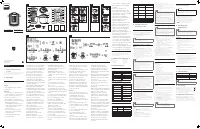 Philips HD2137/40 Инструкция по эксплуатации