Philips HD2137/40 - Инструкция по эксплуатации
Мультиварка Philips HD2137/40 - инструкция пользователя по применению, эксплуатации и установке на русском языке. Мы надеемся, она поможет вам решить возникшие у вас вопросы при эксплуатации техники.
Если остались дополнительные вопросы — свяжитесь с нами через контактную форму.
English
1 Your electric pressure
cooker
Congratulations on your purchase, and welcome to Philips!
To fully benefit from the support that Philips offers, register
your product at www.philips.ua/myphilips.
2 Important
Safety
Read this user manual carefully before you use the
appliance, and save it for future reference.
Danger
•
The appliance must not be
immersed.
Warning
•
Check if the voltage indicated
on the appliance corresponds
to the local power voltage
before you connect it.
•
The appliance is intended to
be used in household or similar
applications such as:
•
staff kitchen areas in shops,
offices, and other residential
type environments;
•
farm houses;
•
by clients in hotels, motels
and other residential type
environments;
•
bed and breakfast type
environments.
•
This appliance is not intended
for use by persons (including
children) with reduced physical,
sensory or mental capabilities,
or lack of experience and
knowledge, unless they have
been given supervision or
instruction concerning use
of the appliance by a person
responsible for their safety.
•
Children should be supervised
to ensure that they do not play
with the appliance.
•
If the supply cord is damaged,
it must be replaced by the
manufacturer, its service agent
or similarly qualified persons in
order to avoid a hazard.
•
The appliance is not intended
to be operated by means of
an external timer or a separate
remote-control system.
•
The ducts in the pressure
regulator allowing the escape
of steam should be checked
regularly to ensure that they
are not blocked.
•
The container must not be
opened until the pressure has
decreased sufficiently.
•
Cleaning and user
maintenance shall not be
made by children.
•
Keep the appliance and its
cord out of reach of children.
•
WARNING: Always follow
the instructions and use the
appliance properly to avoid
potential injury.
•
WARNING: Make sure to
avoid spillage on the power
connector to avoid a potential
hazard.
•
Surface of the heating element
is subject to residual heat after
use.
•
Use clean and soft cloth to
clean the surfaces in contact
with food.
•
Only connect the appliance
to a grounded power outlet.
Always make sure that the plug
is inserted firmly into the power
outlet.
•
Do not use the appliance if the
plug, the power cord, the inner
pot, the sealing ring, or the
main body is damaged.
•
Do not let the power cord
hang over the edge of the
table or worktop on which the
appliance stands.
•
Make sure the heating
element, the temperature
sensor, and the outside of the
inner pot are clean and dry
before you put the plug in the
power outlet.
•
Do not plug in the appliance or
turn the control knob with wet
hands.
•
When pressure is being
released from the pressure
regulator valve, hot steam or
liquid will be ejected. Keep
hands and face away from the
steam vent.
•
Always put the inner pot in the
appliance before you put the
plug in the power outlet and
switch it on.
•
Do not place the inner pot
directly over an open fire to
cook food.
•
Do not use the inner pot if it is
deformed.
•
Make sure that the sealing ring
is clean and in good condition.
•
The accessible surfaces
may become hot when the
appliance is operating. Take
extra caution when touching
the surfaces.
•
Beware of hot steam coming
out of the floating valve and
pressure regulator valve during
cooking or when you open the
lid. Keep hands and face away
from the appliance to avoid
the steam.
•
Do not lift and move the
appliance while it is operating.
•
Do not exceed the maximum
water level indicated in the
inner pot to prevent overflow.
•
Do not place the cooking
utensils inside the pot while
cooking.
•
Make sure the power socket is
clean and dry before you plug
in the appliance.
•
Do not use the appliance if too
much air or steam is leaking
from under the top lid.
•
When cooking soup or viscous
liquid, do not release pressure
by turning the pressure
regulator to the steam vent
position, otherwise liquid
might spurt from the pressure
regulator valve. Wait until the
pressure is naturally released
and the floater has dropped to
open the top lid.
Caution
•
Never use any accessories or
parts from other manufacturers
or that Philips does not
specifically recommend. If
you use such accessories or
parts, your guarantee becomes
invalid.
•
Do not expose the appliance
to high temperatures, nor place
it on a working or still hot stove
or cooker.
•
Do not expose the appliance
to direct sunlight.
•
Place the appliance on a
stable, horizontal, and level
surface.
•
Do not use the handle on the
top lid to move the appliance,
use the side handles instead.
www.philips.com/welcome
User manual
HD2137
www.philips.com/welcome
Safety leaflet
HD2137
www.philips.com/welcome
Warranty
HD2137
a
m
l
k
j
b
c
d
e
f
g
h
i
1
3
4
5
6
n
‚
€
o
p
q
r
s
t
u
v
w
y
z
{
}
|
~
x
2
•
Only use the cooking utensils
provided. Avoid using sharp
utensils.
•
To avoid scratches, it is
not recommended to cook
ingredients with crustaceans
and shellfish. Remove the hard
shells before cooking.
•
Do not place a magnetic
substance on the lid. Do not
use the appliance near a
magnetic substance.
•
Always let the appliance cool
down to room temperature
before you clean or move it.
•
Always clean the appliance
after use. Do not clean the
appliance in dishwasher.
•
Always unplug the appliance if
not used for a longer period.
•
If the appliance is used
improperly or for professional
or semi-professional purposes,
or if it is not used according to
the instructions in this safety
leaflet, the guarantee becomes
invalid and Philips refuses
liability for any damage caused.
•
Visit www.philips.com/support
to download the user manual.
Electromagnetic fields (EMF)
This Philips appliance complies with all applicable
standards and regulations regarding exposure to
electromagnetic fields.
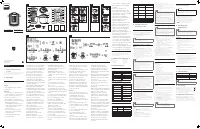
3 What’s in the box (fig. 1)
Main unit
Power cord
Rice & Soup ladle
Steaming plate
Measuring cup
Safety leaflet
User manual
Warranty card
4 Overview (fig. 1)
Product overview
a
Lid handle
h
Control Panel
b
Top lid
i
Heating element
c
Detachable inner lid
j
Power socket
d
Sealing ring
k
Locking pin
e
Water level indications
l
Floater
f
Side handle
m
Pressure regulator
g
Inner pot
n
Safety valve
Controls overview
o
Heating indicator
y
Increase button
p
Power indicator
z
Cooking time button
q
Slow cook button (low
temperature)
{
Bake button
r
Slow cook button (high
temperature)
|
Yogurt button
s
Sauté/sear button (low
temperature)
}
Display screen
t
Sauté/sear button (high
temperature)
~
Stew button
u
Preset timer button
Start/Reheat button
v
Decrease button
€
Keep warm indicator
w
Pressure cook button
Maintain pressure
indicator
x
Cancel/Warm button
‚
Start pressure indicator
Functions overview
Pressure cooking functions
Cooking
function
Default pressure
keeping time
(minute)
Pressure keeping
time regulating range
(minute)
Soup
20
20-59
Risotto
14
Not adjustable
Rice
14
Not adjustable
Steam
10
5-59
Meat/Poultry
15
12-59
Manual
2
2-59
©2018 Koninklijke Philips N.V.
All rights reserved.
HD2137_UM_UK_v2.0
HD2137
Normal cooking functions
Cooking
function
Default cooking
time
Cooking time
regulating range
Slow cook
(low
temperature)
6 hours
2 - 12 hours
Slow cook
(high
temperature)
6 hours
2 - 12 hours
Sauté/sear
(low
temperature)
2 minutes
2 minutes - 2 hours
Sauté/sear
(high
temperature)
2 minutes
2 minutes - 2 hours
Stew
1 hour
20 minutes - 10 hours
Yogurt
8 hours
6 - 12 hours
Bake
45 minutes
10 - 59 minutes
Reheat
25 minutes
8 - 25 minutes
5 Using the electric
pressure cooker
Before first use
1
Remove all packaging materials from the appliance.
2
Take out all the accessories from the inner pot.
3
Clean the parts of the electric pressure cooker
thoroughly before using it for the first time (see chapter
‘Cleaning and Maintenance’).
Note
•
Make sure all parts are completely dry before you
start using the electric pressure cooker.
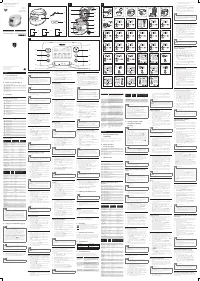
Preparations before cooking
(fig. 2)
Before using the electric pressure cooker to cook food,
follow below preparation steps:
1
Hold the lid handle and turn it anti-clockwise until the
top lid cannot move any more, then lift up the top lid.
2
Take out the inner pot from the electric pressure cooker
and put the pre-washed food in the inner pot.
3
Wipe the outside of the inner pot dry, then put it back
into the electric pressure cooker.
4
Place the top lid onto the electric pressure cooker and
turn it clockwise. You will hear a “click” sound when the
top lid is properly locked.
Note
•
Make sure the sealing ring is properly assembled
around the edge of the detachable inner lid.
•
Make sure the pressure regulator valve and floating
valve are clean and not blocked.
•
Make sure the outside of the inner pot is dry and
clean, and that there is no foreign residue on the
heating element.
•
Make sure the inner pot is in proper contact with the
heating element.
Cooking food (fig. 3)
Note
•
Do not fill the inner pot with less than 1/3 or more
than 2/3 full of food and liquid.
•
For food that expands during cooking, do not fill the
inner pot with more than 1/2 full of food and liquid.
•
For rice cooking, follow the water level indications
on the inside of the inner pot. You can adjust the
water level for different types of rice and according to
your own preference. Do not exceed the maximum
quantities indicated on the inside of the inner pot.
•
Make sure the floater on the top lid drops down
before cooking.
•
After the cooking process is started, you can press
Cancel/Warm
to deactivate the current work, and the
appliance goes to standby mode.
Pressure cooking
1
Follow the steps in “Preparations before cooking”.
2
Turn the pressure regulator to
seal
.
3
Put the plug in the power socket.
»
The power indicator starts flashing.
4
Press
Pressure cook
to choose one of the pressure
cooking functions -
Soup
,
Risotto
,
Rice
,
Steam
,
Meat/
Poultry
or
Manual
.
»
The default pressure keeping time is displayed on
the screen.
Note
•
The pressure keeping time is not adjustable for
Risotto
and
Rice
.
5
To set a different pressure keeping time, press
Cooking
time
.
6
Press or to set the pressure keeping time.
7
Press
Start/Reheat
to start the cooking process.
8
When the electric pressure cooker reaches the working
pressure:
»
Maintain Pressure
lights up.
9
When the pressure keeping time has elapsed, the
electric pressure cooker automatically switches to keep
warm mode.
»
The keep warm indicator (
Keep warm
) lights up.
10
Turn the pressure regulator to
vent
.
»
The electric pressure cooker starts releasing pressure.
»
The floater drops down when the pressure is
released sufficiently.
11
Hold the top lid handle and turn the lid anti-clockwise
until it cannot move any more, then lift it up.
Note
•
When cooking soup or viscous liquid, do not release
pressure by turning the pressure regulator to
vent
,
otherwise liquid might spurt from the pressure
regulator valve. Wait until the pressure is naturally
released and the floater has dropped down to open
the top lid.
•
The pressure keeping timer will start counting down
when the working pressure is reached.
•
After the cooking is finished and the pressure is
released, you can press the cancel button (
Warm/
Cancel
) and unplug the electric pressure cooker to
turn off the keep warm function or when not in use.
Normal cooking
Note
•
For normal cooking, you can cook food without
adding water in the inner pot. In this case, make sure
to turn the pressure regulator to
bake
.
•
Make sure to keep the top lid open for the entire time
when you cook food in the
Sauté/sear
mode.
•
To choose the
Reheat
function, press
Start/Reheat
when the appliance is in standby mode.
To cook food with normal pressure, press the cooking
buttons and choose
Slow cook
,
Sauté/sear
,
Stew
,
Yogurt
or
Bake
.
1
Follow the steps in “Preparations before cooking”.
2
Turn the pressure regulator to
bake
or
seal
.
•
For
Slow cook
,
Stew
and
Yogurt,
turn the pressure
regulator to
seal
.
•
For
Bake
, turn the perssure regulator to
bake
.
3
Put the plug in the power socket.
»
The power indicator (
Power
) starts flashing.
4
Press the desired cooking function button to choose a
cooking mode.
5
To set a different cooking time, press
Cooking time
.
»
The cooking time flashes on the screen.
6
Press or to set the cooking time.
7
Press
Start/Reheat
to start the cooking process.
8
When the cooking time has elapsed, the electric
pressure cooker automatically switches to keep warm or
standby mode.
9
Turn the pressure regulator to
vent
.
10
Hold the top lid handle and turn the lid anti-clockwise
until it cannot move any more, then lift it up.
Baking recipe
Apple cake with hazelnuts
Ingredients:
•
190g margarine
•
190g flour
•
200g sugar
•
3/4 tsp.baking powder
•
Cinnamon
•
100g almond meal
•
2 medium eggs
•
80ml of mayple syrup
•
2 medium apples, peeled, cored and cut into eights.
1
Mix the margarine with sugar, add the eggs and mix
thoroughly. Add the flour, baking powder and almond
meal, mix until the mixture is creamy. Fold with maple
syrups.
2
Grease the base and slides of the inner pot, add the
mixture and smooth the top of mixture to create level
finish. Place the apples on top, pushing them slightly
into the mixture. Sprinkle with cinnamon.
3
Press
Bake
, set cooking time for 50 minutes and press
Start/Reheat.
Close the lid.
Preset time for delayed cooking
(fig.4)
You can preset the delayed cooking time for different
cooking functions. The preset timer is available up to 24
hours.
1
After the cooking function is selected, press
Preset
timer
.
»
The hour unit starts flashing on the display.
2
Press or to set the hour unit.
3
After the hour unit is set, press
Preset timer
again.
»
The minute unit starts flashing on the display.
4
Press or to set the minute button.
5
Press
Preset timer
to confirm the preset time.
6
Press
Start/Reheat
to start the cooking process.
7
When the preset time has elapsed, the electric pressure
cooker starts working automatically.
Note
•
The preset function is not available in the
following modes:
Sauté/Sear
(both low and high
temperatures),
Reheat
,
Manual
and
Warm
.
Assembling and disassembling
the pressure regulator
Warning
•
Do not disassemble the pressure regulator during
cooking. Always unplug the electric pressure cooker
and wait until the pressure has been released
sufficiently to do so.
•
To disassemble the pressure regulator:
1
Turn the lower screw anticlockwise until it becomes
loose.
2
Pull it up and take out the pressure regulator.
•
To assemble the pressure regulator:
1
Assemble the lower screw back to the regulator.
2
Make sure the regulator points at the sealed position
(
) and put it back to the steam valve.
3
Turn the screw clockwise until it is fastened.
6 Cleaning and
Maintenance
Note
•
Unplug the electric pressure cooker before starting
to clean it.
•
Wait until the electric pressure cooker has cooled
down sufficiently before cleaning it.
Interior
Inside of the top lid and the main body:
•
Wipe with wrung out and damp cloth.
•
Make sure to remove all the food residues stuck to
the electric pressure cooker.
Heating element:
•
Wipe with wrung out and damp cloth.
•
Remove food residues with wrung out and damp
cloth.
Sealing ring:
•
Soak in warm water and clean with sponge.
Inner lid:
•
Remove the detachable inner lid. Soak it in warm
water and clean with sponge.
Exterior
Surface of the top lid and outside of the main body:
•
Wipe with a cloth damped with soap water.
•
Only use soft and dry cloth to wipe the control panel.
•
Make sure to remove all the food residues around the
pressure regulator valve and floating valve.
Pressure regulator valve and floating valve:
•
Disassemble the pressure regulator, soak it in warm
water, and clean with sponge.
•
Remove food residues in the pressure regulator valve
and floating valve.
Accessories
Measuring cup, rice spoon, soup ladle, and inner pot:
•
Soak in hot water and clean with sponge.
7 Specifications
Model Number
HD2137
Rated power output
1000W
Rated capacity
6.0L
Warm keeping temperature
60-80°C
Note
•
Always unplug the appliance if not used for a longer
period.
8 Recycling
This symbol means that this product shall not
be disposed of with normal household waste
(2012/19/EU).
Follow your country’s rules for the separate
collection of electrical and electronic products.
Correct disposal helps prevent negative consequences for
the environment and human health.
9 Guarantee and service
If you need service or information, or if you have a
problem, visit the Philips website at
www.philips.com or contact the Philips Customer Care
Center in your country. You can find its phone number in
the worldwide guarantee leaflet. If there is no Customer
Care Center in your country, go to your local Philips dealer.
EN User manual
UK Посібник
користувача
"Загрузка инструкции" означает, что нужно подождать пока файл загрузится и можно будет его читать онлайн. Некоторые инструкции очень большие и время их появления зависит от вашей скорости интернета.
Была ли эта инструкция полезной?
Об этой инструкции
- Бренд
- Philips
- Модель
- HD2137/40
- Тип документа
- Инструкция по эксплуатации
- Категория
- Мультиварка
- Язык(и)
- Русский
- Страницы
- 2
- Размер файла
- 2,1 MB
- Формат
Задать вопрос
Похожие инструкции
Популярные мультиварки Philips
Ещё модели: мультиварки Philips
 Philips HD4737 Инструкция по эксплуатации
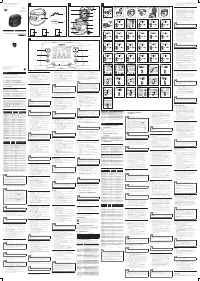 Philips HD4749 Инструкция по эксплуатации
- Philips HD4749/03 Инструкция по эксплуатации
 Philips HD9252/90 Инструкция по эксплуатации
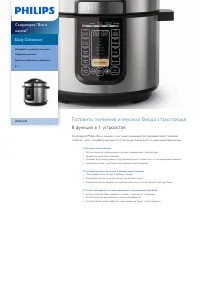 Philips HD2133/40 Инструкция по эксплуатации
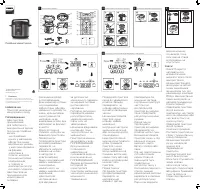 Philips HD2139/40 Инструкция по эксплуатации
 Philips HD2173 Инструкция по эксплуатации
 Philips HD2178 Инструкция по эксплуатации
 Philips HD3033 Инструкция по эксплуатации
 Philips HD3033/00 Инструкция по эксплуатации
 Philips HD3039 Инструкция по эксплуатации
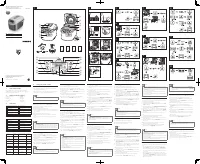 Philips HD3058 Инструкция по эксплуатации
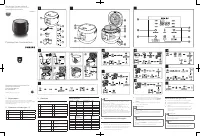 Philips HD3060 Инструкция по эксплуатации
 Philips HD3060/03 Avance Collection Инструкция по эксплуатации
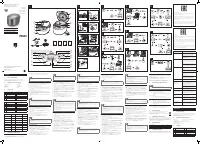 Philips HD3065/03 Инструкция по эксплуатации
- Philips HD3067 Инструкция по эксплуатации
 Philips HD3077/40 Инструкция по эксплуатации
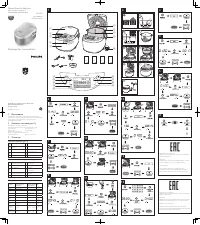 Philips HD3095 Инструкция по эксплуатации
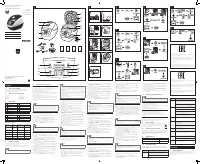 Philips HD3134 Инструкция по эксплуатации