Перфораторы Sparky BPR 220E - инструкция пользователя по применению, эксплуатации и установке на русском языке. Мы надеемся, она поможет вам решить возникшие у вас вопросы при эксплуатации техники.
Если остались вопросы, задайте их в комментариях после инструкции.
"Загружаем инструкцию", означает, что нужно подождать пока файл загрузится и можно будет его читать онлайн. Некоторые инструкции очень большие и время их появления зависит от вашей скорости интернета.


8
EN
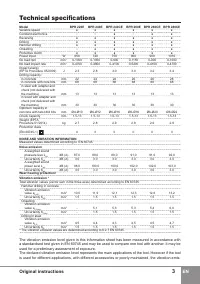
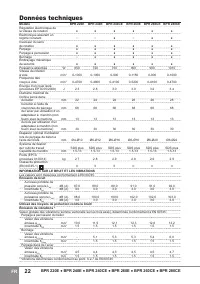
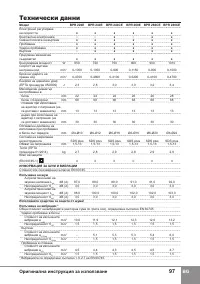
BPR 220Е ● BPR 240Е ● BPR 240CЕ ● BPR 260Е ● BPR 260CЕ ● BPR 280CE
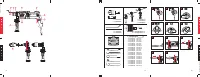
▪ Hammer mode (Fig.5) - chiselling grooves
and demolishing in concrete, masonry, etc.
▪ Adjusting the chisel (Fig.6) - to avoid opera
-
tor’s fatigue, insert and fix the chisel in the
necessary position.
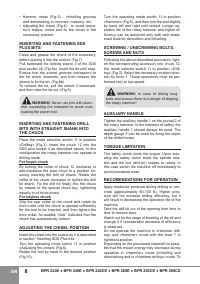
INSERTING AND fASTENING SDS
PLUS BITS
Clean and grease the shank of the accessory,
before placing it into the socket! (Fig.7)
Pull backward the locking sleeve 3 of the SDS
plus socket (4) (Fig.8a). Insert the bit until stop.
Ensure that the socket grooves correspond to
the bit shank channels, and then release the
sleeve to fix the bit. (Fig.8b)
To remove the bit, pull the sleeve 3 backward,
and then take the bit out. (Fig.9)
WARNING:
Never use bits with diam-
eter exceeding the indicated to avoid over-
loading the power tool.
INSERTING AND fASTENING DRILL
BITS WITH STRAIGHT SHANK INTO
THE CHUCK
Place the mode selection switch 11 in position
«Drilling» (Fig.3). Insert the chuck 12 into the
SDS plus socket 4 as described above. In this
configuration the rotary hammer can operate in
drilling mode.
for keyed chuck
By turning the collar of chuck 12 clockwise or
anti-clockwise the jaws move to a position en-
suring inserting the drill bit shank. Rotate the
collar of the chuck clockwise to tighten the drill
bit shank. Fix the drill bit finally into the chuck
by means of the special chuck key, tightening
equally in all three bores.
for keyless chuck
Grip the rear collar of the chuck and rotate its
front collar until the chuck is opened sufficiently
for the tool to be inserted, and then tighten the
front collar. An audible “click” indicates that the
chuck has automatically locked.
ADJUSTING THE CHISEL POSITION
Insert the chisel into the socket as it is described
in section “Inserting SDS-Plus bits”.
Turn the operating mode switch 11 in position
«Adjusting the chisel» (Fig.6).
Rotate the tool by hand to the desired position
(Fig.10).
Turn the operating mode switch 11 to position
«Hammer» (Fig.5), and then turn the tool slightly
by hand left and right until locked. Longer op-
eration life of the rotary hammer and higher ef-
ficiency can be achieved only with well sharp
-
ened tools for demolition and chiseling.
SCREWING / UNSCREWING BOLTS,
SCREWS AND NUTS
Following the above-described procedure, tight
-
en the corresponding accessory into chuck 12.
Set mode selector switch 11 to position «Drill-
ing» (Fig.3). Select the necessary rotation direc
-
tion by lever 7. These operations must be per-
formed only at low speed.
WARNING:
In case of driving long
bolts and screws there is a danger of slipping
the rotary hammer!
AUXILIARY HANDLE
Tighten the auxiliary handle 1 on the journal 2 of
the rotary hammer. In the interests of safety, the
auxiliary handle 1 should always be used. The
depth gauge 5 can be used for fixing the depth
of the drilled bores.
TORQUE LIMITATION
The safety clutch limits the torque. Upon actu-
ating the safety clutch stops the spindle rota-
tion and the tool (drill bit) ceases to rotate. In
this case switch the machine off immediately to
avoid premature wear.
RECOMENDATIONS fOR OPERATION
Apply moderate pressure during drilling in con-
crete (approximately 80-100 N). Higher pres-
sure will not increase drilling efficiency, but it
will result in decreasing the operation life of the
machine.
Take the drill bit out of the opening from time to
time to remove dust.
Watch out for the stage of blunting of the bit and
change it if considerable decrease of efficiency
is observed.
Do not operate the machine in «Hammer drill-
ing» and «Hammer» mode with the lever 7 in
rightmost position.
Depending on the processed material it is possi-
ble that the impact energy may decrease during
operation in «Hammer» mode (chiselling and
demolishing and in «Hammer drilling» mode. To
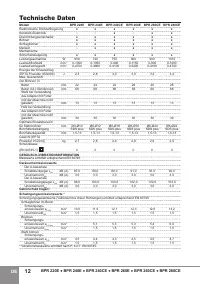
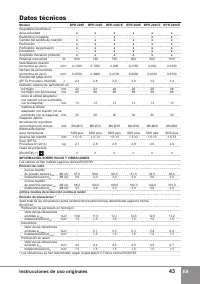
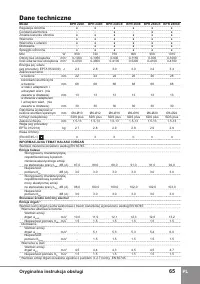
Характеристики

Остались вопросы?Не нашли свой ответ в руководстве или возникли другие проблемы? Задайте свой вопрос в форме ниже с подробным описанием вашей ситуации, чтобы другие люди и специалисты смогли дать на него ответ. Если вы знаете как решить проблему другого человека, пожалуйста, подскажите ему :)


