Пароварки Saturn ST-EC1180 - инструкция пользователя по применению, эксплуатации и установке на русском языке. Мы надеемся, она поможет вам решить возникшие у вас вопросы при эксплуатации техники.
Если остались вопросы, задайте их в комментариях после инструкции.
"Загружаем инструкцию", означает, что нужно подождать пока файл загрузится и можно будет его читать онлайн. Некоторые инструкции очень большие и время их появления зависит от вашей скорости интернета.
4
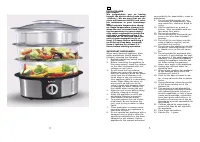
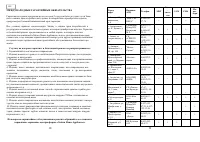
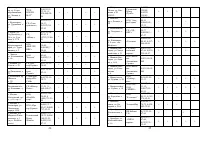
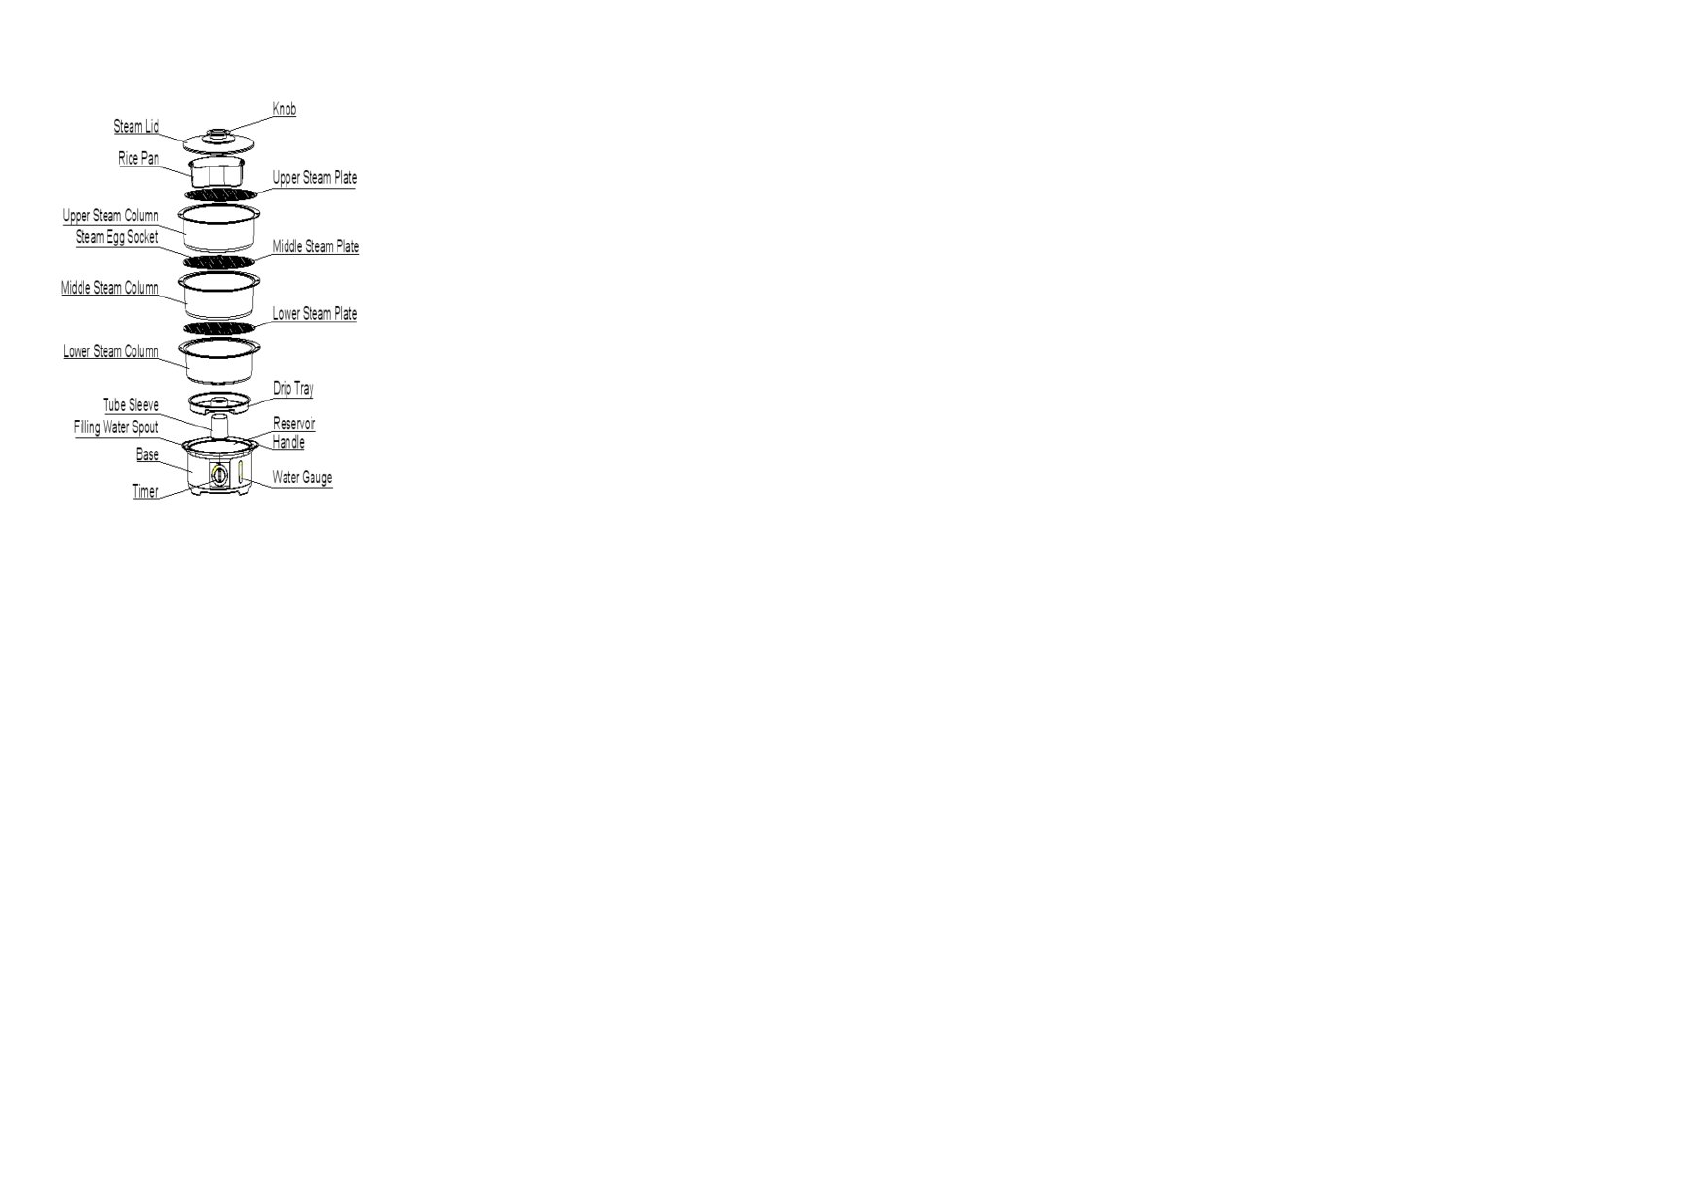
Description
PARTS
1.
Indicating light
: Show the working
state, it would be illuminated only after
the timer has been set.
2.
Timer
: Set steaming food time within
75 minutes, a bell will be heard after
finishing steaming food
3.
Filling water spout
: For the pur-
pose of facilitating filling water into res-
ervoir, both of the left and right owning
a spout.
4.
Reservoir
: Hold water for steaming
food, don’t place any other liquid in the
reservoir.
5.
Drip tray
: Prevent water condensa-
tion and food liquids from dripping back
to the reservoir to ensure the water in
the reservoir is clean.
6.
Steam column
: In order to indentify
the steam column conveniently, each
one has been numbered. The lower
steam column is numbered “1” , and
marked at the above side of steam col-
umn handle, for the medium and upper
are numbered “2”, “3” respectively.
7.
Steam plate
: Each steam column
has corresponding steam plate, and
they can be combined in a
Steam as-
sembly
. To clean the steam plate readi-
ly, this is designed for detachable.
8.
Steam egg socket
: This particular
design for steaming egg easily, only
place the egg on it vertically. Every
steam plate has six steam egg sockets.
9.
Rice pan
: It can be placed on any
steam plate to cook rice. For the sake of
reducing space, the rice pan can be
stored in the reservoir when not in use.
But it should be overturned, then posi-
tion it in place.
10.
Steamer lid
: It has a convenient
knob on top to avoid scalding when it is
removed. Besides, the steam lid can
match with any steam support.
11.
Tube sleeve
: Cover around of the
heating element and make the water
boiling by rapid rate.
12.
Base
: Appliance which have the
electronic components.
BEFORE THE FIRST USE
Before using the food steamer for the
first time, please clean the food steamer
completely, put the attachments such as
steam column, steam plate, drip tray,
steamer lid etc into water (also adding
proper cleanser) and clean them. Fill the
reservoir with water to the max mark,
assemble all parts and begin to operate,
after working for about 30 minutes,
discard the water.
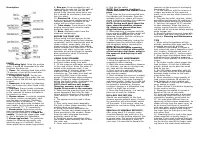
USING FOOD STEAMER
1. Place the food steamer on a stable
and level surface away from walls.
2. Fill the reservoir with water according
to the need of food. When the water is
added to the minimum mark, it can
steam almost 20 minutes; when to the
maximum mark, it can steam 60
minutes or so. The water level shall not
exceed the MAX level on the water
gauge. If food steamer stops producing
steam or steam is reduced obviously
before the food is ready, it indicates you
should add water to the reservoir.
NOTE: Don’t add any salt, pepper,
flavoring, essence, wine or other
liquids in tap water in the reservoir.
3. Make sure the prominent part of tube
sleeve downward, and inlay the tube
sleeve with the cylinder in the center of
inner reservoir. Then put on the drip
tray.
4. The appliance can be used in three
ways:
1) Only using lower steam assembly:
Put food in lower steam assembly, then
position them on the base.
2) Using three steam assemblies to-
gether: Position each steam assembly in
place according to the number. Please
keep the order otherwise the steam
assembly cannot sit flat.
3) Using two steam assemblies: Only
the middle steam assembly can fix with
the lower one.
5. Cover with the steamer lid.
5
6. Plug into the outlet.
NOTE: Don’t operate it without
steam assemblies and steamer lid in
place
.
7. Set timer by the recommended time,
the indicator will illuminate. Once the
indicator light is on, steam will be pro-
duced in several minutes, the condensa-
tion is normal during steaming.
NOTE: During work don’t touch the
base, steam assemblies, steamer
lid, always use gloves when han-
dling the food steamer.
8. When steaming is complete and the
timer returns to
OFF
position, a bell will
heard and automatically cut off the
steaming function. And the working in-
dicator will extinguish.
9. After finishing steaming, unplug the
appliance from the outlet and make it
cool completely before removing the
steam column assembly.
NOTE: Be careful when removing
the drip tray in spite of other parts
of the unit may cool down, water in
the reservoir and drip tray is still
very hot.
CLEANING AND MAINTENANCE
1. Allow the appliance to cool down
completely before cleaning.
2. Wash the steam assemblies, steamer
lid, drip tray, rice pan in hot soapy wa-
ter, rinse and dry completely.
3. Don’t clean any part with abrasive
cleaners such as metal scouring pads,
and scouring powder
4. Don’t immerse the reservoir in water,
whereas pour the warm water into the
reservoir firstly, then rinse thoroughly
and discard water, finally dry it with soft
cloth. All parts except the reservoir can
be cleaned in dishwasher, however,
continual cleaning in a dishwasher may
result in a slight loss of polish.
5. Store the food steamer in a cool dry
place out of reach for children.
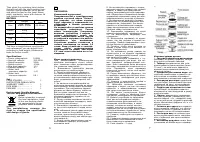
BOIL-DRY PROTECTION
Should you accidentally let the food
steamer operate without water, the boil-
dry protection will automatically switch
off the power. If this occurs, allow the
appliance to cool before filling with cold
water.
REMOVAL OF MINERAL DEPOSITS
After using about 2-3 months, some
chemical deposits may build up in the
reservoir or on the heating element, this
is normal case. The amount of deposits
depends on the hardness of water in
your area, it is essential to descale the
reservoir on the purpose of prolonging
the product life.
1. Fill the reservoir with the mixture of
vinegar and water to the maximum
mark, not to use any other chemical or
descaler.
2. Plug into the outlet, drip tray, steam
assemblies and steamer lid should be in
the correct place during this procedure.
3. Set timer for approx 20-25 minutes
to start steaming. When the timer is
ringing, unplug from the outlet and al-
low the unit to cool down before pouring
white vinegar out.
4. Rinse the reservoir several times with
cold water and clean other parts as de-
scribed in
Cleaning and Maintenance
.
TIPS
1. When using the appliance at high
altitude, steaming time may need to be
increased and vary by altitude
2. Steaming time stated in recipes is
only referenced, also it depends on food
size, location, freshness and taste. If
you are familiar with it , set time easily.
3. Single layer food steams faster than
multiplayer food, therefore, steaming
time for a large quantity of food is much
longer.
4. For better results, select proper size
food to steam, if food size is different
greatly, advise you to place the small
food on the top.
5. Don’t fill steam assemblies with full
food, as there should be enough space
between foods to allow for the maxi-
mum steam flow.
6. When steaming a large quantity of
food, remove steamer lid and stir the
food halfway by a long handled tool.
7. Save liquids in drip tray for making
soup, sauces or gravy.
8. Please defrost it first before steaming
frozen meat or poultry.
9. Steaming time stated in recipes is
based on the use of cold water.
10. Inner steam assembly is also used
for steaming other food such as fruits,
vegetables, pudding, quick bread etc.
11. You may place different food re-
spectively in three steam assemblies. As
steam will drip from the upper layer, so
as to ensure food flavor is consistent
with each other, such as steaming meat
and vegetables, always place meat in
the lower layer so that gravy can’t drip
onto other food.
12. Steaming time for food in the upper
steam assembly is usually longer 5
minutes. If you need to steam the food
with different cooking time, start steam-
ing the food in need of the longer cook-
ing time in the lower steam assembly.

