
Отпариватели BRAYER BR4121 - инструкция пользователя по применению, эксплуатации и установке на русском языке. Мы надеемся, она поможет вам решить возникшие у вас вопросы при эксплуатации техники.
Если остались вопросы, задайте их в комментариях после инструкции.
"Загружаем инструкцию", означает, что нужно подождать пока файл загрузится и можно будет его читать онлайн. Некоторые инструкции очень большие и время их появления зависит от вашей скорости интернета.


8
9
EN
EN
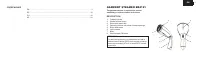
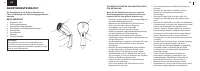
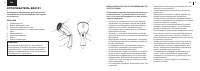
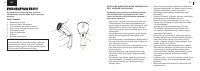
• Insert the power plug to the mains socket, the
indicator (6) will light up. When the indicator (6) goes
out, you can start the steamer operation.
• Hang the clothes on a hanger.
Note:
never steam clothes on a person as the outgoing
steam temperature is very high, use a hanger only.
• To switch the steam supply on, press and hold down
the button (8).
•
To switch the steam supply off release the button (8).
• For continuous steam supply move the button (8)
towards the handle (1), to switch the continuous
steam supply off, move the button (8) backwards.
• Slowly move the brush attachment (5) along the
fabric, smooth out the fabric with your free hand.
Notes:
- during operation, hold the garment steamer
horizontally and do not turn it over;
- during the garment steamer operation the upper part
of the body (7) becomes very hot. Be careful and do not
touch hot parts of the unit body (7) and the operating
surface (4);
- after steaming the clothes may need some time to dry,
leave them on the hanger.
• After the unit operation, remove the power plug from
the mains socket and let the garment steamer cool
down.
• Detach the brush attachment.
• Remove the water tank (3) and pour out the remaining
water, install the water tank (3) back to its place.
• To reduce the size, press and hold the button (2), fold the
handle (1).
CLEANING AND CARE
• Disconnect the power plug from the mains socket and
wait until the garment steamer cools down completely.
• Remove the water tank (3) and pour out the remaining
water, install the water tank (3) back to its place.
• Clean the garment steamer body (7) and the operating
surface with the steam release openings (4) with a
slightly damp cloth, and then wipe dry.
• You can remove the mineral deposit from the operating
surface (4) with a cloth soaked in vinegar-water solution.
• Remove the brush attachment (5) and wash it under a
water jet.
• Do not use abrasive cleaners and solvents to clean the
garment steamer.
• Do not immerse the garment steamer, the power cord
and the power plug into water or any other liquids.
STORAGE
• Unplug the garment steamer and wait till it cools down
completely.
• Clean the garment steamer.
• Keep the unit in a dry cool place out of reach of children
and disabled persons.
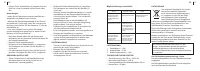
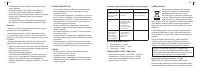
Troubles and troubleshooting
Malfunction
Possible reason
Solution
When the steam
supply is switched
on, water leaks from
the steam release
openings
The garment steamer
is not hot enough
Let the garment steamer
heat up a little longer
before the use
Water leaks from
the steam release
openings
During heating the
pressure in the steam
chamber increases
and water drops can
appear in the steam
release openings
It is normal
A sound of boiling
water inside the
garment steamer
and slight vibration
of the garment
steamer body
Boiling of water in
the steam chamber is
accompanied with a
corresponding sound
and slight vibration
It is normal
DELIVERY SET
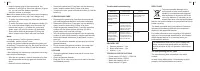
1. Garment steamer – 1 pc.
2. Brush attachment – 1 pc.
3. Manual – 1 pc.
TECHNICAL SPECIFICATIONS
• Power supply: 220-240 V, ~ 50/60 Hz
• Rated input power: 1200 W
• Water tank capacity: 90 ml
• Steam release: 16 g/min
RECYCLING
To prevent possible damage to the
environment or harm to the health of
people by uncontrolled waste disposal,
after expiration of the service life of the
unit or the batteries (if included), do not
discard them with usual household waste,
take the unit and the batteries to specialized stations for
further recycling.
The waste generated during the disposal of products
is subject to mandatory collection and consequent
disposal in the prescribed manner.
For further information about recycling of this product
apply to a local municipal administration, a household
waste disposal service or to the shop where you
purchased this product.
The manufacturer reserves the right to change the
design, structure and specifications not affecting
general principles of the unit operation, without prior
notice.
The unit operating life is 3 years
The manufacturing date is specified in the serial
number.
In case of any malfunctions, it is necessary to apply
promptly to the authorized service center.
Характеристики

Остались вопросы?Не нашли свой ответ в руководстве или возникли другие проблемы? Задайте свой вопрос в форме ниже с подробным описанием вашей ситуации, чтобы другие люди и специалисты смогли дать на него ответ. Если вы знаете как решить проблему другого человека, пожалуйста, подскажите ему :)


