
Отпариватели BRAYER BR4121 - инструкция пользователя по применению, эксплуатации и установке на русском языке. Мы надеемся, она поможет вам решить возникшие у вас вопросы при эксплуатации техники.
Если остались вопросы, задайте их в комментариях после инструкции.
"Загружаем инструкцию", означает, что нужно подождать пока файл загрузится и можно будет его читать онлайн. Некоторые инструкции очень большие и время их появления зависит от вашей скорости интернета.


6
7
EN
EN
THE UNIT IS INTENDED FOR HOUSEHOLD USE
ONLY, DO NOT USE THE UNIT FOR COMMERCIAL
OR LABORATORY PURPOSES.
BEFORE THE FIRST USE
After the unit’s transportation or storage at negative
temperature, unpack it and wait for at least 3 hours
before using it.
• Unpack the unit and remove all the packaging
materials.
•
If there is a protective film on the operating surface
(5), remove it.
• Keep the original package.
• Read the safety measures and operating
recommendations.
• Check the delivery set.
• Examine the unit for damages, in case of damage do
not plug it into the mains.
•
Make sure that specified specifications of power
supply voltage of the unit correspond to the
specifications of your mains. When using the unit in
the mains with 60 Hz frequency, the unit does not
need any additional settings.
• Wipe the garment steamer body with a slightly damp
cloth and then wipe it dry.
GARMENT STEAMER PURPOSE
- The garment steamer can be used for careful
smoothing of folds on clothes or furniture.
- If you have doubts about steaming any certain kind of
fabric or clothes, you should follow the recommendations
on the product label.
- If no such information is available, try to steam the fabric
on the reverse side.
- When steaming such fabrics as silk or corduroy, keep the
garment steamer at some distance from the fabric.
- Use the brush attachment (5) to steam delicate fabrics
and to remove lint or threads from the fabric.
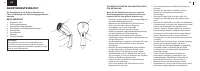
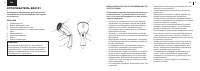
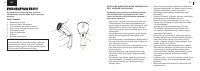
STEAMER OPERATION
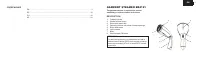
• Press and hold the handle release button (2), unfold the
handle (1) and release the button (2).
WATER SELECTION
• Fill the water tank (3) with tap water. If tap water is
hard, we recommend mixing it with distilled water
in proportion 1:1. If tap water is too hard, mix it with
distilled water in proportion 1:2 or use distilled water
only.
ATTENTION!
Before detaching the water tank (3), make sure that the
power plug is not inserted into the mains socket.
• Take the water tank by the ledges on both sides and
remove it (3).
• Fill the water tank (3) with water non exceeding the
MAX mark.
•
Do not fill the tank (3) with carbonated water,
perfume additives, vinegar, chemical agents, etc.
• Install the water tank (3) back to its place and make
sure that the tank (3) is fixed properly.
ATTENTION!
Do not plug the garment steamer in if the water tank
(3) is empty.
• Hold the steamer by the handle (1).
• Insert the power plug to the mains socket, the
indicator (6) will light up. When the indicator (6) goes
out, you can start the steamer operation.
• To switch the steam supply on, press and hold down
the button (8).
•
To switch the steam supply off release the button (8).
• For continuous steam supply, move the button (8)
towards the handle (1), to switch the continuous
steam supply off, move the button (8) in the opposite
direction.
• Before general use of the garment steamer clean the
steam chamber. To do this, direct the outgoing steam
to a piece of cloth, for instance, try to smooth out a
kitchen towel.
• If during the operation the water tank (3) becomes
empty, switch the garment steamer off before
removing the tank (3) and refilling it with water. To
do this, disconnect the power plug from the mains
socket.
• After the unit operation, remove the power plug from the
mains socket and let the garment steamer cool down.
• Remove the water tank (3), drain the remaining water
and install the water tank back to its place.
• To reduce the size, press and hold the button (2), fold the
handle (1).
Note:
when switching the unit on for the first time, foreign
smell can appear. It is normal.
USING THE BRUSH ATTACHMENT
• Press and hold the handle release button (2), unfold the
handle (1) and release the button (2).
ATTENTION!
Before installing the brush attachment (5) and removing
the tank (3), make sure that the power plug is not
inserted into the mains socket.
• Install the brush attachment (5) on the operating surface
(4).
• Take the water tank by the ledges on both sides and
remove it (13).
• Fill the water tank (3) with water non exceeding the MAX
mark.
•
Do not fill the tank (3) with carbonated water, perfume
additives, vinegar, chemical agents, etc.
• Install the water tank (3) back to its place and make sure
that the tank (3) is fixed properly.
• Take the steamer by the handle (1).
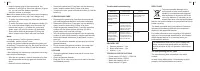
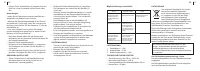
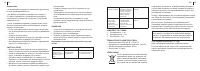
Характеристики

Остались вопросы?Не нашли свой ответ в руководстве или возникли другие проблемы? Задайте свой вопрос в форме ниже с подробным описанием вашей ситуации, чтобы другие люди и специалисты смогли дать на него ответ. Если вы знаете как решить проблему другого человека, пожалуйста, подскажите ему :)


