Настольные часы VITEK VT-3526 BK - инструкция пользователя по применению, эксплуатации и установке на русском языке. Мы надеемся, она поможет вам решить возникшие у вас вопросы при эксплуатации техники.
Если остались вопросы, задайте их в комментариях после инструкции.
"Загружаем инструкцию", означает, что нужно подождать пока файл загрузится и можно будет его читать онлайн. Некоторые инструкции очень большие и время их появления зависит от вашей скорости интернета.


4
ENGLISH
usage of the unit and information about dan-
ger that can be caused by its improper usage.
•
For children safety reasons do not leave poly-
ethylene bags used as packaging unattended.
Attention!
Do not allow children to play with
polyethylene bags or packaging film.
Danger of
suffocation!
•
Do not disassemble the unit by yourself, if any
malfunction is detected or after it was dropped,
apply to the nearest authorized service center.
•
Transport the unit in the original package only.
•
Keep the unit out of reach of children and dis-
abled persons.
THE UNIT IS INTENDED FOR HOUSEHOLD USAGE
ONLY
Power connection
After unit transportation or storage under
winter (cold) conditions, it is necessary
to keep it for at least two hours at room
temperature before switching on.
•
Make sure that operating voltage of the unit cor-
responds to voltage of your home mains.
•
The unit is equipped with an integrated battery
backup power supply system, that allows to
save settings of current time, timer, alarm and
programmed radio stations in case of AC sup-
ply voltage interruption. Once the voltage gets
normal, the unit will be switched to the mains
power supply.
Note:
Alarm operation is only possible when the unit is
connected to the mains.
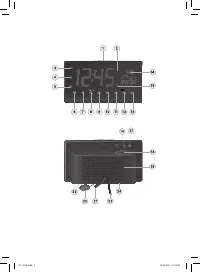
•
Open the battery compartment lid (23) having
preliminary unscrewed the fixing screw. Insert a
CR2032 battery (not included), with the “plus”
upward.
•
Close the battery compartment lid (23) and
tighten up the screw.
•
To connect the unit to the mains, insert the plug
of the power cord (21) into the mains socket.
Attention!
Battery leakage can cause injuries or unit damage.
To avoid damages, follow the recommendations
specified below:
•
insert the battery following the polarity (“plus”
upward);
•
remove the battery if you are not planning to use
the unit for a long time;
•
do not dismantle the battery, do not subject it to
high temperatures;
•
replace the battery in time.
Date and time setting
•
Plug the unit into the mains.
•
Press and hold the button (12) «NAP/M+/
MEM/
¹
», the year digits will start flashing on
the display.
•
Set the required year by pressing consequently
or holding the buttons (8) «◄◄» and (9) «►►».
•
Press the button (12) «NAP/M+/MEM/
¹
».
The
month digits will start flashing on the display.
•
Use the buttons (8) «◄◄» and (9) «►►» to
select the necessary month.
•
Press the button (12) «NAP/M+/MEM/
¹
».
The
day digits will start flashing on the display.
•
Use the buttons (8) «◄◄» and (9) «►►» to
select the necessary day.
•
Press the button (12) «NAP/M+/MEM/
¹
», the
time format symbol will start flashing on the dis-
play: 24 hours (24 Hr) or 12 hours (12 Hr).
•
Use the buttons (8) «◄◄» and (9) «►►» to
select the time format (12 Нr or 24 Нr)
.
•
Press the button (12) «NAP/M+/MEM/
¹
». The
hour digits will start flashing on the display.
•
Use the buttons (8) «◄◄» and (9) «►►» to
select the necessary hour.
Note:
To set the afternoon time in the 12 hour
format (12 Hr), press the buttons (8) «
◄◄
» and
(9) «
►►
» consequently until the «PM» indicator
appears.
•
Press the button (12) «NAP/M+/MEM/
¹
».
The
minute digits will start flashing on the display.
•
Use the buttons (8) «◄◄» and (9) «►►» to set
the time in minutes.
•
To finish the setup procedure press the button
(12) «NAP/M+/MEM/
¹
».
Note:
If during setting the buttons (8)
«
◄◄
»
и (9)
«
►►
»
are not pressed within 30 seconds, the unit
will be switched to the current time mode.
Current date, temperature and relative
humidity view
•
To view the date in the current time mode (radio
is off) press the button (8) «Y-M-D/C-F».
•
Consequently press the button (8) «Y-M-D/C-F»
to view the year, current date, temperature, rel-
ative humidity and time.
Note:
To change temperature measurement units
(C/F) in temperature view mode, press and hold
the button (8) «Y-M-D/C-F».
Weather forecast function
The unit display is equipped with weather mode
indications («sunny», «partly cloudy», «overcast»,
«rain» modes).
VT-3526.indd 4
19.02.2014 17:19:01


