Мультиварки VITEK VT-4222 BK - инструкция пользователя по применению, эксплуатации и установке на русском языке. Мы надеемся, она поможет вам решить возникшие у вас вопросы при эксплуатации техники.
Если остались вопросы, задайте их в комментариях после инструкции.
"Загружаем инструкцию", означает, что нужно подождать пока файл загрузится и можно будет его читать онлайн. Некоторые инструкции очень большие и время их появления зависит от вашей скорости интернета.


5
ENGLISH
–
Place the unit on a flat, heat-resistant sur-
face away from all kitchen heat sources (gas
cooker, electric cooker or cooking unit).
–
Place the multicooker keeping at least 20 cm
gap between the multicooker body and the
wall and 30-40 cm gap above the unit.
–
Do not place the multicooker close to objects
that can be damaged by the released steam
of high temperature.
Attention! Do not place the unit near bath
tubs, kitchen sinks or other containers filled
with water.
–
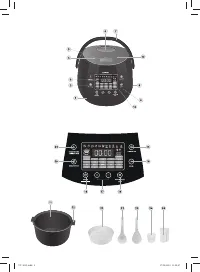
Open the lid (4) by pressing the button (5).
–
Wash all removable parts with a soft sponge
and a neutral detergent: bowl (11), steam
cooking basket (21), plastic soup ladle (22),
plastic spatula (23), measuring cup (24) and
cups with lids (25). Then rinse them under
running water and dry.
–
Remove the protection screen (13) by pull-
ing the handles on the lower part of the
screen. Wash the screen with warm water
and neutral detergent, rinse and dry it thor-
oughly. Insert the upper part of the protec-
tion screen into the groove on the lid (4) and
press the lower part of the screen until the
lock clicks.
–
Clean the unit body with a damp cloth and
then wipe it dry.
CURRENT TIME SET TING
–
Insert the power cord connector into the con-
nection socket (8) and the power cord plug
into the mains socket.
–
Press and hold the «TIME» button (18) for
3 seconds, the hour digits will be flashing.
–
Use the «+/-» buttons (17) to set the time in
hours.
–
Touch the «TIME» button (18), the minute dig-
its will be flashing.
–
Use the «+/-» buttons (17) to set the time in
minutes.
–
Press the “START/STOP” button (14) or wait
for 10 seconds to save the settings.
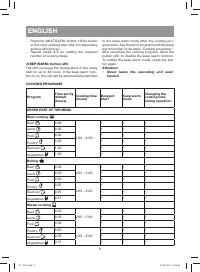
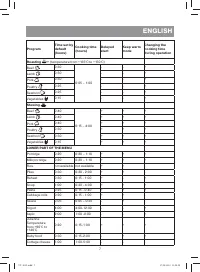
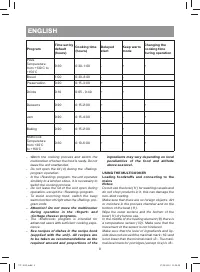
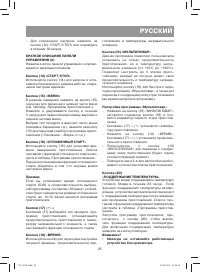
SHORT DESCRIPTION OF THE CONTROL
PANEL (2)
Pressing of the control panel buttons is accom-
panied by a sound signal.
«START/STOP» Button (14)
Use this button (14) to start the set operation
mode and to save the time settings.
«MENU» button (15)
While in standby mode, press the button (15)
once to switch to the lower part of the menu (see
the «Cooking programs» table).
Press and hold down the button for 3 seconds to
switch between the upper and the lower parts of
the menu.
After selecting the type of product in the upper
part of the menu (beef, lamb etc.) press the but-
ton (15) to switch to cooking program selection
(«Slow cooking», «Boiling» etc.).
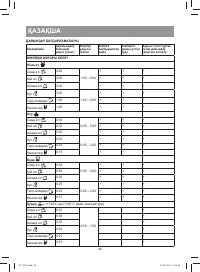
«DELAYED START» button (16)
Use this button (16) to set the cooking end time.
See the list of programs with available delayed
start function in the table «Cooking programs».
Before using the delayed start function, make
sure that the current time is set properly.
Example:
If you set the delayed start time for15:00, the
selected program runtime being 50 minutes, the
unit will stay in delayed start mode until 14:10,
and then the cooking process will start.
«+/-» buttons (17)
Use the «+/-» buttons (17) to select food type
and cooking program, to set cooking time, heat-
ing element temperature and the delayed start
function.
«TIME» button (18)
Use the button to switch to setting current time,
cooking time and heating element temperature.
«MULTICOOK» Button (19)
This program allows to set both the cooking
time and the heating element temperature (from
+30°C to +160°C). Allows to set up to 6 cooking
steps, each of them has its own cooking duration
and heating element temperature.
Use this button (19) for quick access to the pro-
gram «Multicook» and for switching to the next
cooking step (when setting the cooking pro-
gram).
Setting the «Multicook» program
–
Press the MULTICOOK button (19), the but-
ton (19) illumination and the first cooking step
indicator will light up.
–
Use the buttons (17) «-/+» to set the cooking
temperature.
–
Press the «TIME» button (18). Use the buttons
«+/-» (17) to set the cooking time.
VT-4222.indd 5
27.08.2014 11:58:48
Содержание
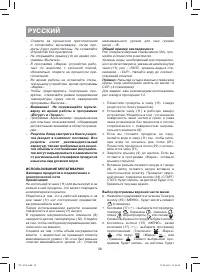
- 23 крайнюю
- 24 Не заменяйте чашу другой ёмкостью.; ПЕРЕД ПЕРВЫМ ИСПОЛЬЗОВАНИЕМ
- 25 устанавливайте; Настройка программы «Мультиповар»; Прикоснитесь
- 27 Тушение
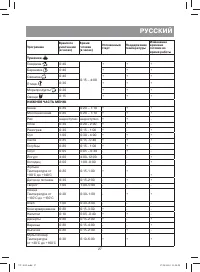
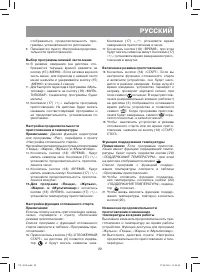
- 28 ледите за тем, чтобы объём ингредиентов; Выбор программы верхней части меню
- 29 Выбор программы нижней части меню; коснитесь; Настройка функция отложенного старта; и будут мигать символы часа.; Включение режима приготовления; ления будет завершена, символ; Функция поддержания температуры
- 30 Завершение приготовления
- 31 ХРАНЕНИЕ; Срок службы прибора – 3 года
- 52 RUS


