Мультиварки VITEK VT-4219 W - инструкция пользователя по применению, эксплуатации и установке на русском языке. Мы надеемся, она поможет вам решить возникшие у вас вопросы при эксплуатации техники.
Если остались вопросы, задайте их в комментариях после инструкции.
"Загружаем инструкцию", означает, что нужно подождать пока файл загрузится и можно будет его читать онлайн. Некоторые инструкции очень большие и время их появления зависит от вашей скорости интернета.


7
ENGLISH
BEFORE THE FIRST USE
After the unit transportation or storage at low
temperature it is necessary to keep it for at least
two hours at room temperature before switching
on.
–
Unpack the unit, remove any stickers and package
materials that can prevent normal operation of the
multicooker.
–
Place the unit on a flat, heat-resistant surface
away from all kitchen heat sources (gas cooker,
electric cooker or cooking unit).
–
Place the multicooker keeping at least a 20 cm
gap between the multicooker body and the wall
and at least a 30-40 cm gap above the unit.
–
Do not place the multicooker close to the objects
that can be damaged by the released steam of
high temperature.
Attention! Do not use the unit near bath tubs,
kitchen sinks or other containers filled with water.
–
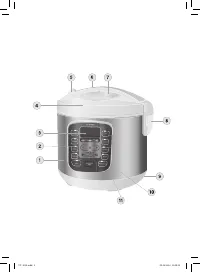
Open the lid (4) by pressing the button (5) and
pulling the handle (6).
–
Wash all the removable parts - the bowl (12),
steam cooking basket (13), soup ladle (14), spat-
ula (15) and measuring cup (16), yogurt cups (22)
and small lids (23) - with a soft sponge with neutral
detergent, then rinse under running water and dry.
–
Clean the unit body with a damp cloth, then wipe
it dry.
USING OF THE MULTICOOKER
–
Place the food in the bowl following the recipe (see
“Recipe book”).
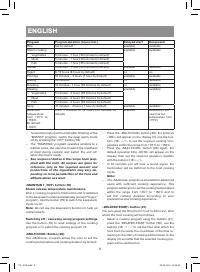
Note: Make sure that the ingredients and liquids level
does not exceed the maximal mark “1.8L” andthat it is
not lower than the minimal mark “0.6L”. Maximal level
mark for porridges (except rice) is «1.4L»
General example of loading products and water
(as an example rice is considered)
Measure rice with the measuring cup (16) (one mea-
suring cup is equal to approximately 160 grams of
rice), wash it and place in the casserole.
Add water up to the corresponding level.
For simplicity use the graduated scale in cups (CUP).
The scale has graduation, marking proportions of rice
and water.
Example: If you put four measuring cups of cereal,
pour water up to the mark of 4 cups (CUP).
For cooking thin milk porridges the recommended
proportion of rice and water is 1:3.
–
Put the bowl (12) in the process chamber. Make
sure that the outer surface of the bowl (12) is
clean and dry, and the bowl itself (12) is placed
evenly and is in secure contact with heating ele-
ment (10) surface.
Notes:
–
do not use the bowl (12) for washing cereals and
do not chop products in it, this can damage the
non-stick coating;
–
make sure that there are no foreign objects, dirt or
moisture in the process chamber and on the bot-
tom of the bowl (12);
–
wipe the outer surface and the bottom of the
bowl (12) dry before use;
–
there is a temperature sensor (11) in the mid-
dle of the heating element (10); make sure that
nothing prevents free sensor movement.
–
If you steam products, pour water into the bowl
(12) so that boiling water doesn’t reach the bot-
tom of the basket (13). Put the basket with food
(13) into the bowl (12).
–
Close the lid (4) until click.
–
Insert the power cord jack into the connector (9)
and the power cord plug into the socket. You will
hear a sound signal, the «8888» symb ols will light
up on the display (3) and the “Rice” cooking pro-
gram indicator will be flashing.
–
Use the buttons (17) to select the desired auto-
cooking program, the cooking program indicator
will light up
Attention!
If you switched an auto-cooking program on by
pressing one of the buttons (17) without making
additional program settings, in 10 seconds you
will hear a sound signal and the multicooker will be
switched on in the selected food cooking mode.
–
If necessary, enter the required cooking program
duration time, set the time by consequent pressing
of the buttons (18) «-/+», the numerical data will be
shown on the display (3).
Note: If you select the cooking program “Rice”, then
setting of the cooking duration time will be unavailable,
proceed to the next step of setting.
–
Set the delayed start function, if necessary. For
this purpose press the “DELAYED START” button
(20) and then use the buttons (18) «-/+» to set the
time, after which cooking will be finished. If you
want to start cooking immediately, skip this step.
–
Cooking will start automatically a few seconds af-
ter the setting is completed, the display will show
the operation remaining time (for all programs ex-
cept the “Rice” program).
–
Sound signals will notify on finishing of cooking,
the unit will be automatically switched to the keep
warm mode (except for the “Yogurt” program), the
display (3) will show time of the multicooker opera-
tion in the keep warm mode.
–
To cancel the keep warm mode, press the “OFF”
button (19).
VT-4219.indd 7
09.04.2014 16:50:30


