Мультиварки VITEK VT-4215 BW - инструкция пользователя по применению, эксплуатации и установке на русском языке. Мы надеемся, она поможет вам решить возникшие у вас вопросы при эксплуатации техники.
Если остались вопросы, задайте их в комментариях после инструкции.
"Загружаем инструкцию", означает, что нужно подождать пока файл загрузится и можно будет его читать онлайн. Некоторые инструкции очень большие и время их появления зависит от вашей скорости интернета.


6
ENGLISH
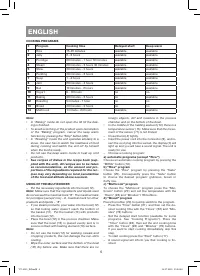
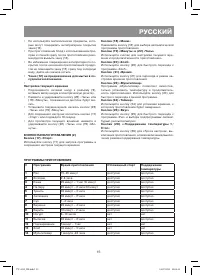
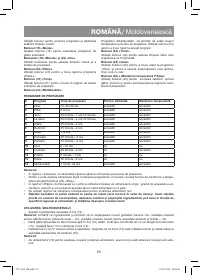
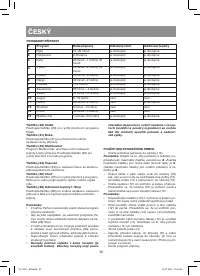
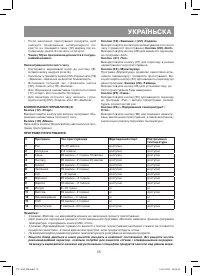
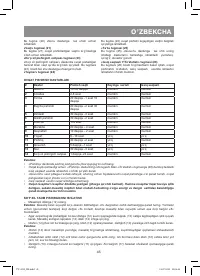
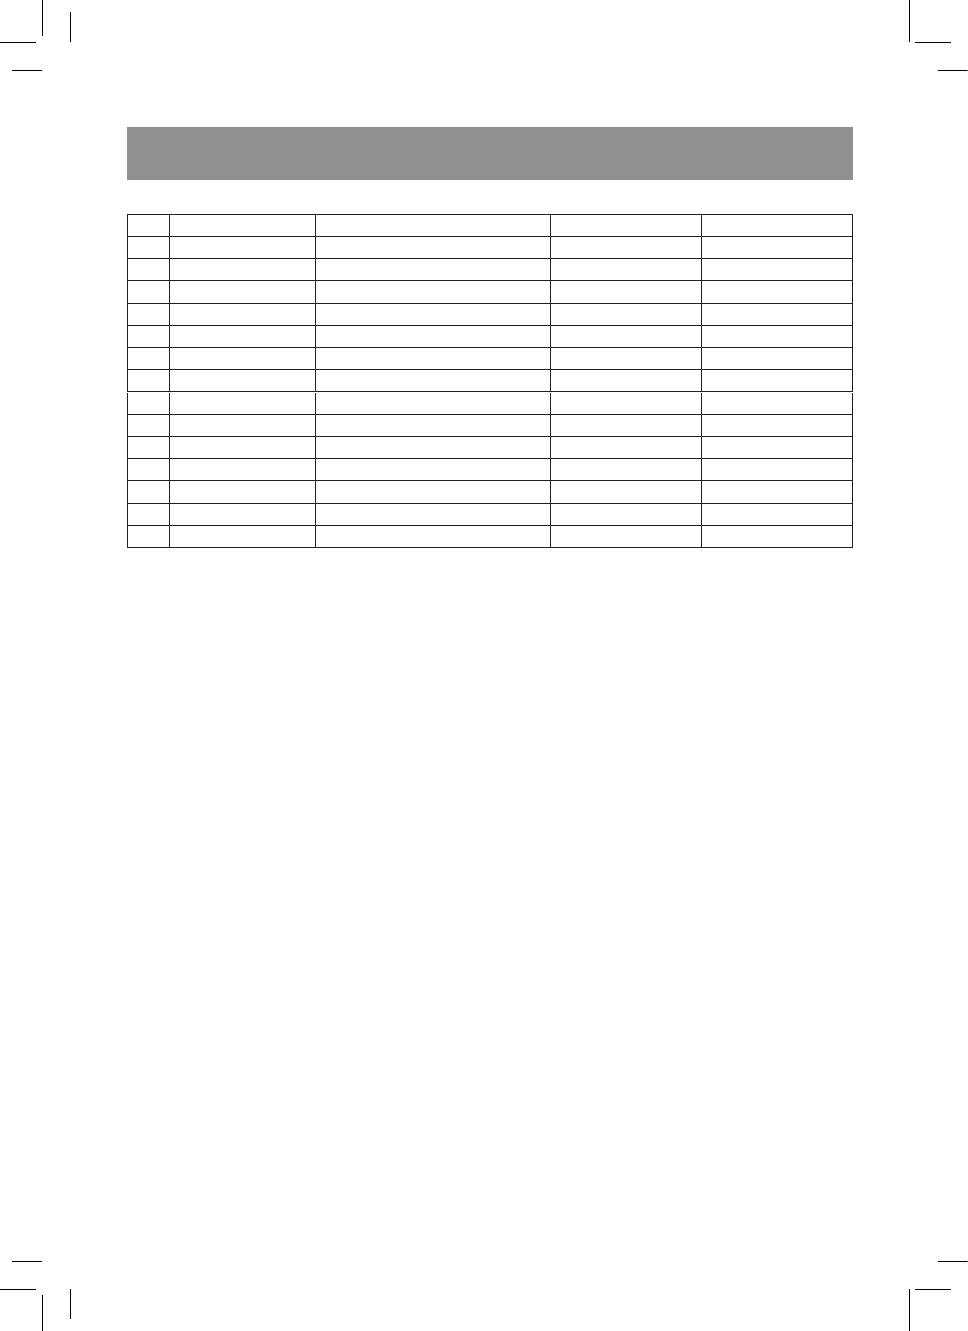
cookiNG ProGrAMS
#
Program
cooking time
Delayed start:
keep warm
1
Rice
15-45 minutes
available
available
2
Jelly
2 - 8 hours
available
available
3
Porridge
20 minutes - 1 hour 10 minutes
available
available
4
Steam
20 minutes - 2 hours 30 minutes
available
available
5
Stew
30 minutes - 3 hours
available
available
6
Pudding
30 minutes - 2 hours
available
available
7
Soup
1 - 4 hours
available
available
8
Jam
20 minutes - 4 hours
available
available
9
Boil
10 minutes - 2 hours
available
available
10
Yogurt
6 - 10 hours
no
no
11
Baking
40 minutes - 2 hours
no
available
12
Roasting
5 minutes - 1 hour
no
no
13
Bread
30 minutes - 3 hours
no
no
14
Multicook
1 minute - 24 hours
available
available
Note:
•
In “Baking” mode do not open the lid till the bak-
ing is finished.
•
To avoid scorching of the product upon termination
of the “Baking” program, cancel the keep warm
function by pressing the “Stop” button (26).
•
In “Roasting” mode the unit operates similarly to a
stove, the user has to watch the readiness of food
during cooking and switch the unit off by himself
when the food is ready.
•
Do not use the keep warm mode to heat up cold
products.
•
See recipes of dishes in the recipe book (sup-
plied with the unit). All recipes are to be taken
as recommendations, as the amount and pro-
portions of the ingredients required for the rec-
ipes may vary depending on local peculiarities
of the food and altitude above sea level.
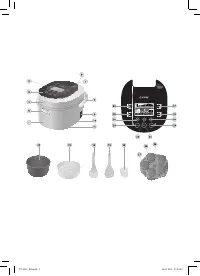
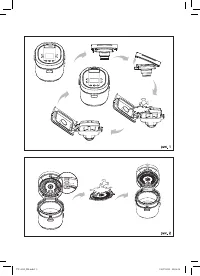
uSiNG oF tHe Multicooker
–
Put the necessary ingredients into the bowl (12).
Note:
Make sure that the ingredients and liquids level
do not exceed the maximal mark “8”. The maximal mark
for porridges (except rice) - 6, maximal mark for other
products and liquids – “8”.
–
If you steam products, pour water into the bowl (12)
so that boiling water doesn’t reach the bottom of
the basket (13). Put the basket (13) with products
into the bowl (12).
–
Place the bowl (12) in the process chamber. Make
sure that the bowl (12) is placed evenly and is in
secure contact with heating element (10) surface.
Note:
•
Do not use the bowl (12) for washing cereals and
chopping products, this can damage the non-stick
coating.
•
Wipe the outer surface and the bottom of the bowl
(12) dry before use. Make sure that there are no
foreign objects, dirt and moisture in the process
chamber and on the bottom of the bowl.
•
In the middle of the heating element (10) there is a
temperature sensor (11). Make sure that the move-
ment of the sensor (11) is not limited.
–
Close the lid (4) tightly.
–
Insert the power cord into the connector (9), and in-
sert the cord plug into the socket, the display (3) will
light up and you will hear a sound signal. The unit is
ready for use.
–
Choose a cooking program:
a) automatic programs (except “rice”)
Choose an automatic cooking program by pressing the
“MENU” button (18).
b) “rice” program
Choose the “Rice” program by pressing the “Taste”
button (25). Consequently press the “Taste” button
to choose the desired program: glutinous, brown or
fluffy rice.
c) “Multicook” program
To choose the “Multicook” program press the “Mul-
ticook” button (23) and set the temperature with the
“Hours” (22) and “Minutes” (19) buttons.
d) “Bread” program
Press the button (20) to quickly switch to the program.
–
Press the “Time” button (21), and then set the de-
sired cooking time with the “Hours” (22) and “Min-
utes” (19) buttons.
–
Set the delayed start function (available for some
programs. See “Cooking Programs”). Press the
“Timer” button (24), then set the end cooking time
with the “Hours” (22) and “Minutes” (19) buttons.
If you want to start cooking immediately, skip this
step.
–
To start cooking press the “Start” button (17).
–
A sound signal will inform you that cooking is fin-
ished.
VT-4215_IM.indd 6
24.07.2013 15:04:40
Содержание
- 14 Не накрывайте мультиварку во время работы.; ПЕрЕД ПЕрвЫМ иСПОльЗОваНиЕМ; После транспортировки или хранения
- 16 иСПОльЗОваНиЕ Мультиварки; Выберите программу приготовления:; а) автоматические программ
- 17 ПрОГраММа «ЙОГурт»; Примечание; ЧиСтк а и уХОД; Отключите устройство и произведите его чистку.; кОМПлЕктаЦиЯ; Срок службы прибора – 3 года


