
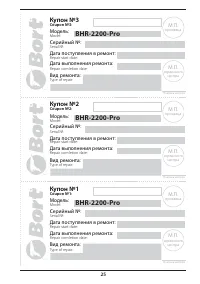
Мойки высокого давления Bort BHR-2200 - инструкция пользователя по применению, эксплуатации и установке на русском языке. Мы надеемся, она поможет вам решить возникшие у вас вопросы при эксплуатации техники.
Если остались вопросы, задайте их в комментариях после инструкции.
"Загружаем инструкцию", означает, что нужно подождать пока файл загрузится и можно будет его читать онлайн. Некоторые инструкции очень большие и время их появления зависит от вашей скорости интернета.


8
tion .
• The cross-section of any extension cables used must
be proportional to their length, i .e . the longer the ex-
tension cable, the greater the cross-section; cables with
a protection level of “IPX5” must be used .
• Position the high pressure
cleaner AS NEAR POSSIBLE
to the water supply .
• Use the high pressure
cleaner only with accessories
and replacement parts authorized by the manufacturer .
The use of original accessories and replacement parts
will ensure safe, trouble-free operation .
• Avoid unintentional firing of the trigger . Do not carry
the lance / trigger assembly with your hand over the
trigger . Always use the trigger lock mechanism .
• Ensure that the safety lock on the trigger is used,
when you have stopped using the pressure washer to
prevent accidental operation .
• Do not use the cleaner with inflammable or toxic liq-
uids, or any products which are not compatible with the
correct operation of the high pressure
cleaner .
• Do not direct the water jet towards the unit itself,
electrical parts or towards other electrical equipment .
• Do not allow children or incompetent persons to use
the high pressure
cleaner .
• Do not touch the plug and/or socket with wet hands .
• Do not use the high pressure
cleaner if the electrical
cable is damaged .
• Do not use the high pressure
cleaner if the high pres-
sure hose is damaged .
• Do not jam the trigger in the operating position .
• Check that the data plates are affixed to the high
pressure
cleaner, if not, inform your dealer . Cleaners
without plates must NOT be used as they are unidenti-
fiable and potentially dangerous .
• Do not tamper with or alter the calibration of the safe-
ty valve .
• Do not alter the original diameter of the spray head
nozzle .
• Do not leave the high pressure
cleaner unattended .
• Do not move the high pressure
cleaner by pulling on
the electrical cable .
• All electrical conductors MUST BE PROTECTED against
the water jet .
• The high pressure cleaner MUST ONLY BE CONNECT-
ED to a correctly earthed power supply .
• The high pressure may cause materials to bounce off
surfaces at speed; therefore protective clothing and
safety goggles MUST BE WORN .
• Before doing work on the cleaner, REMOVE the plug .
• Before pressing the trigger, GRIP the gun firmly to
counteract the recoil .
• Maintenance and/or repair of electrical components
MUST be carried out by qualified staff .
• DISCHARGE residual pressure before disconnecting
the high pressure
cleaner hose .
• Before using the high pressure
cleaner, CHECK every
time that the screws are fully tightened and that there
are no broken or worn parts .
• Only USE detergents which will not corrode the coat-
ing materials of the high pressure hose/electrical cable
• ENSURE that all people or animals keep a minimum
distance of 16 yd . (15m) away .
ASSEMBLY
Please read the below Operation Instruction carefully
and follow it to avoid any problems when installing and
operating the appliance . Please go to the dealer for ex-
change if assembly fails for not-matching accessories .
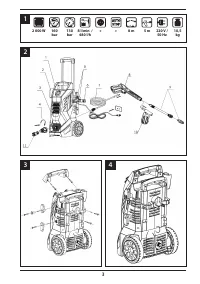
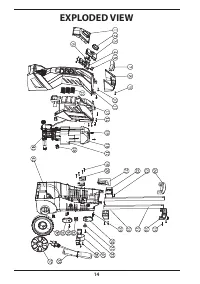
1 . Fixing the handle and cord hook with enclosed
screw and fixing foam canon hook . See figures 3 and 4;
2 . Fixing the gun holder . See figures 5 and 6;
3 . Connecting the water inlet hose to the water inlet
adapter . See figure 7 and 8;
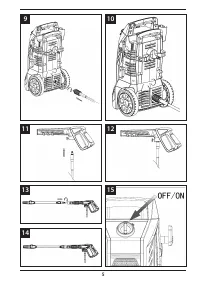
4 . Connecting the pressure hose to the unit . See fig-
ures 9 and 10;
5 . Connecting the pressure hose to the gun handle .
See figures 11 and 12;
6 . Connecting the gun lance to the gun handle . See
figures 13 and 14;
7 . Turning the tap on, making sure that the tap is fully
open .
8 . Triggering the gun to expel the air in the unit before
its working;
9 . Turning the On/Off switch to the Off position . See
figure 15;
10 . Putting plug into socket of main electric power .
Now, the pressure washer is ready for use .
PRE-OPERATION:
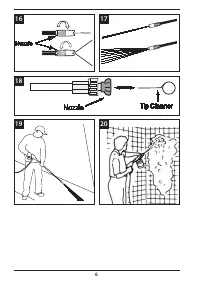
Adjusting fan pattern
The angle of spray coming out of the lance may be ad-
justed on some lances by rotating the nozzle . This will
vary the spray pattern from approximately a 0° narrow
high impact stream to a 60° wide fan spray (fig . 16-17) .
A narrow stream has high impact force on the clean-
ing surface and results in maximum deep cleaning in
a concentrated area . However, this narrow high impact
spray must be used cautiously, as it may damage some
surfaces .
A wide fan pattern will distribute the impact of the
water over a larger area, resulting in excellent cleaning
action with a reduced risk of surface damage, Large sur-
face areas can be cleaned more quickly using a wide
fan pattern .
Nozzle cleaning instructions
A clogged or partially clogged nozzle can cause a sig-
nificant reduction of water coming out of the nozzle
Характеристики

Остались вопросы?Не нашли свой ответ в руководстве или возникли другие проблемы? Задайте свой вопрос в форме ниже с подробным описанием вашей ситуации, чтобы другие люди и специалисты смогли дать на него ответ. Если вы знаете как решить проблему другого человека, пожалуйста, подскажите ему :)


