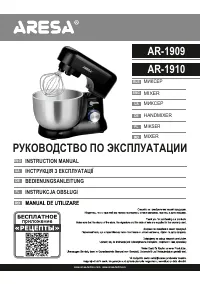
Миксеры ARESA AR-1909 - инструкция пользователя по применению, эксплуатации и установке на русском языке. Мы надеемся, она поможет вам решить возникшие у вас вопросы при эксплуатации техники.
Если остались вопросы, задайте их в комментариях после инструкции.
"Загружаем инструкцию", означает, что нужно подождать пока файл загрузится и можно будет его читать онлайн. Некоторые инструкции очень большие и время их появления зависит от вашей скорости интернета.


РУССКИЙ
ENGLISH
TECHNICAL SPECIFICATIONS
Please read this instruction manual carefully before using the appliance.
Save the instruction manual as you may require it in future.
The device
should be used
for mixing products
(f
or beating eggs,
cream, cocktails, mousse, omelet, dough, mashed potatoes, sauces and other products
)
.
For household use, not suitable for industrial use.
The device is intended for use only for domestic purposes in accordance with this Instruction Manual.
After unit transportation or storage at low temperature it is necessary to keep it for at least 4 hours at room temperature
before switching on.
Supply voltage: 220-240 V ~ 50 Hz
Power: 1000 W
IMPORTANT SAFEGUARDS
• Read this manual carefully before operating the unit to avoid damage during use. Incorrect
usage
can lead to damage to the product, cause material damage or
cause damage to the health of the user.
• Before
the first use
check that the product specifications match the mains supply.
• The device is not intended for use by persons (including children) with reduced physical, sensory or mental abilities or if they have no experience or knowledge, if they
are not controlled or instructed about the use of the device by a person,responsible for their safety.
• Do not use the appliance if the cord or plug is damaged, or if the appliance is damaged or defective. Take it to the service Centre. The appliance must be repaired only
by an authorized service center. Do not repair the appliance yourself.
• If the power cord is damaged, it must be replaced by the manufacturer, after-sales service or similar qualified staff.
• Before disconnecting from the mains, make sure that the speed selector is in the "0" position. Do not pull on the power cord, do not wind do not twist it.
• To avoid electric shock, do not immerse the appliance in water or other liquids, do not wash the mixer with running water. If the device
fell into the water, do not touch the water! Immediately unplug the appliance and then remove it. Contact the service center for inspection or repair of the product.
• Do not let the cord hang over the edge of the table or over hot surfaces.
• Do not handle the power cord with wet hands.
• Unplug the appliance if it is not in use, and if you want to remove or add accessories and before cleaning. Do not leave the appliance included.
• Do not place the appliance, nor its components in the dishwasher.
• Do not use the appliance for purposes other than those specified in the instruction manual. • Do not allow children to use the mixer or its parts.
• Be extremely careful when children are near the appliance. • Do not use the appliance near hot surfaces.
• Before using the appliance, make sure that the
attachments
are correctly installed in the mixer.
• Make sure that the motor has completely stopped before removing the
attachments
.
• Do not use accessories that are not included in the delivery.
• This appliance is intended for household use only. Do not use it for commercial or other purposes that go beyond household use.
• The mixer is designed exclusively for food processing. Do not mix paint and solvents with a mixer.
• Do not use the appliance outdoors.
• Make sure that the plug of the appliance is suitable for your outlet. Otherwise, contact the service center for assistance. Do not use If the power cord and / or plug are
damaged.
• Do not operate the device with wet hands.
• Do not touch the rotating parts with your hands or other objects during operation!
• Do not use the appliance and its accessories in a microwave oven.
• Do not use the appliance for hard and hard ingredients and inedible parts of products. When working with viscous products, the engine may burn out.
• The manufacturer reserves the right to make minor changes to the product design without additional notice,
not affecting its safety, performance and functionality.
• Keep this instruction manual.
OPERATION
Warranty period
in
the European Union
-
twenty four
months
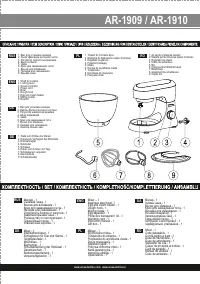
Unpack the device and make sure that there are all the accessories in the set (see the Contents section).
Remove the packing materials from the device. Make sure that the accessories and the power cord are not damaged. Before the first use clean all the parts of the
appliance that will come into contact with food (attachments, bowl, bowl lid).
Before assembling the mixer make sure the power cord is unplugged. Never connect the appliance to the mains without the installed bowl.
1. Place the device on a flat, clean and dry surface.
2. Press the locking lever (2) of the motor part and lift it up.
3. Install the bowl (5) into the base, aligning the tabs on the bowl with the grooves on the base, and turn clockwise until it locks.
4. Put some food in the bowl. Please do not overload the bowl. Please note that the maximum amount of ingredients should not exceed 2/3 of the bowl.
5. Select the necessary attachment and install it on the shaft (1).
To install the attachment align the groove on its mounting end with the pin on the working shaft, push it up and turn it counterclockwise until it stops.
Whisk (7) is used for whipping eggs, cream, for making air creams, mousses, desserts.
The dough hook (6) is used for kneading heavy dough.
The mixing attachment (8) is used to prepare batter, creams, icing, mashed potatoes, tomato paste.
Attention! Use only the attachments supplied with this appliance.
6. Press the locking lever (2) and move the motor part of the device down.
7. Install the bowl lid (9).
Attention! When the appliance is in operation, you can add the ingredients to the bowl only through a special hole in the bowl lid.
Attention! Never remove the bowl while the appliance is plugged in, it can be dangerous!
Switching on the device.
1. Unwind the power cord of the appliance.
2. Insert the plug into the outlet, making sure that the speed control (3) is in "0" position.
3. This device has an 8-step speed controller.
4. Turn on the device by turning the speed control knob clockwise.
Attention! To avoid splattering of food, turn on the appliance at a low speed first and then increase it gradually.
Attention! For kneading the dough with a hook or mixing attachment, it is recommended to use the lowest speed setting, while the highest speed is recommended for whipping.
ATTENTION! The time of continuous operation of the device should not exceed 6 minutes when using the dough hook, and 13 minutes for the whisk.
The recommended break between switching on is 30 minutes.
5. For activation of pulse mode, turn the speed control knob counterclockwise to “P” position and hold it.
In pulse mode the mixer works as long as you hold the regulator. If released, it will automatically return to "0" position.
Adding ingredients and changing attachments.
1. Turn off the device by moving the speed control knob to “0” position. Disconnect the appliance from the mains by unplugging the power cord.
2. Wait until the drive has come to a complete stop.
3. Press locking lever (2) and lift it up.
4. Replace the attachment.
5. Add ingredients to the bowl.
6. Pressing the locking lever (2), move down the motor part of the device.
7. Plug the device in, turn it on by setting the required speed with the speed regulator (3).
8. When the appliance is in operation, use only the special hole in the bowl lid (9) for adding ingredients.
ATTENTION THERE IS
RISK OF INJURY FROM ROTATING NOZZLES!
During operation of the device do not put your hands, other parts of the body and various objects into the bowl.The nozzles can be replaced only after the drive has come
to a complete stop with the device is disconnected from the mains. Never remove the bowl when the appliance is plugged in, it can be dangerous!
After finishing work
1. Set the speed control knob (3) to "0" position and disconnect the device from the mains by pulling out the power plug from the socket.
Wait until the drive has come to a complete stop.
2. Remove the bowl lid.
3. Press the locking lever (2) and lift up the motor part.
4. Remove the nozzle from the shaft (1) by pushing it up along the drive axis and turning it clockwise.
5. Remove the bowl (5) by turning it counterclockwise and take it out from the base of the appliance.
Характеристики

Остались вопросы?Не нашли свой ответ в руководстве или возникли другие проблемы? Задайте свой вопрос в форме ниже с подробным описанием вашей ситуации, чтобы другие люди и специалисты смогли дать на него ответ. Если вы знаете как решить проблему другого человека, пожалуйста, подскажите ему :)


