Микроволновые печи VITEK VT-2453 W - инструкция пользователя по применению, эксплуатации и установке на русском языке. Мы надеемся, она поможет вам решить возникшие у вас вопросы при эксплуатации техники.
Если остались вопросы, задайте их в комментариях после инструкции.
"Загружаем инструкцию", означает, что нужно подождать пока файл загрузится и можно будет его читать онлайн. Некоторые инструкции очень большие и время их появления зависит от вашей скорости интернета.


7
ENGLISH
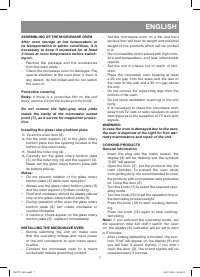
ASSEMBLING OF THE MICROWAVE OVEN
After oven storage at low temperature or
its transportation in winter conditions, it is
necessary to keep it unpacked for at least
3 hours at room temperature before switch-
ing on.
–
Remove the package and the accessories
from the oven cavity.
–
Check the microwave oven for damages. Pay
special attention to the oven door. If there is
any defect, do not install and do not switch
the oven on.
Protective covering
Body:
if there is a protective film on the unit
body, remove it from the surface of the body.
Do not remove the light-gray mica plate
inside the cavity at the microwave output
point (7), as it serves for magnetron protec-
tion.
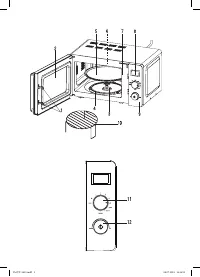
Installing the glass rotary bottom plate
13.
Open the oven door (2).
14.
Set the roller support (3) of the glass rotary
bottom plate into the opening located in the
bottom of the oven cavity.
15.
Install the roller ring (4).
16.
Carefully set the glass rotary bottom plate
(5) on the roller ring (4) and the support (3).
Never set the glass rotary bottom plate with
its bottom side up.
Notes:
•
Do not prevent rotation of the glass rotary
bottom plate (5) while oven operation.
•
Always use the glass rotary bottom plate (5)
and the roller support (3) when cooking.
•
Food and cookware should be always placed
only on the glass rotary bottom plate (5).
•
During operation of the oven the glass rotary
bottom plate (5) can rotate clockwise or
counterclockwise.
•
If cracks or chops appear on the glass rotary
bottom plate (5), replace it immediately.
INSTALLING THE MICROWAVE OVEN
–
Before switching the unit on, make sure
that the operating voltage and input power
of the unit correspond to your mains speci-
fication.
–
Connect the microwave oven to a mains
socket with reliable grounding contact.
–
Set the microwave oven on a flat and hard
surface that will bear its weight and maximal
weight of the products which will be cooked
in it.
–
Do not install the unit in places with high mois-
ture and temperature, and near inflammable
objects.
–
Set the unit in places out of reach of chil-
dren.
–
Place the microwave oven keeping at least
a 20 cm gap from the sides and the rear of
the oven to the wall and a 30 cm gap above
the unit.
–
Do not remove the supporting legs from the
bottom of the oven.
–
Do not block ventilation openings in the unit
body.
–
It is necessary to place the microwave oven
away from TV-sets or radio receivers to avoid
interferences in the reception of TV and radio
signals.
WARNING:
In case the oven is damaged due to the user,
the user is deprived of the right for free war-
ranty maintenance and repair of the unit.
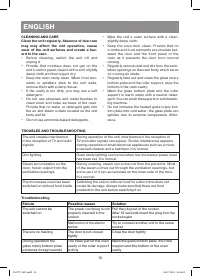
COOKING PRODUCTS
General information
–
Insert the plug into the mains socket, the
display (8) will be flashing and the symbols
“0:00” will appear.
–
Open the door (2), put the products into the
oven chamber. To prevent the oven cavity
from getting dirty, it is recommended to cover
the products with a microwave-safe protective
lid. Close the door (2).
–
Turn the knob (11) to select the required oper-
ating mode.
–
Turn the knob (12) to set the operation time or
the defrosting product weight.
–
Press the knob (12) to start cooking/defrost-
ing.
–
Press the knob (12) again to stop cooking/
defrosting.
Note: if you selected the operating mode, set
the operation time but didn’t switch the oven
on, the display (8) indication will be set to zero
in 2 minutes.
–
After cooking/defrosting is finished, the sym-
bols “End” will appear on the display (8) and
you will hear 3 sound signals; if you didn’t
open the door (2), the sound signals will be
repeated every 3 minutes.
IM VT-2453.indd 7
04.07.2018 16:34:53
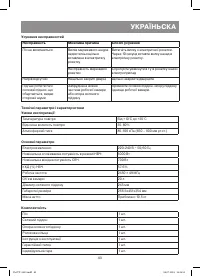
Характеристики

Остались вопросы?Не нашли свой ответ в руководстве или возникли другие проблемы? Задайте свой вопрос в форме ниже с подробным описанием вашей ситуации, чтобы другие люди и специалисты смогли дать на него ответ. Если вы знаете как решить проблему другого человека, пожалуйста, подскажите ему :)


