
Метеостанции VITEK VT-6413 - инструкция пользователя по применению, эксплуатации и установке на русском языке. Мы надеемся, она поможет вам решить возникшие у вас вопросы при эксплуатации техники.
Если остались вопросы, задайте их в комментариях после инструкции.
"Загружаем инструкцию", означает, что нужно подождать пока файл загрузится и можно будет его читать онлайн. Некоторые инструкции очень большие и время их появления зависит от вашей скорости интернета.

ENGLISH
6
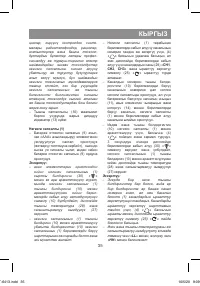
– Use the «
» (6) and «
» (7) buttons to
select the date format. Press the «
» (8)
button to confirm the selected date for-
mat. Flashing numerical indication of the
«month» (24) will appear on the display.
– Use the «
» (6) and «
» (7) buttons to
set the current «month». Press the «
»
(8) button to confirm the setting. Flashing
numerical indication of the «day» (24) will
appear on the display.
– Use the «
» (6) and «
» (7) buttons
to set the current «day». Press the «
»
(8) button to confirm the setting. Flashing
numerical indication of the time format
«24Н» or «12Н» (21) will appear on the
display.
Notes: - when the current time is displayed
in the 12-hour format «12Н», the «PM» (20)
indicator will appear on the display (1).
– Use the «
» (6) and «
» (7) buttons
to select the time format. Press the «
»
(8) button to confirm the selected for-
mat. Flashing numerical indication of the
current time «clock» (21) will appear on
the display.
– Use the «
» (6) and «
» (7) buttons
to set the current time «clock». Press the
«
» (8) button to confirm the setting.
Flashing numerical indication of the cur-
rent time format «minutes» (21) will appear
on the display.
– Use the «
» (6) and «
» (7) buttons to
set the current time «minutes». Press the
«
» (8) button to confirm the setting.
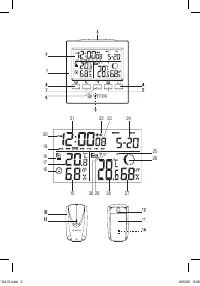
The current time, date, and day of the week
corresponding to the set date (19) will appear
on the display (2). The day of the week indica-
tor with change with the calendar:
Sun.
Mon.
Tue.
Wed. Thru.
Fri.
Sat.
SUN MON TUE WED THU
FRI
SAT
– To see the current «year» setting, press
the «
» (8) button. In 8 seconds the cur-
rent time (21) will automatically appear on
the display (2).
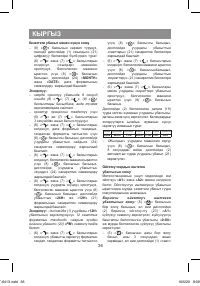
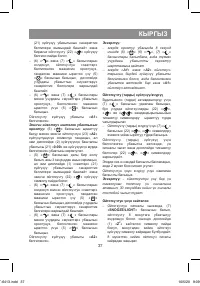
Alarm setting
This weather station model allows for using
two alarms «A1» and «A2». Before setting
the alarm make sure that the current time is
set correctly.
Setting the first alarm: Press the «
»
(5) button once. The first alarm indicator
«А1» (23), the initial alarm (21) «0:00»,
and the previous alarm will appear on the
display (2).
– Press the «
» (5) button a second time,
and hold it for at least 3 seconds - flashing
numerical alarm indication «clock» (21),
and the first alarm indicator «
» (22) will
appear on the display (1).
– Use the «
» (6) and «
» (7) buttons
to set the alarm «clock». Press the «
»
(5) button to confirm the setting. Flashing
numerical indication of the alarm «min-
utes» will appear on the display.
– Use the «
» (6) and «
» (7) buttons to
set the alarm «minutes». Press the «
»
(5) button to confirm the setting.
The alarm «A1» is set.
Setting the second alarm: Tap the «
» (5)
button and select the second alarm indica-
tor «А2» (23). The initial alarm (21) «0:00»,
and the previous alarm will appear on the
display (2).
– Press the «
» (5) button a second time,
and hold it for at least 3 seconds - flashing
numerical alarm indication «clock» (21),
and the second alarm indicator «
» (22)
will appear on the display (1).
– Use the «
» (6) and «
» (7) buttons to
set the second alarm «clock». Press the
«
» (5) button to confirm the setting.
Flashing numerical indication of the alarm
«minutes» will appear on the display.
– Use the «
» (6) and «
» (7) buttons
to set the second alarm «minutes». Press
the «
» (5) button to confirm the set-
ting.
The alarm «A2» is set.
Notes:
– if the buttons «
» (5), «
» (6), «
»
(7) are not pressed during 8 seconds
during the installation, the unit will revert
to displaying the current time.
– if the alarms «A1» and «A2» are set to go
off at the same time, only the «A1» alarm
will activate at the set time.
IM VT-6413.indd 6
10/5/20 9:09 AM


При нажатии на каждую из кнопок на приборе есть звуковой сигнал (не влияющий на работу), или сигнал есть при нажатии только на некоторые, не все кнопки?