Метеостанции VITEK VT-6409 - инструкция пользователя по применению, эксплуатации и установке на русском языке. Мы надеемся, она поможет вам решить возникшие у вас вопросы при эксплуатации техники.
Если остались вопросы, задайте их в комментариях после инструкции.
"Загружаем инструкцию", означает, что нужно подождать пока файл загрузится и можно будет его читать онлайн. Некоторые инструкции очень большие и время их появления зависит от вашей скорости интернета.


ENGLISH
6
time “minutes” (10), press the button (15)
“ALARM” to confirm.
Note: - if during setting of the current time no
setting buttons are pressed within 30 seconds,
the unit will switch to the default settings.
– During the alarm signal you can press
the button (1) to switch the alarm off for
5 minutes; the symbol (9) «
» will appear
on the display, the alarm signal will be
switched on again in 5 minutes.
– To switch the snooze function off press
any button (14, 15, 17, 18), the symbol (9)
«
» will go out.
– To switch the alarm off press the but-
ton (15) “ALARM”, the digital indications
of the alarm actuation time (7, 10) and
the symbol (11) “AL” will appear on the
display. Press the button (15) “ALARM”
again, the symbol (8) “
” will go out.
Note: - the alarm sound signal will be chang-
ing from single beeps to group signals, after
2 minutes the signal will sound constantly.
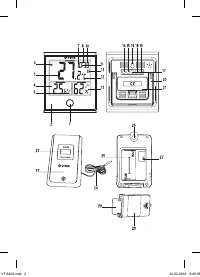
Temperature measurement
unit selection «°С or °F»
– To change the temperature measurement
units (3, 12) press one of the buttons
(17 or 18) “
▲
,
▼
”, the symbols (3 and 12)
«°С or °F» on the display will change.
Temperature changing view
– To view the temperature changes conse-
quently press the button (19) “MAX/MIN”,
the symbols “MAX, MIN” and the digital
indications of maximal and minimal tem-
perature and relative humidity (13) will be
shown on the display.
– To view the current temperature conse-
quently press the button (19) “MAX/MIN”
until the symbols “MAX, MIN” on the dis-
play will go out.
– To reset minimal and maximal temper-
ature indications press the button (19)
“MAX/MIN” once, the symbols “MAX”
will appear on the display, press the but-
ton (19) “MAX/MIN” again and hold it,
the maximal temperature indications will
be reset. To reset the minimal temper-
ature indication press the button (19)
“MAX/MIN” twice, the symbols “MIN” will
appear on the display, press the button
(19) “MAX/MIN” again and hold it, the
minimal temperature indications will be
reset.
– Unfold the base (20) and install the main
unit (2) to the desired place, if necessary
you can hang the main unit (2) on the wall
using the hanging place (16).
MAINTENANCE
•
Do not disassemble the unit by yourself,
there are no parts inside the weather sta-
tion body which require replacement.
•
Check the external sensor (22) batteries,
if the symbol “
” appears on the dis-
play, replace the batteries in the external
sensor (22).
•
Use only new batteries, do not install new
and old batteries together.
•
Insert the batteries, strictly following the
polarity.
•
After changing the batteries set the cur-
rent time on the main unit (2) and recon-
nect it with the external sensor (22).
•
Clean the main unit (2) body and the
external sensor (22) with a soft, slightly
damp cloth, and then wipe them dry.
•
Do not use abrasives or solvents.
•
Do not immers the main unit (2) and the
external sensor (22) into water or any
other liquids.
STORAGE
•
If you are not going to use the weather
station for a long time, it is recommended
to remove the batteries from the main unit
(2) and the external sensor (22).
•
Keep the unit in a dry cool place out of
reach of children and disabled persons.
DELIVERY SET
Weather station – 1 pc.
External wired sensor – 1 pc.
Instruction manual – 1 pc.
IM VT-6409.indd 6
20.02.2018 9:40:38


