Метеостанции VITEK VT-6409 - инструкция пользователя по применению, эксплуатации и установке на русском языке. Мы надеемся, она поможет вам решить возникшие у вас вопросы при эксплуатации техники.
Если остались вопросы, задайте их в комментариях после инструкции.
"Загружаем инструкцию", означает, что нужно подождать пока файл загрузится и можно будет его читать онлайн. Некоторые инструкции очень большие и время их появления зависит от вашей скорости интернета.


ENGLISH
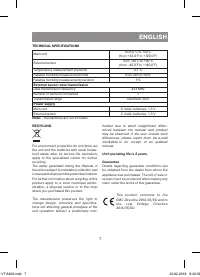
5
the unit, in some cases, the main unit (2) or
the external sensor (22) should be moved to
another location, free from the above said or
other obstacles preventing the passage of
signals from the sensor (22).
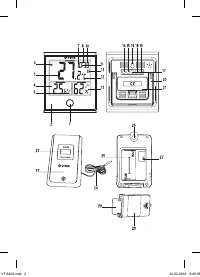
Main unit (2)
– Open the battery compartment lid (21)
and insert two “AAA” batteries (not
included), strictly following the polarity,
you will hear a sound signal and digital
indications of ambient temperature (4)
and ambient humidity (13), install the lid
(21) back to its place.
– After the batteries are installed, the main
unit (2) is mated to the external sensor
(22), and the reception indicator symbols
(6) “
” will change in increasing order,
after the main unit (2) is mated to the
external sensor (22), the indicator (6) “
”
will light constantly and the digital indica-
tions (5) of temperature measured by the
wired sensor (24), will be displayed on the
display of the main unit (2).
– The time of mating of the main unit (2)
with the external sensor (22) depends on
the data transferring conditions from the
sensor (22) and the conditions of recep-
tion by the main unit (2) and it does not
exceed 3 minutes.
Current time and date setting
Note: - Every pressing of the control panel
buttons is accompanied by a sound signal.
– Press and hold the button (14) “SET”, the
time format digital indications “24H” will
appear on the display.
– Press the button (17 or 18) “
▲
,
▼
” to
select the current time format “24H or
12H”, press the button (14) “SET” to con-
firm, the digital time indications “hours”
(7) will be flashing on the display.
– Press or press and hold the button (17 or
18) “
▲
,
▼
” to set the current time “hours”
(7), press the button (14) “SET” to con-
firm, the digital time indications “minutes”
(10) will be flashing on the display.
– Press or press and hold the button (17 or
18) “
▲
,
▼
” to set the current time “minutes”
(10), press the button (14) “SET” to con-
firm, the digital indications “years” (7, 10)
and the symbol “Yr” (11) will be flashing on
the display.
– Press or press and hold the button (17 or 18)
“
▲
,
▼
” to set the current “year”, press the
button (14) “SET” to confirm, the digital
indications “months” (10) will be flashing
on the display.
– Press or press and hold the button (17 or 18)
“
▲
,
▼
” to set the current “month” (10),
press the button (14) “SET” to confirm,
the digital indication “day” (7) will be
flashing on the display.
– Press or press and hold the button (17 or 18)
“
▲
,
▼
” to set the current “day” (7), press
the button (14) “SET” to confirm
– The digital symbols (7, 10, 11) will show
the current time.
– To view the current date press the but-
ton (14) “SET” once, the current “day” and
“month” (7 and 10) digital indications will
appear on the display.
Note: - if during setting of the current time no
setting buttons are pressed within 30 seconds,
the unit will switch to the default settings.
Alarm actuation time setting
– Press and hold the alarm setting button
(15) “ALARM”, the digital indications of
the preset alarm actuation time “hours
and minutes” (7, 10) and the symbol (11)
“AL” will be shown on the display.
– Press and hold the button (15) “ALARM”
again, the symbol (8) “
” and the digi-
tal indications of the alarm actuation time
“hours” (7) will be flashing.
– Press or press and hold the button (17
or 18) “
▲
,
▼
” to set the alarm actuation
time “hours” (7), press the button (15)
“ALARM” to confirm, the digital indica-
tions of the alarm actuation time “min-
utes” (10) will be flashing on the display.
– Press or press and hold the button (17
or 18) “
▲
,
▼
” to set the alarm actuation
IM VT-6409.indd 5
20.02.2018 9:40:38


