Метеостанции VITEK VT-6407 - инструкция пользователя по применению, эксплуатации и установке на русском языке. Мы надеемся, она поможет вам решить возникшие у вас вопросы при эксплуатации техники.
Если остались вопросы, задайте их в комментариях после инструкции.
"Загружаем инструкцию", означает, что нужно подождать пока файл загрузится и можно будет его читать онлайн. Некоторые инструкции очень большие и время их появления зависит от вашей скорости интернета.


4
ENGLISH
4
To avoid unit failures, place the batteries
into the remote sensor before the main
unit.
Place the remote sensor within the effective
data transfer range and as close as possible
to the main unit. Locate the main unit and
remote sensor in places with minimal inter-
ference for better data transfer. Take into
account that remote sensor data transfer
range depends on material of walls and their
quantity. Try several locations of remote
sensor and main unit. Though the remote
sensor is weather-resistant, it should be
placed away from direct sunlight, rain or
snow.
Home devices (doorbell, alarm system etc.)
can interfere when the main unit receives data
signal from the remote sensor. It is normal
and does not influence general operation.
Transfer and receipt of data signal will resume
after temporary interference is removed.
Installation of batteries into the remote
sensor
•
Open the battery compartment lid, by
pulling the lid down.
•
Insert 2 batteries (“ААA”, 1,5 V), strictly
following the polarity.
•
Close the battery compartment lid.
Installing batteries into the main unit
1. Open the battery compartment lid.
2. Insert 3 batteries (“ААA”, 1,5 V), following
the polarity.
3. Close the battery compartment lid.
Note:
Main unit is intended both for mains and bat-
tery supply. When the unit is powered by the
adapter, the display is illuminated constantly.
Replacing batteries of the main unit
In case of significant decrease of display
contrast, the batteries in the main unit need
to be replaced.
Replacing batteries of the remote sensor
If the battery-low pictogram appears, the bat-
teries need to be replaced.
Note:
Long remote sensor operation under
low or high temperatures can reduce voltage
of its batteries that causes decreasing of
transmission range.
Starting operation
After the main unit is connected to the
mains or the batteries are installed, 2 signal
tones will sound; display illumination will be
switched on, and a flashing symbol
, indi-
cating search of remote sensor signal, will
appear on the display.
After installing batteries into the remote sen-
sor it will start data transfer (temperature and
humidity) with an interval of about 1 minute.
After a few seconds of receiving data it will
appear on the display of the main unit. The
data is updated automatically every minute.
If there is no signal from the remote sensor,
the symbols “--“will appear in the upper-right
corner of display.
Press and hold the
▼
button for 2 seconds to
synchronize the main unit and remote sensor.
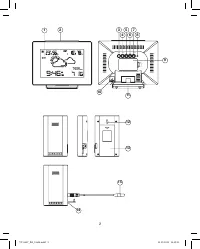
Installing the main unit and remote sen
sor
You can install the remote sensor both on a
desk and on a wall, using the appropriate hole
(12). When installing the sensor make sure,
that it is fastened properly. Do not place the
sensor close to metal surfaces. Install it within
the effective data transfer range and as close
as possible to the main unit. Locate the main
unit and remote sensor in places with minimal
interference for better data transfer. Take into
account that data transfer range (up to 30
meters in open areas) depends on the mate-
rial and quantity of walls. Try several locations
of remote sensor and main unit and select the
optimal one. Though the remote sensor is
VT-6407_IM_18x14.indd 4
15.05.2013 14:19:36


