
Метеостанции Oregon Scientific RRA320PN-B - инструкция пользователя по применению, эксплуатации и установке на русском языке. Мы надеемся, она поможет вам решить возникшие у вас вопросы при эксплуатации техники.
Если остались вопросы, задайте их в комментариях после инструкции.
"Загружаем инструкцию", означает, что нужно подождать пока файл загрузится и можно будет его читать онлайн. Некоторые инструкции очень большие и время их появления зависит от вашей скорости интернета.


LCD Clock with Projection &
Analogue FM Radio
Model: RRA320PN
USER MANUAL
EN
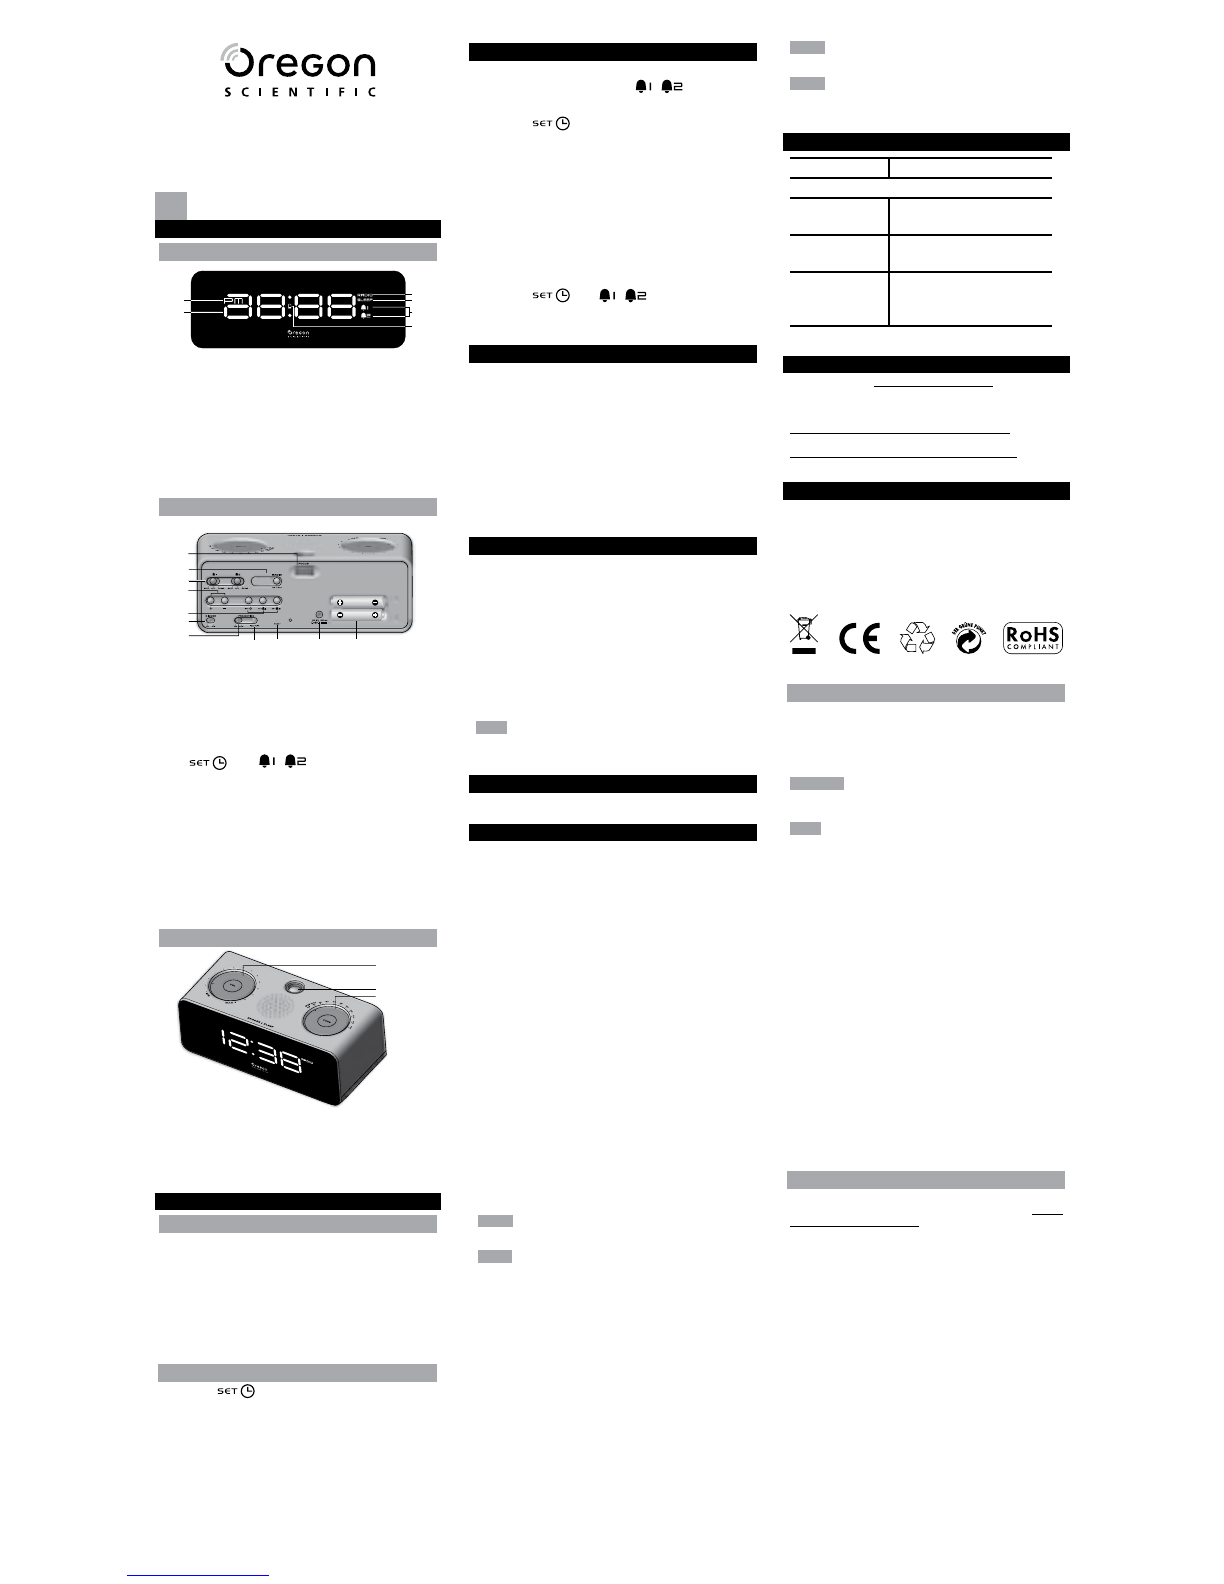
OVERVIEW
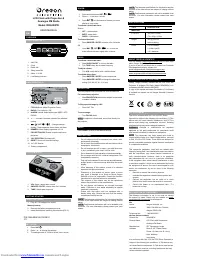
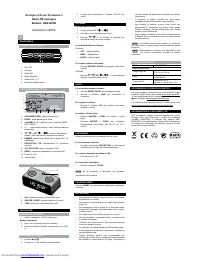
FRONT VIEW (FIG. 1)
1
2
3
4
5
6
1. AM / PM
2. Clock
3. Radio ON
4. Sleep mode ON
5. Alarm 1 / 2 ON
6. Low Battery indicator
BACK VIEW (FIG. 2)
1
2
3
5
4
6
7
8
9
10
11
1.
FOCUS
Wheel: Adjust Projection Focus
2.
RADIO
: Turn radio On / Off
3.
ALARM 1
and
2
: Select alarm type, BEEP / OFF /
RADIO
4.
+ / -
: Increase / decrease values of the selected
setting
5.
/
SET
/
, : Change settings /
display / View respective alarm status; set alarm
6.
DIMMER
: Select display brightness LO / HI
7.
PROJECTION ON
: Enable / disable continuous
projection
8.
180° ROTATION
: flip image180°
9.
RESET
: Reset unit to default settings
10. AC / DC Socket
11. Battery compartment
TOP VIEW (FIG. 3)
1
2
3
1.
VOL
: Mute / adjust radio volume
2.
SNOOZE / SLEEP
: silence alarm for 8 minutes
3.
TUNE
: Select radio frequency
GETTING STARTED
INSERT BATTERIES
1. Plug AC / DC adaptor into socket.
Memory backup:
2. Remove the battery compartment cover.
3. Insert the batteries, matching the polarities (FIG. 2).
SET CLOCK
1. Press
.
2. Press + or - to change the settings.
3. The settings order is: 12/24 hr format, hour, minute.
ALARM
To set the alarm:
1. Press and hold desired
SET
/
.
2. Press + / - to set hour / minute.
3. Press
(or 10 seconds of inaction) to return
display to clock mode.
To activate / deactivate alarm:
Slide to:
•
OFF
– disable alarm
•
BEEP
- beep alarm
•
RADIO
– Radio alarm
To silence the alarm:
• Press
SNOOZE / SLEEP
to silence it for 8 minutes
OR
• Press
,
SET
/
,
+ / -
to turn the
alarm off and activate it again after 24 hours.
RADIO
To activate / deactivate radio:
1. Slide
RADIO ON/OFF
to turn on the radio.
2. Turn
TUNE
rotary dial to select frequency
To adjust volume:
• Turn
VOL
rotary dial to mute / adjust volume.
To activate sleep timer:
•
Press
SNOOZE / SLEEP
to enter sleep mode.
• Press
SNOOZE / SLEEP
to change the sleep time.
setting (120, 90, 60, 30, 15, 0 min).
PROJECTION
This unit projects time information for your convenience.
For continuous projection:
• Slide
PROJECTION
switch when adaptor is connected,
to enable / disable.
To flip projected image by 180°:
• Press 180° Flip.
To focus image:
• Turn
FOCUS
wheel.
NOTE
If projection is illuminated, do not look directly into
the projector.
RESET
Press
RESET
to return to the default settings.
PRECAUTIONS
• Do not subject the unit to excessive force, shock, dust,
temperature or humidity.
• Do not cover the ventilation holes with any items such as
newspapers, curtains etc.
• Do not immerse the unit in water. If you spill liquid over
it, dry it immediately with a soft, lint-free cloth.
• Do not clean the unit with abrasive or corrosive materials.
• Do not tamper with the unit ’s internal components. This
invalidates the warranty.
•
Only use fresh batteries. Do not mix new and old batteries.
• Images shown in this manual may differ from the actual
display.
• When disposing of this product, ensure it is collected
separately for special treatment
.
• Placement of this product on certain types of wood
may result in damage to its finish for which Oregon
Scientific will not be responsible. Consult the furniture
manufacturer’s care instructions for information.
•
The contents of this manual may not be reproduced
without the permission of the manufacturer.
• Do not dispose old batteries as unsorted municipal
waste. Collection of such waste separately for special
treatment is necessary.
• Please note that some units are equipped with a
battery safety strip. Remove the strip from the battery
compartment before first use.
NOTE
The technical specifications for this product and the
contents of the user manual are subject to change without
notice.
NOTE
Features and accessories will not be available in all
countries. For more information, please contact your local
retailer.
SPECIFICATIONS
TYPE
DESCRIPTION
MAIN UNIT
L x W x H
183 x 67 x 81mm
(72 x 26.4 x 31.9in)
Weight
386 g (13.6 oz)
without battery
Power
6 V AC adaptor
2 x UM-4 (AAA)
1.5 V batteries
ABOUT OREGON SCIENTIFIC
Visit our website (www.oregonscientific.com) to learn more
about Oregon Scientific products.
If you’re in the US and would like to contact our Customer
Care department directly, please visit:
www2.oregonscientific.com/service/support.asp
For international inquiries, please visit:
www2.oregonscientific.com/about/international.asp.
EU-DECLARATION OF CONFORMITY
Hereby, Oregon Scientific, declares that this LCD Clock with
Projection & Analogue FM Radio (Model: RRA320PN) is in
compliance with EMC directive 89/336/CE.
A copy of the signed and dated Declaration of Conformity
is available on request via our Oregon Scientific Customer
Service.
FCC STATEMENT
This device complies with Part 15 of the FCC Rules.
Operation is subject to the following two conditions: (1) This
device may not cause harmful interference, and (2) This
device must accept any interference received, including
interference that may cause undesired operation.
WARNING
Changes or modifications not expressly
approved by the party responsible for compliance could
void the user’s authority to operate the equipment.
NOTE
This equipment has been tested and found to
comply with the limits for a Class B digital device, pursuant
to Part 15 of the FCC Rules. These limits are designed to
provide reasonable protection against harmful interference
in a residential installation.
This equipment generates, uses and can radiate radio
frequency energy and, if not installed and used in accordance
with the instructions, may cause harmful interference to
radio communications. However, there is no guarantee
that interference will not occur in a particular installation.
If this equipment does cause harmful interference to radio
or television reception, which can be determined by turning
the equipment off and on, the user is encouraged to try to
correct the interference by one or more of the following
measures:
• Reorient or relocate the receiving antenna.
• Increase the separation between the equipment and
receiver.
• Connect the equipment into an outlet on a circuit
different from that to which the receiver is connected.
• Consult the dealer or an experienced radio / TV
technician for help.
DECLARATION OF CONFORMITY
The following information is not to be used as contact
for support or sales. Please visit our website at www2.
oregonscientific.com/service for all enquiries.
We
Name:
Oregon Scientific, Inc.
Address:
19861 SW 95th Ave.,Tualatin,
Oregon 97062 USA
Telephone No.:
1-800-853-8883
declare that the product
Orologio LCD con Proiezione e
Radio FM analogica
Modello: RRA320PN
MANUALE UTENTE
IT
PANORAMICA
VISTA ANTERIORE (FIG.1)
1
2
3
4
5
6
1. AM / PM
2. Orologio
3. Radio ON
4. Modo Sleep ON
5. Allarme ON 1 / 2
6. Indicatore batteria basso
VISTA POSTERIORE (FIG. 2)
1
2
3
5
4
6
7
8
9
10
11
1.
SINTONIZZATORE
: regola la proiezione
2.
RADIO
: accende/spegne la radio
3.
ALLARMI
1
e
2
: seleziona il tipo di allarme, BEEP /
OFF / RADIO
4.
+ / -
: aumenta/diminuisce i valori dell’impostazione
selezionata
5.
/
SET
/
: modifica impostazioni /
display / stato dell’allarme; impostazione allarme
6.
DIMMER
: seleziona la luminosità del display LO / HI
(alta/bassa)
7.
PROJECTION ON
: attiva/disattiva la proiezione
continua
8.
180° ROTATION
: ruota l’immagine di 180°
9.
RESET
: ripristina le impostazioni iniziali dell’unità
10. Presa CA / DC
11. Vano batteria
VISTA DALL’ALTO (FIG. 3)
1
2
3
1.
VOL
: silenzioso/regola il volume della radio
2.
SNOOZE / SLEEP
: intervallo allarme di 8 minuti
3.
TUNE
: seleziona la frequenza della radio
PER INIZIARE
INSERIRE LE BATTERIE
1. Inserire l’adattatore CA/DC nella presa.
Backup di memoria:
2. Rimuovere il coperchio del vano batteria.
3. Inserire le batterie, facendo corrispondere i poli (FIG.
2).
IMPOSTARE L’OROLOGIO
1. Premere
.
2. Premere
+
o
–
per cambiare le impostazioni.
3. L’ordine delle impostazioni è: formato 12/24 hr, ora,
minuti.
ALLARME
Per impostare l’allarme:
1. Tenere premuto SET
or
.
2. Premere
+ / -
per impostare ora/minuti.
3. Premere
(o 10 secondi di inattività) per
ritornare al display del modo orologio.
Per attivare/disattivare l’allarme:
Utilizzare:
•
OFF
– disattiva allarme
•
BEEP
– allarme beep
•
RADIO
– allarme radio
Per rendere l’allarme silenzioso:
•
Premere
SNOOZE / SLEEP
per spegnere l’allarme per
8 minuti
OPPURE
•
Premere
,
SET
/
,
+ / -
per disattivare
l’allarme e riattivarlo dopo 24 ore.
RADIO
Per accendere/spegnere la radio:
1. Scorrere
RADIO ON/OFF
per accendere la radio.
2. Ruotare il selettore
TUNE
per selezionare la
frequenza.
Per regolare il volume:
•
Ruotare il selettore
VOL
per rendere silenzioso/
regolare il volume.
Per attivare il timer sleep:
•
Premere
SNOOZE / SLEEP
per inserire il modo
sleep.
•
Premere
SNOOZE / SLEEP
per modificare
l’impostazione oraria sleep (120, 90, 60, 30, 15, 0
minuti).
PROIEZIONE
Questo prodotto proietta informazioni utili sull’orario.
Per la proiezione continua:
•
Scorrere l’interruttore
PROJECTION
su ON quando
l’adattatore è collegato, per attivare/disattivare.
Per ruotare l’immagine proiettata di 180
°:
•
Premere ruota di 180
°
.
Per focalizzare l’immagine:
•
Ruotare il selettore
FOCUS
.
NOTE
Se la proiezione è illuminata, non guardare
direttamente nel proiettore.
FUNZIONE RESET
Premere
RESET
per ripristinare le impostazioni predefinite
dell’unità.
AVVERTENZE
•
Non sottoporre il prodotto a forza eccessiva, urti, polvere,
temperatura o a umidità.
•
Non otturare i fori di aerazione con oggetti come giornali,
tende, etc.
•
Non immergere l’unità in acqua. Se si versa del liquido
sul prodotto, asciugarlo immediatamente con un panno
morbido e liscio.
•
Non pulire l’unità con materiali abrasivi o corrosivi.
•
Non manomettere i componenti interni. In questo modo
si invalida la garanzia.
•
Utilizzare solo batterie nuove. Non mescolare batterie
nuove con batterie vecchie.
•
Le immagini del manuale possono differire dalla realtà.
•
Al momento dello smaltimento del prodotto, utilizzare la
raccolta differenziata.
•
Oregon Scientific declina ogni responsabilità per
eventuali danni alle finiture causati dal posizionamento
del prodotto su determinati tipi di legno. Consultare le
istruzioni fornite dal fabbricante del mobile per ulteriori
informazioni.
•
Il contenuto di questo manuale non può essere
ristampato senza l’autorizzazione del produttore.
•
Non smaltire le batterie vecchie come rifiuto non
differenziato. È necessario che questo rifiuto venga
smaltito mediante raccolta differenziata per essere
trattato in modo particolare.
•
Alcune unità sono dotate di una striscia di sicurezza per
le batterie. Rimuovere la striscia dal vano batterie prima
del primo utilizzo.
NOTA
Le specifiche tecniche del prodotto e il contenuto
del manuale per l’utente possono essere modificati senza
preavviso.
NOTA
Caratteristiche e accessori non disponibili in tutti
i paesi. Per ulteriori informazioni, rivolgersi al proprio
rivenditore.
SPECIFICHE TECNICHE
TIPO
DESCRIZIONE
UNITA’ PRINCIPALE
Lung x Larg x Alt
183 x 67 x 81 mm
(72 x 26.4 x 31.9 in)
Peso
386
g (13.6 oz)
senza batteria
Alimentazione
Adattatore CA 6 V
Batterie: 2 x UM-4 (AAA) 1,5 V
INFORMAZIONI SU OREGON SCIENTIFIC
Per avere maggiori informazioni sui nuovi prodotti Oregon
Scientific visita il nostro sito internet www.oregonscientific.
it, dove potrai trovare tutte le informazioni di cui hai bisogno,
oppure collegati a www.oregonscientificstore.it.
Per ricerche di tipo internazionale puoi visitare invece il sito
www2.oregonscientific.com/about/international.asp.
DICHIARAZIONE DI CONFORMITA’ UE
Con la presente Oregon Scientific dichiara che questo
Orologio LCD con Proiezione e Radio FM analogica
(modello: RRA320PN) è conforme alla direttiva EMC
89/336/CE. Una copia firmata e datata della Dichiarazione
di Conformità è disponibile, su richiesta, tramite il servizio
clienti della Oregon Scientific.
Horloge de projection LCD avec
Radio FM analogique
Modèle : RRA320PN
MANUEL DE L’UTILISATEUR
FR
VUE D’ENSEMBLE
FACE AVANT (FIG.1)
1
2
3
4
5
6
1. AM / PM
2. Horloge
3. Radio activée
4. Mode sleep activé
5. Alarme 1/2 activée
6. Indicateur de faiblesse des piles
FACE ARRIERE ( FIG. 2)
1
2
3
5
4
6
7
8
9
10
11
1.
Molette FOCUS
: ajuste la mise au point de la
projection
2.
RADIO:
active / désactive la radio
3.
ALARME 1 et 2 :
sélectionne le type d’alarme, par
BIP, RADIO ou désactivée
4.
+ / - :
Augmente / diminue les valeurs du réglage
sélectionné
5.
/ SET
,
: modifie les réglages /
l’affichage / le statut de l’alarme ; règle l’alarme
6.
DIMMER
: ajuste la clarté de l’affichage HI / LO
7.
PROJECTION ON :
active / désactive la projection
continue
8.
180° ROTATION :
permet de renverser l’image à
180°
9.
RESET
(REINITIALISER) :
réinitialise l’appareil aux
réglages par défaut
10. Prise adaptateur
11. Compartiment des piles
VUE DU HAUT (FIG. 3)
1
2
3
1.
VOL
: muet / ajuste le volume de la radio
2.
SNOOZE / SLEEP
: éteint l’alarme pour 8 minutes
3.
TUNE
: sélectionne la fréquence radio
POUR COMMENCER
MISE EN PLACE DES PILES
1. Branchez l’adaptateur CA/CC dans la prise.
Protection de la mémoire :
2. Retirez le couvercle du compartiment des piles.
3. Insérez les piles, en respectant les polarités (voir FIG.
2).
RÉGLER L’HORLOGE
1. Appuyez sur
.
2. Appuyez sur
+
ou
–
pour modifier les réglages.
3. Les réglages s’effectuent dans l’ordre suivant : Format
12/24 h, heure, minute.
ALARME
Pour régler l’alarme :
1. Maintenez appuyé SET
ou
.
2. Appuyez sur
+ / -
pour régler l’heure / les minutes.
3. Appuyez sur
(ou ne rien faire pendant 10
secondes) pour revenir à l’affichage du mode horloge.
Pour activer/ désactiver l’alarme :
Placez l’encoche sur :
•
OFF
– pour désactiver l’alarme
•
BEEP
– pour l’alarme par bip
•
RADIO
– pour l’alarme par radio
Pour couper le son de l’alarme :
•
Appuyez sur
SNOOZE / SLEEP
, pour éteindre l’alarme
pendant 8 minutes
OU
•
Appuyez sur
, SET
/
,
+ / -
, pour
éteindre l’alarme et pour qu’elle se déclenche 24
heures plus tard.
RADIO
Pour activer/ désactiver la radio :
1. Positionnez l’encoche
RADIO
sur
ON
pour activer la
radio.
2. Tournez la molette
TUNE
pour sélectionner la
fréquence.
Pour ajuster le volume :
•
Tournez la molette
VOL
pour mettre le volume sur muet
ou pour l'ajuster.
Pour activer le compteur sleep :
•
Appuyez sur
SNOOZE
/ SLEEP
pour entrer dans le
mode sleep.
•
Appuyez sur
SNOOZE
/ SLEEP
pour modifier le réglage
du temps sleep (120, 90, 60, 45, 30, 15, 0 minutes).
PROJECTION
Cet appareil projette l’heure pour votre commodité.
Projection continue :
•
Positionnez l’encoche
PROJECTION
sur ON une
fois l’adaptateur branché, pour activer / désactiver la
projection continue.
Renverser l’image projetée par 180° :
• Appuyez sur 180° Flip.
Mettre au point l’image :
• Tournez la molette
FOCUS
.
REMARQUE
Si la projection est activée, ne regardez pas
directement dans le projecteur.
REINITIALISATION
Appuyer sur
RESET
pour revenir aux réglages par défaut.
PRECAUTIONS
• Ne pas soumettre le produit à une force excessive, au
choc, à la poussière, aux changements de température
ou à l’humidité.
• Ne pas couvrir les trous de ventilation avec des journaux,
rideaux etc…
• Ne pas immerger le produit dans l’eau. Si vous renversez
du liquide sur l’appareil, séchez-le immédiatement avec
un tissu doux.
• Ne pas nettoyer l’appareil avec des matériaux corrosifs
ou abrasifs.
• Ne pas trafiquer les composants internes. Cela invalidera
votre garantie.
• N’utilisez que des piles neuves. Ne pas mélanger des
piles neuves et usagées.
• Les images de ce manuel peuvent différer de l’aspect
réel du produit.
• Lorsque vous désirez vous débarrasser de ce produit,
assurez-vous qu’il soit collecté séparément pour un
traitement adapté.
• Le poser sur certaines surfaces en bois peut endommager
la finition du meuble, et Oregon Scientific ne peut en
être tenu responsable. Consultez les mises en garde du
fabricant du meuble pour de plus amples informations.
• Le contenu du présent manuel ne peut pas être reproduit
sans la permission du fabriquant.
• Ne pas jeter les piles usagées dans les containers
municipaux non adaptés Veuillez effectuer le tri de ces
ordures pour un traitement adapté si nécessaire.
• Veuillez remarquer que certains appareils sont
équipés d’une bande de sécurité. Retirez la bande du
compartiment des piles avant la première utilisation.
REMARQUE
Les caractéristiques techniques de ce produit
et le contenu de ce manuel peut être soumis à modifications
sans préavis.
REMARQUE
Caractéristiques et accessoires ne seront
pas valables pour tous les pays. Pour plus d’information,
contacter le détaillant le plus proche.
CARACTERISTIQUES
TYPE
DESCRIPTION
APPAREIL PRINCIPAL
L x l x H
183 x 67 x 81mm
(72 x 26,4 x 31,9 pouces)
Poids
386 g (13,6 onces)
sans les piles
Alimentation
Adaptateur CA 6 V
2 piles UM-4 (AAA) 1,5V
A PROPOS D’OREGON SCIENTIFIC
Pour plus d‘informations sur les produits Oregon Scientific
France, rendez-vous sur notre site www.oregonscientific.fr.
Si vous êtes aux Etats-Unis, vous pouvez contacter notre
support consommateur directement : sur le site
www2.oregonscientific.com/service/support.asp
Pour des renseignements internationaux, rendez vous sur le
site: www2.oregonscientific.com/about/international.asp.
EUROPE - DÉCLARATION DE CONFORMITÉ
Par la présente, Oregon Scientific déclare que Horloge
de projection LCD avec Radio FM analogique Model:
RRA320PN est conforme à la directive européenne
89/336/CE. Une copie signée et datée de la déclaration
de conformité est disponible sur demande auprès de notre
Service Client.
Uhr mit Radiowecker, Projektion und
analogem UKW-Radio
Modell: RRA320PN
BEDIENUNGSANLEITUNG
DE
ÜBERSICHT
VORDERANSICHT (ABB.1)
1
2
3
4
5
6
1. AM / PM
2. Uhr
3. Radio EIN
4. Einschlafmodus EIN
5. Alarm 1 / 2 EIN
6. Batterieladeanzeige
RÜCKANSICHT (ABB. 2)
1
2
3
5
4
6
7
8
9
10
11
1.
FOCUS-Rad
: Projektionsschärfe einstellen
2.
RADIO:
Radio ein- / ausschalten
3.
ALARM 1 and 2:
Alarmtyp auswählen, BEEP / OFF
/ RADIO
4.
+ / - :
Werte der gewählten Einstellung erhöhen /
verringern
5.
/ SET
,
: Einstellungen / Anzeige
ändern
/
betreffenden Alarmstatus anzeigen; Alarm
einstellen
6.
DIMMER
: Anzeigehelligkeit LO / HI auswählen
7.
PROJECTION ON
:
Dauerprojektion aktivieren /
deaktivieren
8.
180° ROTATION
:
Bild um 180
°
drehen
9.
RESET
:
Gerät auf Standardeinstellungen
zurücksetzen
10. Anschluss für Netzadapter
11. Batteriefach
OBERE ANSICHT (ABB. 3)
1
2
3
1.
VOL
: Radiolautstärke stummschalten / regulieren
2.
SNOOZE / SLEEP
: Alarm 8 Minuten lang
ausschalten
3.
TUNE
: Radiofrequenz auswählen
ERSTE SCHRITTE
BATTERIEN EINLEGEN
1. Stecken Sie den Netzadapter in den dafür
vorgesehenen Anschluss.
Speichersicherung:
2.
Öffnen Sie die Batteriefachabdeckung.
3. Legen Sie die Batterien ein und achten Sie auf die
Übereinstimmung der Polaritäten (ABB. 2).
UHR EINSTELLEN
1.
Drücken Sie auf
.
2. Drücken Sie auf
+
oder
-
, um die Einstellungen zu
ändern.
3. Die Reihenfolge der Einstellungen lautet: 12-/24-
Stundenformat, Stunde, Minute.
ALARM
So stellen Sie den Alarm ein:
1. Halten Sie die gewünschte Taste SET
oder
gedrückt.
2. Drücken Sie auf
+ / -
, um Stunde / Minute
einzustellen.
3. Drücken Sie auf
(oder bei Inaktivität von
10 Sekunden), damit die Anzeige zum Uhrmodus
zurückkehrt.
So aktivieren / deaktivieren Sie den Alarm:
Verschieben Sie den Schalter auf:
•
OFF
– Alarm deaktivieren
•
BEEP
– Signaltonalarm
•
RADIO
– Radioalarm
So schalten Sie den Alarm stumm:
•
Drücken Sie auf
SNOOZE / SLEEP
, um den Alarm
8 Minuten lang stummzuschalten
ODER
•
Drücken Sie auf
,
SET
/
,
+ / -
um
den Alarm auszuschalten, und ihn nach 24 Stunden
erneut zu aktivieren.
RADIO
So aktivieren / deaktivieren Sie das Radio:
1. Verschieben Sie
RADIO ON/OFF
, um das Radio
einzuschalten.
2.
Drehen Sie das Einstellrad
TUNE
, um die Frequenz
auszuwählen.
So regulieren Sie die Lautstärke:
•
Drehen Sie das Einstellrad
VOL
, um die Lautstärke
stummzuschalten / zu regulieren.
So aktivieren Sie den Einschlaftimer:
•
Drücken Sie auf
SNOOZE
/ SLEEP
, um den
Einschlafmodus aufzurufen.
•
Drücken Sie auf
SNOOZE
/ SLEEP
, um die
Einstellung der Einschlafzeit zu ändern (120, 90, 60,
30, 15, 0 Min.).
PROJEKTION
Dieses Gerät projiziert die Uhrzeit zu Ihrem Komfort.
Für Dauerprojektion:
•
Verschieben Sie den Schalter
PROJECTION
bei
angeschlossenem Netzadapter auf ON, um diese zu
aktivieren / deaktivieren.
So drehen Sie das projizierte Bild um 180°:
•
Drücken Sie auf 180° Flip.
So verstellen Sie die Schärfe des Bildes:
•
Drehen Sie das
FOCUS
-Rad.
HINWEIS
Blicken Sie nicht direkt in den Projektor, wenn
die Projektion beleuchtet ist.
RESET
Drücken Sie auf
RESET
, um das Gerät auf die
Standardeinstellungen zurückzusetzen.
TECHNISCHE DATEN
TYP
BESCHREIBUNG
BASISEINHEIT
L x B x H
183 x 67 x 81mm
Gewicht
386 g (ohne Batterie)
Stromversorgung
Netzadapter 6 V
2 Batterien UM-4 (AAA) 1,5 V
VORSICHTSMASSNAHMEN
• Setzen Sie das Gerät keiner extremen Gewalteinwirkung
und keinen Stößen aus, und halten Sie es von
übermäßigem Staub, Hitze oder Feuchtigkeit fern.
• Sie dürfen die Belüftungsöffnungen nicht mit Gegenständen
abdecken, wie z.B. Zeitungen, Vorhänge, usw.
• Tauchen Sie das Gerät niemals in Wasser. Falls Sie
eine Flüssigkeit über das Gerät verschütten, trocknen
Sie es sofort mit einem weichen, fusselfreien Tuch.
• Reinigen Sie das Gerät keinesfalls mit scheuernden
oder ätzenden Mitteln.
• Machen Sie sich nicht an den internen Komponenten
des Geräts zu schaffen, da dies zum Verlust der
Garantie führen kann.
• Verwenden Sie nur neue Batterien. Verwenden Sie
keinesfalls neue und alte Batterien gemeinsam.
• Die in dieser Anleitung dargestellten Abbildungen
können sich vom Original abweichen.
• Entsorgen Sie das Gerät ausschließlich in den dafür
vorgesehenen, kommunalen Sammelstellen, die Sie
bei Ihrer Gemeinde erfragen können.
• Wenn dieses Produkt auf bestimmte Holzflächen gestellt
wird, kann die Oberfläche beschädigt werden. Oregon
Scientific ist nicht haftbar für solche Beschädigungen.
Entsprechende Hinweise entnehmen Sie bitte der
Pflegeanleitung Ihres Möbelherstellers.
• Der Inhalt dieser Anleitung darf ohne Genehmigung
des Herstellers nicht vervielfältigt werden.
• Verbrauchte Batterien gehören nicht in den Hausmüll.
Bitte geben Sie sie bei einer Sammelstelle für
Altbatterien bzw. Sondermüll ab.
• Bitte beachten Sie, dass manche Geräte mit einem
Batterieunterbrechungsstreifen bestückt sind. Vor dem
ersten Gebrauch müssen Sie den Streifen aus dem
Batteriefach ziehen.
HINWEIS
Die technischen Daten für dieses Produkt
und der Inhalt der Bedienungsanleitung können ohne
Benachrichtigung geändert werden.
HINWEIS
Eigenschaften und Zubehör nicht in allen
Ländern verfügbar. Weitere Informationen erhalten Sie von
Ihrem Fachhändler vor Ort.
ÜBER OREGON SCIENTIFIC
Besuchen Sie unsere Website www.oregonscientific.de und
erfahren Sie mehr über unsere Oregon Scientific-Produkte.
Auf der Website finden Sie auch Informationen, wie Sie im
Bedarfsfall unseren Kundendienst erreichen und Daten
herunterladen können.
Für internationale Anfragen besuchen Sie bitte unsere
Website:
www2.oregonscientific.com/about/international.asp.
EU - KONFORMITÄTSERKLÄRUNG
Hiermit erklärt Oregon Scientific, dass die Uhr mit
Radiowecker, Projektion und analogem UKW-Radio Modell
RRA320PN mit den grundlegenden Anforderungen und
anderen relevanten Vorschriften der Richtlinien EMC 89/336/
CE übereinstimmt. Eine Kopie der unterschriebenen und
mit Datum versehenen Konformitätserklärung erhalten Sie
auf Anfrage über unseren Oregon Scientific Kundendienst.
Product No.:
RRA320PN
Product Name:
LCD Clock with Projection &
Analogue FM Radio
Manufacturer:
IDT Technology Limited
Address:
Block C, 9/F, Kaiser Estate,
Phase 1,41 Man Yue St., Hung
Hom, Kowloon,
Hong Kong
is in conformity with Part 15 of the FCC Rules. Operation is
subject to the following two conditions: 1) This device may
not cause harmful interference. 2) This device must accept
any interference received, including interference that may
cause undesired operation.
P/N: 086L005814-015 REV1
1/2
LCD Clock with Projection &
Analogue FM Radio
Model: RRA320PN
USER MANUAL
EN
OVERVIEW
FRONT VIEW (FIG. 1)
1
2
3
4
5
6
1. AM / PM
2. Clock
3. Radio ON
4. Sleep mode ON
5. Alarm 1 / 2 ON
6. Low Battery indicator
BACK VIEW (FIG. 2)
1
2
3
5
4
6
7
8
9
10
11
1.
FOCUS
Wheel: Adjust Projection Focus
2.
RADIO
: Turn radio On / Off
3.
ALARM 1
and
2
: Select alarm type, BEEP / OFF /
RADIO
4.
+ / -
: Increase / decrease values of the selected
setting
5.
/
SET
/
, : Change settings /
display / View respective alarm status; set alarm
6.
DIMMER
: Select display brightness LO / HI
7.
PROJECTION ON
: Enable / disable continuous
projection
8.
180° ROTATION
: flip image180°
9.
RESET
: Reset unit to default settings
10. AC / DC Socket
11. Battery compartment
TOP VIEW (FIG. 3)
1
2
3
1.
VOL
: Mute / adjust radio volume
2.
SNOOZE / SLEEP
: silence alarm for 8 minutes
3.
TUNE
: Select radio frequency
GETTING STARTED
INSERT BATTERIES
1. Plug AC / DC adaptor into socket.
Memory backup:
2. Remove the battery compartment cover.
3. Insert the batteries, matching the polarities (FIG. 2).
SET CLOCK
1. Press
.
2. Press + or - to change the settings.
3. The settings order is: 12/24 hr format, hour, minute.
ALARM
To set the alarm:
1. Press and hold desired
SET
/
.
2. Press + / - to set hour / minute.
3. Press
(or 10 seconds of inaction) to return
display to clock mode.
To activate / deactivate alarm:
Slide to:
•
OFF
– disable alarm
•
BEEP
- beep alarm
•
RADIO
– Radio alarm
To silence the alarm:
• Press
SNOOZE / SLEEP
to silence it for 8 minutes
OR
/
,
+ / -
to turn the
alarm off and activate it again after 24 hours.
RADIO
To activate / deactivate radio:
1. Slide
RADIO ON/OFF
to turn on the radio.
2. Turn
TUNE
rotary dial to select frequency
To adjust volume:
• Turn
VOL
rotary dial to mute / adjust volume.
To activate sleep timer:
•
Press
SNOOZE / SLEEP
to enter sleep mode.
• Press
SNOOZE / SLEEP
to change the sleep time.
setting (120, 90, 60, 30, 15, 0 min).
PROJECTION
This unit projects time information for your convenience.
For continuous projection:
• Slide
PROJECTION
switch when adaptor is connected,
to enable / disable.
To flip projected image by 180°:
• Press 180° Flip.
To focus image:
• Turn
FOCUS
wheel.
NOTE
If projection is illuminated, do not look directly into
the projector.
RESET
Press
RESET
to return to the default settings.
PRECAUTIONS
• Do not subject the unit to excessive force, shock, dust,
temperature or humidity.
• Do not cover the ventilation holes with any items such as
newspapers, curtains etc.
• Do not immerse the unit in water. If you spill liquid over
it, dry it immediately with a soft, lint-free cloth.
• Do not clean the unit with abrasive or corrosive materials.
• Do not tamper with the unit ’s internal components. This
invalidates the warranty.
•
Only use fresh batteries. Do not mix new and old batteries.
• Images shown in this manual may differ from the actual
display.
• When disposing of this product, ensure it is collected
separately for special treatment
.
• Placement of this product on certain types of wood
may result in damage to its finish for which Oregon
Scientific will not be responsible. Consult the furniture
manufacturer’s care instructions for information.
•
The contents of this manual may not be reproduced
without the permission of the manufacturer.
• Do not dispose old batteries as unsorted municipal
waste. Collection of such waste separately for special
treatment is necessary.
• Please note that some units are equipped with a
battery safety strip. Remove the strip from the battery
compartment before first use.
NOTE
The technical specifications for this product and the
contents of the user manual are subject to change without
notice.
NOTE
Features and accessories will not be available in all
countries. For more information, please contact your local
retailer.
SPECIFICATIONS
TYPE
DESCRIPTION
MAIN UNIT
L x W x H
183 x 67 x 81mm
(72 x 26.4 x 31.9in)
Weight
386 g (13.6 oz)
without battery
Power
6 V AC adaptor
2 x UM-4 (AAA)
1.5 V batteries
ABOUT OREGON SCIENTIFIC
Visit our website (www.oregonscientific.com) to learn more
about Oregon Scientific products.
If you’re in the US and would like to contact our Customer
Care department directly, please visit:
www2.oregonscientific.com/service/support.asp
For international inquiries, please visit:
www2.oregonscientific.com/about/international.asp.
EU-DECLARATION OF CONFORMITY
Hereby, Oregon Scientific, declares that this LCD Clock with
Projection & Analogue FM Radio (Model: RRA320PN) is in
compliance with EMC directive 89/336/CE.
A copy of the signed and dated Declaration of Conformity
is available on request via our Oregon Scientific Customer
Service.
FCC STATEMENT
This device complies with Part 15 of the FCC Rules.
Operation is subject to the following two conditions: (1) This
device may not cause harmful interference, and (2) This
device must accept any interference received, including
interference that may cause undesired operation.
WARNING
Changes or modifications not expressly
approved by the party responsible for compliance could
void the user’s authority to operate the equipment.
NOTE
This equipment has been tested and found to
comply with the limits for a Class B digital device, pursuant
to Part 15 of the FCC Rules. These limits are designed to
provide reasonable protection against harmful interference
in a residential installation.
This equipment generates, uses and can radiate radio
frequency energy and, if not installed and used in accordance
with the instructions, may cause harmful interference to
radio communications. However, there is no guarantee
that interference will not occur in a particular installation.
If this equipment does cause harmful interference to radio
or television reception, which can be determined by turning
the equipment off and on, the user is encouraged to try to
correct the interference by one or more of the following
measures:
• Reorient or relocate the receiving antenna.
• Increase the separation between the equipment and
receiver.
• Connect the equipment into an outlet on a circuit
different from that to which the receiver is connected.
• Consult the dealer or an experienced radio / TV
technician for help.
DECLARATION OF CONFORMITY
The following information is not to be used as contact
for support or sales. Please visit our website at www2.
oregonscientific.com/service for all enquiries.
We
Name:
Oregon Scientific, Inc.
Address:
19861 SW 95th Ave.,Tualatin,
Oregon 97062 USA
Telephone No.:
1-800-853-8883
declare that the product
Orologio LCD con Proiezione e
Radio FM analogica
Modello: RRA320PN
MANUALE UTENTE
IT
PANORAMICA
VISTA ANTERIORE (FIG.1)
1
2
3
4
5
6
1. AM / PM
2. Orologio
3. Radio ON
4. Modo Sleep ON
5. Allarme ON 1 / 2
6. Indicatore batteria basso
VISTA POSTERIORE (FIG. 2)
1
2
3
5
4
6
7
8
9
10
11
1.
SINTONIZZATORE
: regola la proiezione
2.
RADIO
: accende/spegne la radio
3.
ALLARMI
1
e
2
: seleziona il tipo di allarme, BEEP /
OFF / RADIO
4.
+ / -
: aumenta/diminuisce i valori dell’impostazione
selezionata
5.
/
SET
/
: modifica impostazioni /
display / stato dell’allarme; impostazione allarme
6.
DIMMER
: seleziona la luminosità del display LO / HI
(alta/bassa)
7.
PROJECTION ON
: attiva/disattiva la proiezione
continua
8.
180° ROTATION
: ruota l’immagine di 180°
9.
RESET
: ripristina le impostazioni iniziali dell’unità
10. Presa CA / DC
11. Vano batteria
VISTA DALL’ALTO (FIG. 3)
1
2
3
1.
VOL
: silenzioso/regola il volume della radio
2.
SNOOZE / SLEEP
: intervallo allarme di 8 minuti
3.
TUNE
: seleziona la frequenza della radio
PER INIZIARE
INSERIRE LE BATTERIE
1. Inserire l’adattatore CA/DC nella presa.
Backup di memoria:
2. Rimuovere il coperchio del vano batteria.
3. Inserire le batterie, facendo corrispondere i poli (FIG.
2).
IMPOSTARE L’OROLOGIO
1. Premere
.
2. Premere
+
o
–
per cambiare le impostazioni.
3. L’ordine delle impostazioni è: formato 12/24 hr, ora,
minuti.
ALLARME
Per impostare l’allarme:
1. Tenere premuto SET
or
.
2. Premere
+ / -
per impostare ora/minuti.
3. Premere
(o 10 secondi di inattività) per
ritornare al display del modo orologio.
Per attivare/disattivare l’allarme:
Utilizzare:
•
OFF
– disattiva allarme
•
BEEP
– allarme beep
•
RADIO
– allarme radio
Per rendere l’allarme silenzioso:
•
Premere
SNOOZE / SLEEP
per spegnere l’allarme per
8 minuti
OPPURE
•
Premere
,
SET
/
,
+ / -
per disattivare
l’allarme e riattivarlo dopo 24 ore.
RADIO
Per accendere/spegnere la radio:
1. Scorrere
RADIO ON/OFF
per accendere la radio.
2. Ruotare il selettore
TUNE
per selezionare la
frequenza.
Per regolare il volume:
•
Ruotare il selettore
VOL
per rendere silenzioso/
regolare il volume.
Per attivare il timer sleep:
•
Premere
SNOOZE / SLEEP
per inserire il modo
sleep.
•
Premere
SNOOZE / SLEEP
per modificare
l’impostazione oraria sleep (120, 90, 60, 30, 15, 0
minuti).
PROIEZIONE
Questo prodotto proietta informazioni utili sull’orario.
Per la proiezione continua:
•
Scorrere l’interruttore
PROJECTION
su ON quando
l’adattatore è collegato, per attivare/disattivare.
Per ruotare l’immagine proiettata di 180
°:
•
Premere ruota di 180
°
.
Per focalizzare l’immagine:
•
Ruotare il selettore
FOCUS
.
NOTE
Se la proiezione è illuminata, non guardare
direttamente nel proiettore.
FUNZIONE RESET
Premere
RESET
per ripristinare le impostazioni predefinite
dell’unità.
AVVERTENZE
•
Non sottoporre il prodotto a forza eccessiva, urti, polvere,
temperatura o a umidità.
•
Non otturare i fori di aerazione con oggetti come giornali,
tende, etc.
•
Non immergere l’unità in acqua. Se si versa del liquido
sul prodotto, asciugarlo immediatamente con un panno
morbido e liscio.
•
Non pulire l’unità con materiali abrasivi o corrosivi.
•
Non manomettere i componenti interni. In questo modo
si invalida la garanzia.
•
Utilizzare solo batterie nuove. Non mescolare batterie
nuove con batterie vecchie.
•
Le immagini del manuale possono differire dalla realtà.
•
Al momento dello smaltimento del prodotto, utilizzare la
raccolta differenziata.
•
Oregon Scientific declina ogni responsabilità per
eventuali danni alle finiture causati dal posizionamento
del prodotto su determinati tipi di legno. Consultare le
istruzioni fornite dal fabbricante del mobile per ulteriori
informazioni.
•
Il contenuto di questo manuale non può essere
ristampato senza l’autorizzazione del produttore.
•
Non smaltire le batterie vecchie come rifiuto non
differenziato. È necessario che questo rifiuto venga
smaltito mediante raccolta differenziata per essere
trattato in modo particolare.
•
Alcune unità sono dotate di una striscia di sicurezza per
le batterie. Rimuovere la striscia dal vano batterie prima
del primo utilizzo.
NOTA
Le specifiche tecniche del prodotto e il contenuto
del manuale per l’utente possono essere modificati senza
preavviso.
NOTA
Caratteristiche e accessori non disponibili in tutti
i paesi. Per ulteriori informazioni, rivolgersi al proprio
rivenditore.
SPECIFICHE TECNICHE
TIPO
DESCRIZIONE
UNITA’ PRINCIPALE
Lung x Larg x Alt
183 x 67 x 81 mm
(72 x 26.4 x 31.9 in)
Peso
386
g (13.6 oz)
senza batteria
Alimentazione
Adattatore CA 6 V
Batterie: 2 x UM-4 (AAA) 1,5 V
INFORMAZIONI SU OREGON SCIENTIFIC
Per avere maggiori informazioni sui nuovi prodotti Oregon
Scientific visita il nostro sito internet www.oregonscientific.
it, dove potrai trovare tutte le informazioni di cui hai bisogno,
oppure collegati a www.oregonscientificstore.it.
Per ricerche di tipo internazionale puoi visitare invece il sito
www2.oregonscientific.com/about/international.asp.
DICHIARAZIONE DI CONFORMITA’ UE
Con la presente Oregon Scientific dichiara che questo
Orologio LCD con Proiezione e Radio FM analogica
(modello: RRA320PN) è conforme alla direttiva EMC
89/336/CE. Una copia firmata e datata della Dichiarazione
di Conformità è disponibile, su richiesta, tramite il servizio
clienti della Oregon Scientific.
Horloge de projection LCD avec
Radio FM analogique
Modèle : RRA320PN
MANUEL DE L’UTILISATEUR
FR
VUE D’ENSEMBLE
FACE AVANT (FIG.1)
1
2
3
4
5
6
1. AM / PM
2. Horloge
3. Radio activée
4. Mode sleep activé
5. Alarme 1/2 activée
6. Indicateur de faiblesse des piles
FACE ARRIERE ( FIG. 2)
1
2
3
5
4
6
7
8
9
10
11
1.
Molette FOCUS
: ajuste la mise au point de la
projection
2.
RADIO:
active / désactive la radio
3.
ALARME 1 et 2 :
sélectionne le type d’alarme, par
BIP, RADIO ou désactivée
4.
+ / - :
Augmente / diminue les valeurs du réglage
sélectionné
5.
/ SET
,
: modifie les réglages /
l’affichage / le statut de l’alarme ; règle l’alarme
6.
DIMMER
: ajuste la clarté de l’affichage HI / LO
7.
PROJECTION ON :
active / désactive la projection
continue
8.
180° ROTATION :
permet de renverser l’image à
180°
9.
RESET
(REINITIALISER) :
réinitialise l’appareil aux
réglages par défaut
10. Prise adaptateur
11. Compartiment des piles
VUE DU HAUT (FIG. 3)
1
2
3
1.
VOL
: muet / ajuste le volume de la radio
2.
SNOOZE / SLEEP
: éteint l’alarme pour 8 minutes
3.
TUNE
: sélectionne la fréquence radio
POUR COMMENCER
MISE EN PLACE DES PILES
1. Branchez l’adaptateur CA/CC dans la prise.
Protection de la mémoire :
2. Retirez le couvercle du compartiment des piles.
3. Insérez les piles, en respectant les polarités (voir FIG.
2).
RÉGLER L’HORLOGE
1. Appuyez sur
.
2. Appuyez sur
+
ou
–
pour modifier les réglages.
3. Les réglages s’effectuent dans l’ordre suivant : Format
12/24 h, heure, minute.
ALARME
Pour régler l’alarme :
1. Maintenez appuyé SET
ou
.
2. Appuyez sur
+ / -
pour régler l’heure / les minutes.
3. Appuyez sur
(ou ne rien faire pendant 10
secondes) pour revenir à l’affichage du mode horloge.
Pour activer/ désactiver l’alarme :
Placez l’encoche sur :
•
OFF
– pour désactiver l’alarme
•
BEEP
– pour l’alarme par bip
•
RADIO
– pour l’alarme par radio
Pour couper le son de l’alarme :
•
Appuyez sur
SNOOZE / SLEEP
, pour éteindre l’alarme
pendant 8 minutes
OU
•
Appuyez sur
, SET
/
,
+ / -
, pour
éteindre l’alarme et pour qu’elle se déclenche 24
heures plus tard.
RADIO
Pour activer/ désactiver la radio :
1. Positionnez l’encoche
RADIO
sur
ON
pour activer la
radio.
2. Tournez la molette
TUNE
pour sélectionner la
fréquence.
Pour ajuster le volume :
•
Tournez la molette
VOL
pour mettre le volume sur muet
ou pour l'ajuster.
Pour activer le compteur sleep :
•
Appuyez sur
SNOOZE
/ SLEEP
pour entrer dans le
mode sleep.
•
Appuyez sur
SNOOZE
/ SLEEP
pour modifier le réglage
du temps sleep (120, 90, 60, 45, 30, 15, 0 minutes).
PROJECTION
Cet appareil projette l’heure pour votre commodité.
Projection continue :
•
Positionnez l’encoche
PROJECTION
sur ON une
fois l’adaptateur branché, pour activer / désactiver la
projection continue.
Renverser l’image projetée par 180° :
• Appuyez sur 180° Flip.
Mettre au point l’image :
• Tournez la molette
FOCUS
.
REMARQUE
Si la projection est activée, ne regardez pas
directement dans le projecteur.
REINITIALISATION
Appuyer sur
RESET
pour revenir aux réglages par défaut.
PRECAUTIONS
• Ne pas soumettre le produit à une force excessive, au
choc, à la poussière, aux changements de température
ou à l’humidité.
• Ne pas couvrir les trous de ventilation avec des journaux,
rideaux etc…
• Ne pas immerger le produit dans l’eau. Si vous renversez
du liquide sur l’appareil, séchez-le immédiatement avec
un tissu doux.
• Ne pas nettoyer l’appareil avec des matériaux corrosifs
ou abrasifs.
• Ne pas trafiquer les composants internes. Cela invalidera
votre garantie.
• N’utilisez que des piles neuves. Ne pas mélanger des
piles neuves et usagées.
• Les images de ce manuel peuvent différer de l’aspect
réel du produit.
• Lorsque vous désirez vous débarrasser de ce produit,
assurez-vous qu’il soit collecté séparément pour un
traitement adapté.
• Le poser sur certaines surfaces en bois peut endommager
la finition du meuble, et Oregon Scientific ne peut en
être tenu responsable. Consultez les mises en garde du
fabricant du meuble pour de plus amples informations.
• Le contenu du présent manuel ne peut pas être reproduit
sans la permission du fabriquant.
• Ne pas jeter les piles usagées dans les containers
municipaux non adaptés Veuillez effectuer le tri de ces
ordures pour un traitement adapté si nécessaire.
• Veuillez remarquer que certains appareils sont
équipés d’une bande de sécurité. Retirez la bande du
compartiment des piles avant la première utilisation.
REMARQUE
Les caractéristiques techniques de ce produit
et le contenu de ce manuel peut être soumis à modifications
sans préavis.
REMARQUE
Caractéristiques et accessoires ne seront
pas valables pour tous les pays. Pour plus d’information,
contacter le détaillant le plus proche.
CARACTERISTIQUES
TYPE
DESCRIPTION
APPAREIL PRINCIPAL
L x l x H
183 x 67 x 81mm
(72 x 26,4 x 31,9 pouces)
Poids
386 g (13,6 onces)
sans les piles
Alimentation
Adaptateur CA 6 V
2 piles UM-4 (AAA) 1,5V
A PROPOS D’OREGON SCIENTIFIC
Pour plus d‘informations sur les produits Oregon Scientific
France, rendez-vous sur notre site www.oregonscientific.fr.
Si vous êtes aux Etats-Unis, vous pouvez contacter notre
support consommateur directement : sur le site
www2.oregonscientific.com/service/support.asp
Pour des renseignements internationaux, rendez vous sur le
site: www2.oregonscientific.com/about/international.asp.
EUROPE - DÉCLARATION DE CONFORMITÉ
Par la présente, Oregon Scientific déclare que Horloge
de projection LCD avec Radio FM analogique Model:
RRA320PN est conforme à la directive européenne
89/336/CE. Une copie signée et datée de la déclaration
de conformité est disponible sur demande auprès de notre
Service Client.
Uhr mit Radiowecker, Projektion und
analogem UKW-Radio
Modell: RRA320PN
BEDIENUNGSANLEITUNG
DE
ÜBERSICHT
VORDERANSICHT (ABB.1)
1
2
3
4
5
6
1. AM / PM
2. Uhr
3. Radio EIN
4. Einschlafmodus EIN
5. Alarm 1 / 2 EIN
6. Batterieladeanzeige
RÜCKANSICHT (ABB. 2)
1
2
3
5
4
6
7
8
9
10
11
1.
FOCUS-Rad
: Projektionsschärfe einstellen
2.
RADIO:
Radio ein- / ausschalten
3.
ALARM 1 and 2:
Alarmtyp auswählen, BEEP / OFF
/ RADIO
4.
+ / - :
Werte der gewählten Einstellung erhöhen /
verringern
5.
/ SET
,
: Einstellungen / Anzeige
ändern
/
betreffenden Alarmstatus anzeigen; Alarm
einstellen
6.
DIMMER
: Anzeigehelligkeit LO / HI auswählen
7.
PROJECTION ON
:
Dauerprojektion aktivieren /
deaktivieren
8.
180° ROTATION
:
Bild um 180
°
drehen
9.
RESET
:
Gerät auf Standardeinstellungen
zurücksetzen
10. Anschluss für Netzadapter
11. Batteriefach
OBERE ANSICHT (ABB. 3)
1
2
3
1.
VOL
: Radiolautstärke stummschalten / regulieren
2.
SNOOZE / SLEEP
: Alarm 8 Minuten lang
ausschalten
3.
TUNE
: Radiofrequenz auswählen
ERSTE SCHRITTE
BATTERIEN EINLEGEN
1. Stecken Sie den Netzadapter in den dafür
vorgesehenen Anschluss.
Speichersicherung:
2.
Öffnen Sie die Batteriefachabdeckung.
3. Legen Sie die Batterien ein und achten Sie auf die
Übereinstimmung der Polaritäten (ABB. 2).
UHR EINSTELLEN
1.
Drücken Sie auf
.
2. Drücken Sie auf
+
oder
-
, um die Einstellungen zu
ändern.
3. Die Reihenfolge der Einstellungen lautet: 12-/24-
Stundenformat, Stunde, Minute.
ALARM
So stellen Sie den Alarm ein:
1. Halten Sie die gewünschte Taste SET
oder
gedrückt.
2. Drücken Sie auf
+ / -
, um Stunde / Minute
einzustellen.
3. Drücken Sie auf
(oder bei Inaktivität von
10 Sekunden), damit die Anzeige zum Uhrmodus
zurückkehrt.
So aktivieren / deaktivieren Sie den Alarm:
Verschieben Sie den Schalter auf:
•
OFF
– Alarm deaktivieren
•
BEEP
– Signaltonalarm
•
RADIO
– Radioalarm
So schalten Sie den Alarm stumm:
•
Drücken Sie auf
SNOOZE / SLEEP
, um den Alarm
8 Minuten lang stummzuschalten
ODER
•
Drücken Sie auf
,
SET
/
,
+ / -
um
den Alarm auszuschalten, und ihn nach 24 Stunden
erneut zu aktivieren.
RADIO
So aktivieren / deaktivieren Sie das Radio:
1. Verschieben Sie
RADIO ON/OFF
, um das Radio
einzuschalten.
2.
Drehen Sie das Einstellrad
TUNE
, um die Frequenz
auszuwählen.
So regulieren Sie die Lautstärke:
•
Drehen Sie das Einstellrad
VOL
, um die Lautstärke
stummzuschalten / zu regulieren.
So aktivieren Sie den Einschlaftimer:
•
Drücken Sie auf
SNOOZE
/ SLEEP
, um den
Einschlafmodus aufzurufen.
•
Drücken Sie auf
SNOOZE
/ SLEEP
, um die
Einstellung der Einschlafzeit zu ändern (120, 90, 60,
30, 15, 0 Min.).
PROJEKTION
Dieses Gerät projiziert die Uhrzeit zu Ihrem Komfort.
Für Dauerprojektion:
•
Verschieben Sie den Schalter
PROJECTION
bei
angeschlossenem Netzadapter auf ON, um diese zu
aktivieren / deaktivieren.
So drehen Sie das projizierte Bild um 180°:
•
Drücken Sie auf 180° Flip.
So verstellen Sie die Schärfe des Bildes:
•
Drehen Sie das
FOCUS
-Rad.
HINWEIS
Blicken Sie nicht direkt in den Projektor, wenn
die Projektion beleuchtet ist.
RESET
Drücken Sie auf
RESET
, um das Gerät auf die
Standardeinstellungen zurückzusetzen.
TECHNISCHE DATEN
TYP
BESCHREIBUNG
BASISEINHEIT
L x B x H
183 x 67 x 81mm
Gewicht
386 g (ohne Batterie)
Stromversorgung
Netzadapter 6 V
2 Batterien UM-4 (AAA) 1,5 V
VORSICHTSMASSNAHMEN
• Setzen Sie das Gerät keiner extremen Gewalteinwirkung
und keinen Stößen aus, und halten Sie es von
übermäßigem Staub, Hitze oder Feuchtigkeit fern.
• Sie dürfen die Belüftungsöffnungen nicht mit Gegenständen
abdecken, wie z.B. Zeitungen, Vorhänge, usw.
• Tauchen Sie das Gerät niemals in Wasser. Falls Sie
eine Flüssigkeit über das Gerät verschütten, trocknen
Sie es sofort mit einem weichen, fusselfreien Tuch.
• Reinigen Sie das Gerät keinesfalls mit scheuernden
oder ätzenden Mitteln.
• Machen Sie sich nicht an den internen Komponenten
des Geräts zu schaffen, da dies zum Verlust der
Garantie führen kann.
• Verwenden Sie nur neue Batterien. Verwenden Sie
keinesfalls neue und alte Batterien gemeinsam.
• Die in dieser Anleitung dargestellten Abbildungen
können sich vom Original abweichen.
• Entsorgen Sie das Gerät ausschließlich in den dafür
vorgesehenen, kommunalen Sammelstellen, die Sie
bei Ihrer Gemeinde erfragen können.
• Wenn dieses Produkt auf bestimmte Holzflächen gestellt
wird, kann die Oberfläche beschädigt werden. Oregon
Scientific ist nicht haftbar für solche Beschädigungen.
Entsprechende Hinweise entnehmen Sie bitte der
Pflegeanleitung Ihres Möbelherstellers.
• Der Inhalt dieser Anleitung darf ohne Genehmigung
des Herstellers nicht vervielfältigt werden.
• Verbrauchte Batterien gehören nicht in den Hausmüll.
Bitte geben Sie sie bei einer Sammelstelle für
Altbatterien bzw. Sondermüll ab.
• Bitte beachten Sie, dass manche Geräte mit einem
Batterieunterbrechungsstreifen bestückt sind. Vor dem
ersten Gebrauch müssen Sie den Streifen aus dem
Batteriefach ziehen.
HINWEIS
Die technischen Daten für dieses Produkt
und der Inhalt der Bedienungsanleitung können ohne
Benachrichtigung geändert werden.
HINWEIS
Eigenschaften und Zubehör nicht in allen
Ländern verfügbar. Weitere Informationen erhalten Sie von
Ihrem Fachhändler vor Ort.
ÜBER OREGON SCIENTIFIC
Besuchen Sie unsere Website www.oregonscientific.de und
erfahren Sie mehr über unsere Oregon Scientific-Produkte.
Auf der Website finden Sie auch Informationen, wie Sie im
Bedarfsfall unseren Kundendienst erreichen und Daten
herunterladen können.
Für internationale Anfragen besuchen Sie bitte unsere
Website:
www2.oregonscientific.com/about/international.asp.
EU - KONFORMITÄTSERKLÄRUNG
Hiermit erklärt Oregon Scientific, dass die Uhr mit
Radiowecker, Projektion und analogem UKW-Radio Modell
RRA320PN mit den grundlegenden Anforderungen und
anderen relevanten Vorschriften der Richtlinien EMC 89/336/
CE übereinstimmt. Eine Kopie der unterschriebenen und
mit Datum versehenen Konformitätserklärung erhalten Sie
auf Anfrage über unseren Oregon Scientific Kundendienst.
Product No.:
RRA320PN
Product Name:
LCD Clock with Projection &
Analogue FM Radio
Manufacturer:
IDT Technology Limited
Address:
Block C, 9/F, Kaiser Estate,
Phase 1,41 Man Yue St., Hung
Hom, Kowloon,
Hong Kong
is in conformity with Part 15 of the FCC Rules. Operation is
subject to the following two conditions: 1) This device may
not cause harmful interference. 2) This device must accept
any interference received, including interference that may
cause undesired operation.
P/N: 086L005814-015 REV1
1/2
LCD Clock with Projection &
Analogue FM Radio
Model: RRA320PN
USER MANUAL
EN
OVERVIEW
FRONT VIEW (FIG. 1)
1
2
3
4
5
6
1. AM / PM
2. Clock
3. Radio ON
4. Sleep mode ON
5. Alarm 1 / 2 ON
6. Low Battery indicator
BACK VIEW (FIG. 2)
1
2
3
5
4
6
7
8
9
10
11
1.
FOCUS
Wheel: Adjust Projection Focus
2.
RADIO
: Turn radio On / Off
3.
ALARM 1
and
2
: Select alarm type, BEEP / OFF /
RADIO
4.
+ / -
: Increase / decrease values of the selected
setting
5.
/
SET
/
, : Change settings /
display / View respective alarm status; set alarm
6.
DIMMER
: Select display brightness LO / HI
7.
PROJECTION ON
: Enable / disable continuous
projection
8.
180° ROTATION
: flip image180°
9.
RESET
: Reset unit to default settings
10. AC / DC Socket
11. Battery compartment
TOP VIEW (FIG. 3)
1
2
3
1.
VOL
: Mute / adjust radio volume
2.
SNOOZE / SLEEP
: silence alarm for 8 minutes
3.
TUNE
: Select radio frequency
GETTING STARTED
INSERT BATTERIES
1. Plug AC / DC adaptor into socket.
Memory backup:
2. Remove the battery compartment cover.
3. Insert the batteries, matching the polarities (FIG. 2).
SET CLOCK
1. Press
.
2. Press + or - to change the settings.
3. The settings order is: 12/24 hr format, hour, minute.
ALARM
To set the alarm:
1. Press and hold desired
SET
/
.
2. Press + / - to set hour / minute.
3. Press
(or 10 seconds of inaction) to return
display to clock mode.
To activate / deactivate alarm:
Slide to:
•
OFF
– disable alarm
•
BEEP
- beep alarm
•
RADIO
– Radio alarm
To silence the alarm:
• Press
SNOOZE / SLEEP
to silence it for 8 minutes
OR
• Press
,
SET
/
,
+ / -
to turn the
alarm off and activate it again after 24 hours.
RADIO
To activate / deactivate radio:
1. Slide
RADIO ON/OFF
to turn on the radio.
2. Turn
TUNE
rotary dial to select frequency
To adjust volume:
• Turn
VOL
rotary dial to mute / adjust volume.
To activate sleep timer:
•
Press
SNOOZE / SLEEP
to enter sleep mode.
• Press
SNOOZE / SLEEP
to change the sleep time.
setting (120, 90, 60, 30, 15, 0 min).
PROJECTION
This unit projects time information for your convenience.
For continuous projection:
• Slide
PROJECTION
switch when adaptor is connected,
to enable / disable.
To flip projected image by 180°:
• Press 180° Flip.
To focus image:
• Turn
FOCUS
wheel.
NOTE
If projection is illuminated, do not look directly into
the projector.
RESET
Press
RESET
to return to the default settings.
PRECAUTIONS
• Do not subject the unit to excessive force, shock, dust,
temperature or humidity.
• Do not cover the ventilation holes with any items such as
newspapers, curtains etc.
• Do not immerse the unit in water. If you spill liquid over
it, dry it immediately with a soft, lint-free cloth.
• Do not clean the unit with abrasive or corrosive materials.
• Do not tamper with the unit ’s internal components. This
invalidates the warranty.
•
Only use fresh batteries. Do not mix new and old batteries.
• Images shown in this manual may differ from the actual
display.
• When disposing of this product, ensure it is collected
separately for special treatment
.
• Placement of this product on certain types of wood
may result in damage to its finish for which Oregon
Scientific will not be responsible. Consult the furniture
manufacturer’s care instructions for information.
•
The contents of this manual may not be reproduced
without the permission of the manufacturer.
• Do not dispose old batteries as unsorted municipal
waste. Collection of such waste separately for special
treatment is necessary.
• Please note that some units are equipped with a
battery safety strip. Remove the strip from the battery
compartment before first use.
NOTE
The technical specifications for this product and the
contents of the user manual are subject to change without
notice.
NOTE
Features and accessories will not be available in all
countries. For more information, please contact your local
retailer.
SPECIFICATIONS
TYPE
DESCRIPTION
MAIN UNIT
L x W x H
183 x 67 x 81mm
(72 x 26.4 x 31.9in)
Weight
386 g (13.6 oz)
without battery
Power
6 V AC adaptor
2 x UM-4 (AAA)
1.5 V batteries
ABOUT OREGON SCIENTIFIC
Visit our website (www.oregonscientific.com) to learn more
about Oregon Scientific products.
If you’re in the US and would like to contact our Customer
Care department directly, please visit:
www2.oregonscientific.com/service/support.asp
For international inquiries, please visit:
www2.oregonscientific.com/about/international.asp.
EU-DECLARATION OF CONFORMITY
Hereby, Oregon Scientific, declares that this LCD Clock with
Projection & Analogue FM Radio (Model: RRA320PN) is in
compliance with EMC directive 89/336/CE.
A copy of the signed and dated Declaration of Conformity
is available on request via our Oregon Scientific Customer
Service.
FCC STATEMENT
This device complies with Part 15 of the FCC Rules.
Operation is subject to the following two conditions: (1) This
device may not cause harmful interference, and (2) This
device must accept any interference received, including
interference that may cause undesired operation.
WARNING
Changes or modifications not expressly
approved by the party responsible for compliance could
void the user’s authority to operate the equipment.
NOTE
This equipment has been tested and found to
comply with the limits for a Class B digital device, pursuant
to Part 15 of the FCC Rules. These limits are designed to
provide reasonable protection against harmful interference
in a residential installation.
This equipment generates, uses and can radiate radio
frequency energy and, if not installed and used in accordance
with the instructions, may cause harmful interference to
radio communications. However, there is no guarantee
that interference will not occur in a particular installation.
If this equipment does cause harmful interference to radio
or television reception, which can be determined by turning
the equipment off and on, the user is encouraged to try to
correct the interference by one or more of the following
measures:
• Reorient or relocate the receiving antenna.
• Increase the separation between the equipment and
receiver.
• Connect the equipment into an outlet on a circuit
different from that to which the receiver is connected.
• Consult the dealer or an experienced radio / TV
technician for help.
DECLARATION OF CONFORMITY
The following information is not to be used as contact
for support or sales. Please visit our website at www2.
oregonscientific.com/service for all enquiries.
We
Name:
Oregon Scientific, Inc.
Address:
19861 SW 95th Ave.,Tualatin,
Oregon 97062 USA
Telephone No.:
1-800-853-8883
declare that the product
Orologio LCD con Proiezione e
Radio FM analogica
Modello: RRA320PN
MANUALE UTENTE
IT
PANORAMICA
VISTA ANTERIORE (FIG.1)
1
2
3
4
5
6
1. AM / PM
2. Orologio
3. Radio ON
4. Modo Sleep ON
5. Allarme ON 1 / 2
6. Indicatore batteria basso
VISTA POSTERIORE (FIG. 2)
1
2
3
5
4
6
7
8
9
10
11
1.
SINTONIZZATORE
: regola la proiezione
2.
RADIO
: accende/spegne la radio
3.
ALLARMI
1
e
2
: seleziona il tipo di allarme, BEEP /
OFF / RADIO
4.
+ / -
: aumenta/diminuisce i valori dell’impostazione
selezionata
5.
/
SET
/
: modifica impostazioni /
display / stato dell’allarme; impostazione allarme
6.
DIMMER
: seleziona la luminosità del display LO / HI
(alta/bassa)
7.
PROJECTION ON
: attiva/disattiva la proiezione
continua
8.
180° ROTATION
: ruota l’immagine di 180°
9.
RESET
: ripristina le impostazioni iniziali dell’unità
10. Presa CA / DC
11. Vano batteria
VISTA DALL’ALTO (FIG. 3)
1
2
3
1.
VOL
: silenzioso/regola il volume della radio
2.
SNOOZE / SLEEP
: intervallo allarme di 8 minuti
3.
TUNE
: seleziona la frequenza della radio
PER INIZIARE
INSERIRE LE BATTERIE
1. Inserire l’adattatore CA/DC nella presa.
Backup di memoria:
2. Rimuovere il coperchio del vano batteria.
3. Inserire le batterie, facendo corrispondere i poli (FIG.
2).
IMPOSTARE L’OROLOGIO
1. Premere
.
2. Premere
+
o
–
per cambiare le impostazioni.
3. L’ordine delle impostazioni è: formato 12/24 hr, ora,
minuti.
ALLARME
Per impostare l’allarme:
1. Tenere premuto SET
or
.
2. Premere
+ / -
per impostare ora/minuti.
3. Premere
(o 10 secondi di inattività) per
ritornare al display del modo orologio.
Per attivare/disattivare l’allarme:
Utilizzare:
•
OFF
– disattiva allarme
•
BEEP
– allarme beep
•
RADIO
– allarme radio
Per rendere l’allarme silenzioso:
•
Premere
SNOOZE / SLEEP
per spegnere l’allarme per
8 minuti
OPPURE
•
Premere
,
SET
/
,
+ / -
per disattivare
l’allarme e riattivarlo dopo 24 ore.
RADIO
Per accendere/spegnere la radio:
1. Scorrere
RADIO ON/OFF
per accendere la radio.
2. Ruotare il selettore
TUNE
per selezionare la
frequenza.
Per regolare il volume:
•
Ruotare il selettore
VOL
per rendere silenzioso/
regolare il volume.
Per attivare il timer sleep:
•
Premere
SNOOZE / SLEEP
per inserire il modo
sleep.
•
Premere
SNOOZE / SLEEP
per modificare
l’impostazione oraria sleep (120, 90, 60, 30, 15, 0
minuti).
PROIEZIONE
Questo prodotto proietta informazioni utili sull’orario.
Per la proiezione continua:
•
Scorrere l’interruttore
PROJECTION
su ON quando
l’adattatore è collegato, per attivare/disattivare.
Per ruotare l’immagine proiettata di 180
°:
•
Premere ruota di 180
°
.
Per focalizzare l’immagine:
•
Ruotare il selettore
FOCUS
.
NOTE
Se la proiezione è illuminata, non guardare
direttamente nel proiettore.
FUNZIONE RESET
Premere
RESET
per ripristinare le impostazioni predefinite
dell’unità.
AVVERTENZE
•
Non sottoporre il prodotto a forza eccessiva, urti, polvere,
temperatura o a umidità.
•
Non otturare i fori di aerazione con oggetti come giornali,
tende, etc.
•
Non immergere l’unità in acqua. Se si versa del liquido
sul prodotto, asciugarlo immediatamente con un panno
morbido e liscio.
•
Non pulire l’unità con materiali abrasivi o corrosivi.
•
Non manomettere i componenti interni. In questo modo
si invalida la garanzia.
•
Utilizzare solo batterie nuove. Non mescolare batterie
nuove con batterie vecchie.
•
Le immagini del manuale possono differire dalla realtà.
•
Al momento dello smaltimento del prodotto, utilizzare la
raccolta differenziata.
•
Oregon Scientific declina ogni responsabilità per
eventuali danni alle finiture causati dal posizionamento
del prodotto su determinati tipi di legno. Consultare le
istruzioni fornite dal fabbricante del mobile per ulteriori
informazioni.
•
Il contenuto di questo manuale non può essere
ristampato senza l’autorizzazione del produttore.
•
Non smaltire le batterie vecchie come rifiuto non
differenziato. È necessario che questo rifiuto venga
smaltito mediante raccolta differenziata per essere
trattato in modo particolare.
•
Alcune unità sono dotate di una striscia di sicurezza per
le batterie. Rimuovere la striscia dal vano batterie prima
del primo utilizzo.
NOTA
Le specifiche tecniche del prodotto e il contenuto
del manuale per l’utente possono essere modificati senza
preavviso.
NOTA
Caratteristiche e accessori non disponibili in tutti
i paesi. Per ulteriori informazioni, rivolgersi al proprio
rivenditore.
SPECIFICHE TECNICHE
TIPO
DESCRIZIONE
UNITA’ PRINCIPALE
Lung x Larg x Alt
183 x 67 x 81 mm
(72 x 26.4 x 31.9 in)
Peso
386
g (13.6 oz)
senza batteria
Alimentazione
Adattatore CA 6 V
Batterie: 2 x UM-4 (AAA) 1,5 V
INFORMAZIONI SU OREGON SCIENTIFIC
Per avere maggiori informazioni sui nuovi prodotti Oregon
Scientific visita il nostro sito internet www.oregonscientific.
it, dove potrai trovare tutte le informazioni di cui hai bisogno,
oppure collegati a www.oregonscientificstore.it.
Per ricerche di tipo internazionale puoi visitare invece il sito
www2.oregonscientific.com/about/international.asp.
DICHIARAZIONE DI CONFORMITA’ UE
Con la presente Oregon Scientific dichiara che questo
Orologio LCD con Proiezione e Radio FM analogica
(modello: RRA320PN) è conforme alla direttiva EMC
89/336/CE. Una copia firmata e datata della Dichiarazione
di Conformità è disponibile, su richiesta, tramite il servizio
clienti della Oregon Scientific.
Horloge de projection LCD avec
Radio FM analogique
Modèle : RRA320PN
MANUEL DE L’UTILISATEUR
FR
VUE D’ENSEMBLE
FACE AVANT (FIG.1)
1
2
3
4
5
6
1. AM / PM
2. Horloge
3. Radio activée
4. Mode sleep activé
5. Alarme 1/2 activée
6. Indicateur de faiblesse des piles
FACE ARRIERE ( FIG. 2)
1
2
3
5
4
6
7
8
9
10
11
1.
Molette FOCUS
: ajuste la mise au point de la
projection
2.
RADIO:
active / désactive la radio
3.
ALARME 1 et 2 :
sélectionne le type d’alarme, par
BIP, RADIO ou désactivée
4.
+ / - :
Augmente / diminue les valeurs du réglage
sélectionné
5.
/ SET
,
: modifie les réglages /
l’affichage / le statut de l’alarme ; règle l’alarme
6.
DIMMER
: ajuste la clarté de l’affichage HI / LO
7.
PROJECTION ON :
active / désactive la projection
continue
8.
180° ROTATION :
permet de renverser l’image à
180°
9.
RESET
(REINITIALISER) :
réinitialise l’appareil aux
réglages par défaut
10. Prise adaptateur
11. Compartiment des piles
VUE DU HAUT (FIG. 3)
1
2
3
1.
VOL
: muet / ajuste le volume de la radio
2.
SNOOZE / SLEEP
: éteint l’alarme pour 8 minutes
3.
TUNE
: sélectionne la fréquence radio
POUR COMMENCER
MISE EN PLACE DES PILES
1. Branchez l’adaptateur CA/CC dans la prise.
Protection de la mémoire :
2. Retirez le couvercle du compartiment des piles.
3. Insérez les piles, en respectant les polarités (voir FIG.
2).
RÉGLER L’HORLOGE
1. Appuyez sur
.
2. Appuyez sur
+
ou
–
pour modifier les réglages.
3. Les réglages s’effectuent dans l’ordre suivant : Format
12/24 h, heure, minute.
ALARME
Pour régler l’alarme :
1. Maintenez appuyé SET
ou
.
2. Appuyez sur
+ / -
pour régler l’heure / les minutes.
3. Appuyez sur
(ou ne rien faire pendant 10
secondes) pour revenir à l’affichage du mode horloge.
Pour activer/ désactiver l’alarme :
Placez l’encoche sur :
•
OFF
– pour désactiver l’alarme
•
BEEP
– pour l’alarme par bip
•
RADIO
– pour l’alarme par radio
Pour couper le son de l’alarme :
•
Appuyez sur
SNOOZE / SLEEP
, pour éteindre l’alarme
pendant 8 minutes
OU
•
Appuyez sur
, SET
/
,
+ / -
, pour
éteindre l’alarme et pour qu’elle se déclenche 24
heures plus tard.
RADIO
Pour activer/ désactiver la radio :
1. Positionnez l’encoche
RADIO
sur
ON
pour activer la
radio.
2. Tournez la molette
TUNE
pour sélectionner la
fréquence.
Pour ajuster le volume :
•
Tournez la molette
VOL
pour mettre le volume sur muet
ou pour l'ajuster.
Pour activer le compteur sleep :
•
Appuyez sur
SNOOZE
/ SLEEP
pour entrer dans le
mode sleep.
•
Appuyez sur
SNOOZE
/ SLEEP
pour modifier le réglage
du temps sleep (120, 90, 60, 45, 30, 15, 0 minutes).
PROJECTION
Cet appareil projette l’heure pour votre commodité.
Projection continue :
•
Positionnez l’encoche
PROJECTION
sur ON une
fois l’adaptateur branché, pour activer / désactiver la
projection continue.
Renverser l’image projetée par 180° :
• Appuyez sur 180° Flip.
Mettre au point l’image :
• Tournez la molette
FOCUS
.
REMARQUE
Si la projection est activée, ne regardez pas
directement dans le projecteur.
REINITIALISATION
Appuyer sur
RESET
pour revenir aux réglages par défaut.
PRECAUTIONS
• Ne pas soumettre le produit à une force excessive, au
choc, à la poussière, aux changements de température
ou à l’humidité.
• Ne pas couvrir les trous de ventilation avec des journaux,
rideaux etc…
• Ne pas immerger le produit dans l’eau. Si vous renversez
du liquide sur l’appareil, séchez-le immédiatement avec
un tissu doux.
• Ne pas nettoyer l’appareil avec des matériaux corrosifs
ou abrasifs.
• Ne pas trafiquer les composants internes. Cela invalidera
votre garantie.
• N’utilisez que des piles neuves. Ne pas mélanger des
piles neuves et usagées.
• Les images de ce manuel peuvent différer de l’aspect
réel du produit.
• Lorsque vous désirez vous débarrasser de ce produit,
assurez-vous qu’il soit collecté séparément pour un
traitement adapté.
• Le poser sur certaines surfaces en bois peut endommager
la finition du meuble, et Oregon Scientific ne peut en
être tenu responsable. Consultez les mises en garde du
fabricant du meuble pour de plus amples informations.
• Le contenu du présent manuel ne peut pas être reproduit
sans la permission du fabriquant.
• Ne pas jeter les piles usagées dans les containers
municipaux non adaptés Veuillez effectuer le tri de ces
ordures pour un traitement adapté si nécessaire.
• Veuillez remarquer que certains appareils sont
équipés d’une bande de sécurité. Retirez la bande du
compartiment des piles avant la première utilisation.
REMARQUE
Les caractéristiques techniques de ce produit
et le contenu de ce manuel peut être soumis à modifications
sans préavis.
REMARQUE
Caractéristiques et accessoires ne seront
pas valables pour tous les pays. Pour plus d’information,
contacter le détaillant le plus proche.
CARACTERISTIQUES
TYPE
DESCRIPTION
APPAREIL PRINCIPAL
L x l x H
183 x 67 x 81mm
(72 x 26,4 x 31,9 pouces)
Poids
386 g (13,6 onces)
sans les piles
Alimentation
Adaptateur CA 6 V
2 piles UM-4 (AAA) 1,5V
A PROPOS D’OREGON SCIENTIFIC
Pour plus d‘informations sur les produits Oregon Scientific
France, rendez-vous sur notre site www.oregonscientific.fr.
Si vous êtes aux Etats-Unis, vous pouvez contacter notre
support consommateur directement : sur le site
www2.oregonscientific.com/service/support.asp
Pour des renseignements internationaux, rendez vous sur le
site: www2.oregonscientific.com/about/international.asp.
EUROPE - DÉCLARATION DE CONFORMITÉ
Par la présente, Oregon Scientific déclare que Horloge
de projection LCD avec Radio FM analogique Model:
RRA320PN est conforme à la directive européenne
89/336/CE. Une copie signée et datée de la déclaration
de conformité est disponible sur demande auprès de notre
Service Client.
Uhr mit Radiowecker, Projektion und
analogem UKW-Radio
Modell: RRA320PN
BEDIENUNGSANLEITUNG
DE
ÜBERSICHT
VORDERANSICHT (ABB.1)
1
2
3
4
5
6
1. AM / PM
2. Uhr
3. Radio EIN
4. Einschlafmodus EIN
5. Alarm 1 / 2 EIN
6. Batterieladeanzeige
RÜCKANSICHT (ABB. 2)
1
2
3
5
4
6
7
8
9
10
11
1.
FOCUS-Rad
: Projektionsschärfe einstellen
2.
RADIO:
Radio ein- / ausschalten
3.
ALARM 1 and 2:
Alarmtyp auswählen, BEEP / OFF
/ RADIO
4.
+ / - :
Werte der gewählten Einstellung erhöhen /
verringern
5.
/ SET
,
: Einstellungen / Anzeige
ändern
/
betreffenden Alarmstatus anzeigen; Alarm
einstellen
6.
DIMMER
: Anzeigehelligkeit LO / HI auswählen
7.
PROJECTION ON
:
Dauerprojektion aktivieren /
deaktivieren
8.
180° ROTATION
:
Bild um 180
°
drehen
9.
RESET
:
Gerät auf Standardeinstellungen
zurücksetzen
10. Anschluss für Netzadapter
11. Batteriefach
OBERE ANSICHT (ABB. 3)
1
2
3
1.
VOL
: Radiolautstärke stummschalten / regulieren
2.
SNOOZE / SLEEP
: Alarm 8 Minuten lang
ausschalten
3.
TUNE
: Radiofrequenz auswählen
ERSTE SCHRITTE
BATTERIEN EINLEGEN
1. Stecken Sie den Netzadapter in den dafür
vorgesehenen Anschluss.
Speichersicherung:
2.
Öffnen Sie die Batteriefachabdeckung.
3. Legen Sie die Batterien ein und achten Sie auf die
Übereinstimmung der Polaritäten (ABB. 2).
UHR EINSTELLEN
1.
Drücken Sie auf
.
2. Drücken Sie auf
+
oder
-
, um die Einstellungen zu
ändern.
3. Die Reihenfolge der Einstellungen lautet: 12-/24-
Stundenformat, Stunde, Minute.
ALARM
So stellen Sie den Alarm ein:
1. Halten Sie die
Характеристики

Остались вопросы?Не нашли свой ответ в руководстве или возникли другие проблемы? Задайте свой вопрос в форме ниже с подробным описанием вашей ситуации, чтобы другие люди и специалисты смогли дать на него ответ. Если вы знаете как решить проблему другого человека, пожалуйста, подскажите ему :)


