Метеостанции FIRST AUSTRIA FA-2461-4 - инструкция пользователя по применению, эксплуатации и установке на русском языке. Мы надеемся, она поможет вам решить возникшие у вас вопросы при эксплуатации техники.
Если остались вопросы, задайте их в комментариях после инструкции.
"Загружаем инструкцию", означает, что нужно подождать пока файл загрузится и можно будет его читать онлайн. Некоторые инструкции очень большие и время их появления зависит от вашей скорости интернета.
4
5
ENGLISH
ENGLISH
• Press the “▼” key can switch the display of
different channels of remote temperature and
humidity, when displaying the symbol
„
”, will display the channel every 5
seconds automatically switch a channel
• If the weather station failed to receive
transmission from remote sensor (“- -”display
on the LCD), press and hold “▼” button
for 3 seconds to receive transmission
manually. the remote temperature will show
an animation of the RF antenna symbol,
the Base Station will re receive the wireless
signal of the remote sensor.
F.Y.I.:
• when the wireless sensor set up different
channels, the weather station „REMOTE
SENSOR“ also want to switch to the same
channel. When there is no wireless sensor
signal transmission on the channel, „--“ will
be displayed in the channel of the weather
station
• When the wireless remote sensor has no
channel selection function, the sensor
defaults to channel 1.
Maximum/Minimum Temperature/Relative
Humidity
• To toggle indoor/ remote maximum, minimum
temperature and humidity data, press the
“MEM” button:
Once to show the maximum temperature and
humidity values.
Twice to sow the minimum temperature and
humidity values
Three times to return to the current
temperature and humidity levels
• To reset the maximum and minimum
temperature and humidity, press and hold
down the “MEM” button about 2 seconds.
This will reset all minimum and maximum
data recorded to the current displayed values.
F.Y.I.:
• If the temperature reading is below ranges,
the LL.L will be displayed. If the temperature
reading is above ranges, the HH.H will be
displayed.
Remote Temperature alert setting
• Press and hold down the “ ” button for
2 seconds until the icon for the Temperature
Alert” starts to flash
• The icon of Upper limit of the Temperature
alarm starts to flash. Use the “▲” and
“▼” buttons to set the required maximum
temperature. Press “ ” to confirm your
setting.
• The icon of the Lower limit of the Temperature
alarm starts to flash. Use the “▲” and
“▼” buttons to set the required minimum
temperature. Press “ ” button to confirm
your setting and to end the setting procedure
F.Y.I.:
• Before entering the setup, you must select
the remote channel, different channels can
set different temperature alarm range
Temperature and frost alert
• Press “ ” button to activate or deactivate
the remote temperature alert, When the
remote temperature alarm is activated, the
temperature alarm icon is displayed in the
remote sensor bar
• When the remote channel temperature value
exceeds the set temperature range, will
activate the alarm, the weather station will
every minute continuous alarm 5 times, at
the same time, temperature alarm in alarm
icon “ ” flashes, If the alarm activates the
temperature that is currently displayed on
the channel, its temperature value and alarm
upper limit icon “
„or lower limit icon “
„
also flashes
• When the temperature of REMOTE SENSOR
is –1°C to + 3°C or +30°F to + 37°F, the frost
alarm will be activated, symbol „ „ flashing.
F.Y.I.:
• When the temperature is higher than the
upper limit of the alarm temperature setting,
the activation of the upper limit alarm, symbol
“
„ flashing,
• When the temperature is lower than the lower
limit of the alarm temperature, the lower limit
alarm is activated, and the symbol
“
flashes
Low battery:
If the battery symbol “
„ appears the
batteries in the remote sensor should be
replaced as soon as possible.
THE WEATHER FORECAST:
• The weather station calculates a weather
forecast for about the next 12 hours based on
the barometric pressure trend. Of course this
forecast can‘t compare to that of professional
weather services supported by satellites and
high performance computers, but merely
provides an approximate indication of current
developments. Please take the weather
forecast from your local weather forecasting
service into account as well as the forecast
from your weather station. If there are
discrepancies between the information from
your device and from the local weather
forecasting service, please take the advice of
the latter as authoritative.
• Press and hold the “
” button for 2 seconds
to enter the air pressure unit and weather
settings, the pressure units will be flashing
display, Use the “▲” and “▼” button to set
the pressure unit to display in the „hPa/mb“ or
„inHg“.
• Press the “
” key to confirm the settings
and switch to the weather, the weather
graphics will be flashing display, Use the “▲”
and “▼” button to set the current weather
conditions, so that the weather forecast is
more accurate.
• The weather station displays the following
weather symbols:
see Table 3
• The weather station can display the
barometric pressure trend.
• You may see the following displays:
The barometric pressure will rise.
The barometric pressure will remain
constant.
The barometric pressure will fall.
Background lighting
• If the product is powered by batteries, touch
the “
” field. Backlight lit 15 seconds.
• When the power supply of the product is
inserted into the power supply adapter, the
battery will automatically disconnect the
power supply, and the backlight will always
be bright. Press the “
” button to adjust the
brightness of the backlight, you can adjust
the 5 state: 4 different brightness backlight
and close the backlight. Users can choose
according to the personal preferences of
different brightness backlight or turn off the
backlight. Turn off backlight when you can
touch the “
” field to light the backlight
15 seconds
Storage
It is recommended to store in a covered and dry
place at an ambient temperature not higher than
+ 40°C with relative humidity above 70% and the
absence in the environment of dust, acid and
other vapours.
Transportation
To the device special transportation rules are
not applied. When transporting the unit, use the
original packaging. During transportation, avoid
drops, impacts and other mechanical influences
on the device, as well as direct exposure to
atmospheric precipitation and aggressive
environments.
Unit operating life is 3 years
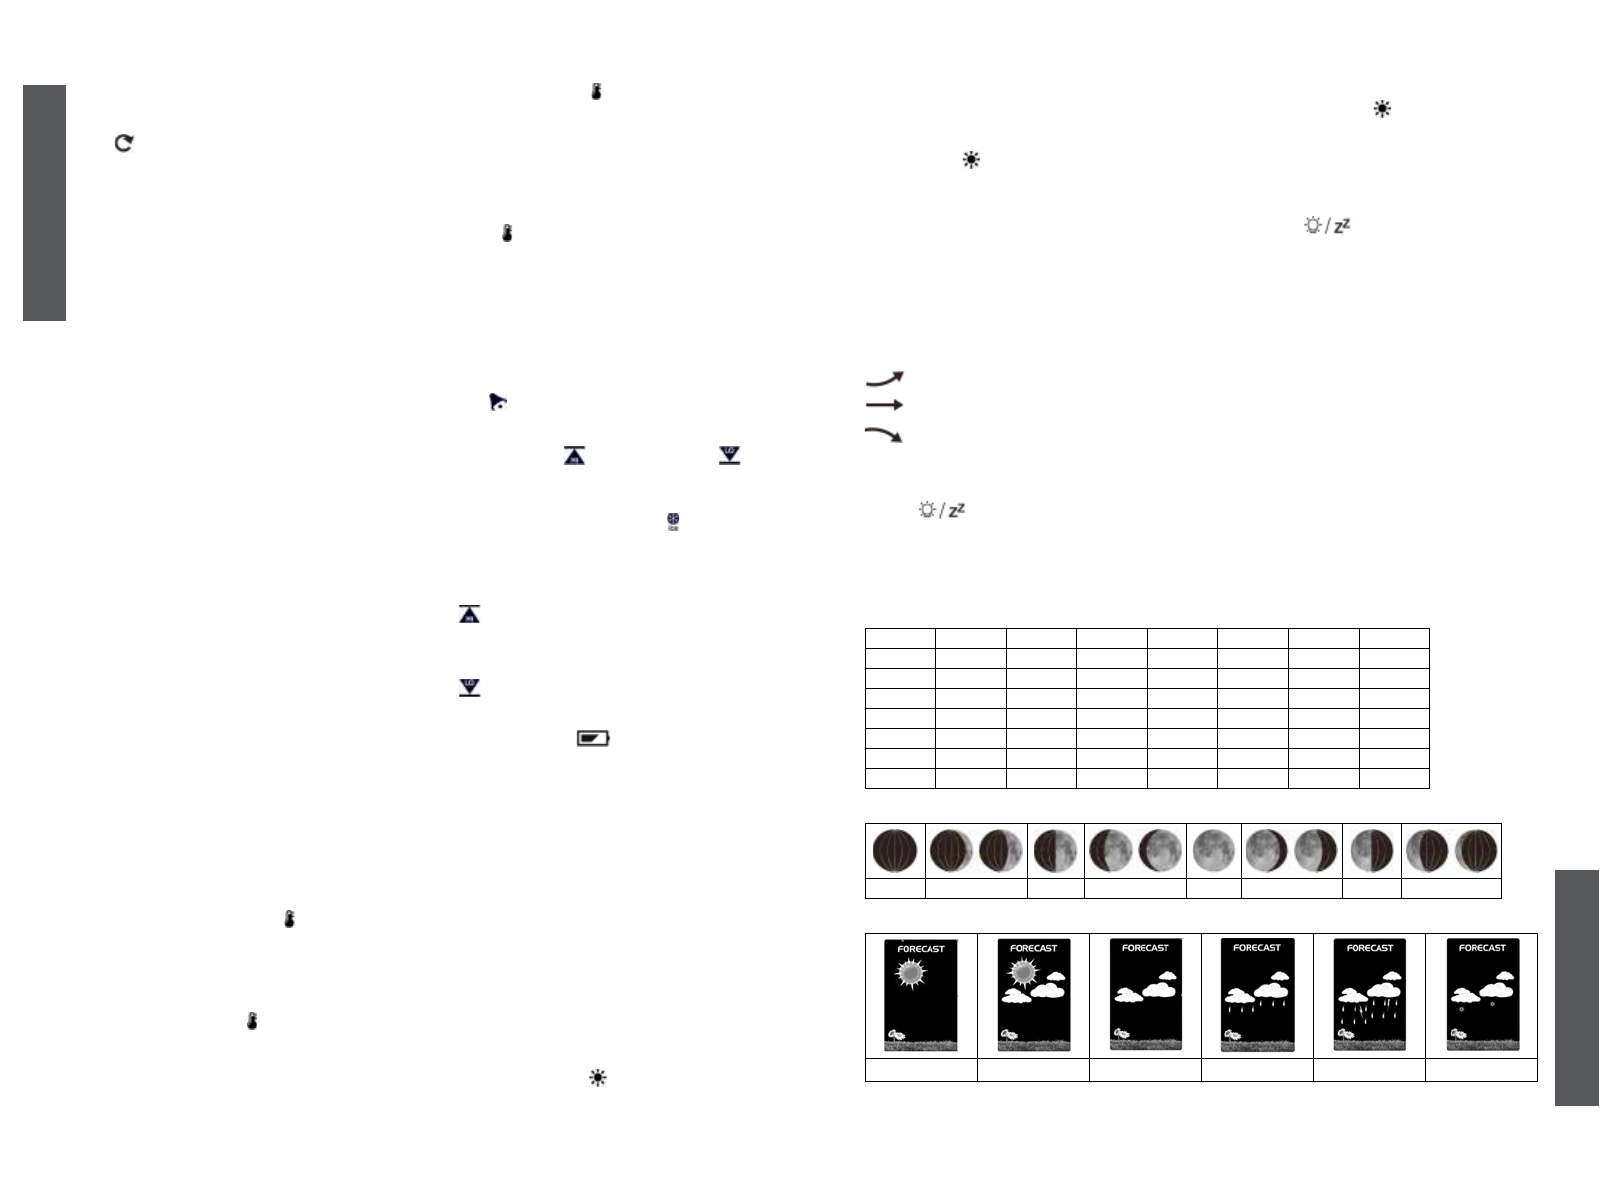
Languages
(table 1)
Language
Sunday
Monday
Tuesday
Wednesday
Thursday
Friday
Saturday
German, GE
SO
MO
DI
MI
DO
FR
SA
English, EN
SU
MO
TU
WE
TH
FR
SA
French, FR
DI
LU
MA
ME
JE
VE
SA
Italian, IT
DO
LU
MA
ME
GI
VE
SA
Spanish, SP
DO
LU
MA
MI
JU
VI
SA
Dutch, DU
ZO
MA
DI
WO
DO
VR
ZA
Danish, DA
SO
MA
TI
ON
TO
FR
LO
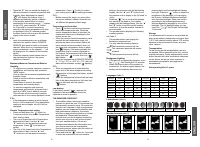
Lunar phases
(table 2)
New moon
Waxing half-moon
Half-moon
Waxing full moon
Full moon
Waning full moon
Half-moon
Waning half-moon
Weather forecast
(table 3)
sunny
slightly cloudy
cloudy
rainy
Heavy rainy
Snowy

