
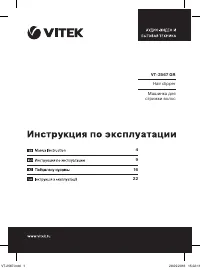
Машинки для стрижки Vitek VT-2567 - инструкция пользователя по применению, эксплуатации и установке на русском языке. Мы надеемся, она поможет вам решить возникшие у вас вопросы при эксплуатации техники.
Если остались вопросы, задайте их в комментариях после инструкции.
"Загружаем инструкцию", означает, что нужно подождать пока файл загрузится и можно будет его читать онлайн. Некоторые инструкции очень большие и время их появления зависит от вашей скорости интернета.


7
ENGLISH
Hair cutting
– The hair should be clean and dry.
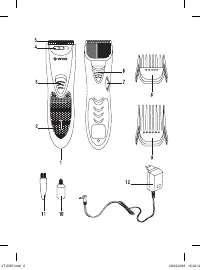
– Before cutting hair, switch the hair clip-
per on, setting the power switch (
3
) to
the position «
I
», the ON indicator (
2
) will
light up red.
– Make sure that the hair clipper operates
normally and the blades move smoothly.
If there is excess oil on blades, remove it
with a dry cloth.
– During operation with the unit connected
to the power adapter, always check the
power cord condition, do not allow its mul-
tiple twisting, periodically turn off the unit
and straighten the power cord.
– Switch the unit off by setting the switch (
3
)
to the position «
O
», then install the univer-
sal attachment (
8
) or (
9
).
– Seat a person so that his/her head is
approximately at your eye level, cover the
person’s shoulders with a towel and set
hair with the comb.
– Switch the unit on, setting the power
switch (
3
) to the position «
I
», the ON indi-
cator (
2
) will light up red.
– After using set the power switch (
3
) to
the position «
O
», the ON indicator (
2
) will
go out.
Notes:
– Always switch the hair clipper off during
breaks of operation cycles.
– Before changing the attachment switch
the hair clipper off, and if the hair clipper is
cord-operated, remove the power adapter
from the mains.
Reminders:
•
Cut off a little amount of hair at a time; you
can always return to the cut part for addi-
tional cutting.
•
The best haircutting results are reached on
dry hair, not wet.
•
Comb the hair with a comb to reveal
uneven locks.
•
It is better to leave longer hair after cutting
for the first time.
•
After learning the unit better, you will be
able to arrange your hair in any style you
need.
HAIR STYLING INSTRUCTIONS
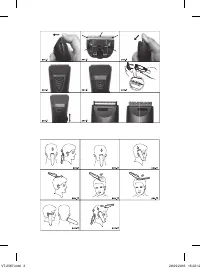
Step one
Set the universal attachment (
8
) to the posi-
tion «
3
» or «
6
». Switch the hair clipper on,
setting the power switch (
3
) to the position
«
I
». Hold the hair clipper with the blades
pointed upwards. Start cutting from the lower
part of the head. Slowly move the hair clipper
upwards. Cut the head back area at the bot-
tom and near the ears (
pic. 9, 10, 11
).
Step two
Switch the hair clipper off, set the attachment to
the position «
9
» or «
12
», switch the hair clipper
on and continue cutting hair closer to the top of
the head (
pic. 12
).
Step 3 – cutting in the temples area
Switch the hair clipper off, set the attachment
to the position «
3
» or «
6
» and cut hair on the
temples. Then set it to the position «9» or «12»
and continue cutting towards the top of the
head.
Step 4 – cutting the crown of the head
Using the universal attachments cut the hair
from the top of the head towards the crown
against the hair growth direction.
•
You can cut hair against and along the
direction of hair growth, but keep in mind
that the hair cut against the growth will be
shorter than the hair cut along the growth.
•
Use the attachment (
8
) positions «
3
» or
«
6
» for very short cutting. To leave a little
longer hair use the following attachment
positions.
•
To leave longer hair use the universal
attachment (
9
).
•
To leave longer hair, grip hair locks
between your fingers and cut the hair off
using the clipper (
pic. 13
).
•
You can use the comb: lift the hair locks
and cut them with the hair clipper above
the comb (
pic. 14
).
•
Always start cutting from the head back.
•
Comb the hair with a comb to reveal
uneven locks.
•
Use the scissors to make haircut even.
IM VT-2567.indd 7
28.09.2016 15:22:13
Содержание
- 10 ПЕРЕД ПЕРВЫМ ИСПОЛЬЗОВАНИЕМ
- 11 По окончании зарядки индикатор (; Использование сетевого адаптера; индикатор включения (; Смазка блока лезвий; ) и смажьте его маслом
- 12 Каждая из универсальных насадок (; Функция филировки волос
- 13 Стрижка волос
- 14 Шаг 4 – стрижка в области темени; » или «; Шаг 5 – заключительная часть; Установите универсальную насадку (; ЧИСТК А И УХОД; Снимите блок лезвий (
- 15 ХРАНЕНИЕ; Срок службы прибора – 3 года; Информация для связи –
- 28 RUS
Характеристики

Остались вопросы?Не нашли свой ответ в руководстве или возникли другие проблемы? Задайте свой вопрос в форме ниже с подробным описанием вашей ситуации, чтобы другие люди и специалисты смогли дать на него ответ. Если вы знаете как решить проблему другого человека, пожалуйста, подскажите ему :)


