
Машинки для стрижки Vitek VT-2567 - инструкция пользователя по применению, эксплуатации и установке на русском языке. Мы надеемся, она поможет вам решить возникшие у вас вопросы при эксплуатации техники.
Если остались вопросы, задайте их в комментариях после инструкции.
"Загружаем инструкцию", означает, что нужно подождать пока файл загрузится и можно будет его читать онлайн. Некоторые инструкции очень большие и время их появления зависит от вашей скорости интернета.


6
ENGLISH
6
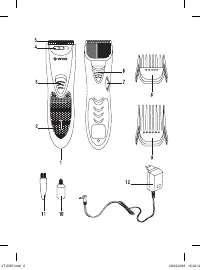
Lubricating the blade block
Before using the unit for the first time remove
the blade block (
5
) and lubricate it with oil
(
10
) (supplied with the unit).
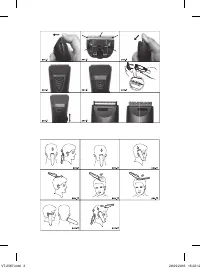
– To remove the blade block place the clip-
per with the blades up and press on the
upper edge of the blade block with your
thumb to release it from the locking frame,
as shown on
pic. 1
.
– Points for applying the lubricating oil are
marked with arrows on the
pic. 2
.
Apply 1
drop of oil to each point.
– To install the blade block back to its place
first insert its lower part to the installa-
tion place and then carefully press on the
upper edge of the blades until clicking to
lock it, see the
pic. 3.
– Let the hair clipper operate for approxi-
mately 30 seconds to spread the oil across
the rubbing surfaces. After that remove
the surplus oil with a dry cloth or a paper
towel.
Notes:
– Always set the blade height switch (6) to
the lower position to avoid difficulties when
installing the blade block to its place.
– Lubricate the blades after every use of the
hair clipper.
– Use only the oil (10) supplied with the set.
– Do not use vegetable oil or oil that
includes solvents.
Solvents will evaporate,
leaving thick grease that may slow down
the blades motion.
Blade height switch 0.8/1.8 mm (6)
When the switch is in the lower (usual)
position (see
pic. 4
), the cutting length is
1.8 mm. To reduce the cutting length to
0.8 mm set the switch (6) to the upper posi-
tion (see
pic. 5
).
Universal attachments (8) and (9)
Each universal attachment (
8
) and (
9
) has
6
positions for hair of different length. It is
indicated on the scale situated on the left side
of the hair clipper body:
– universal attachment (
8
) for 3 mm, 6 mm,
9 mm, 12 mm, 15 mm, 18 mm hair length;
– universal attachment (
9
) for 21 mm,
24 mm, 27 mm, 30 mm, 33 mm, 36 mm
hair length (see
pic. 6
).
– Before installing, removing or changing
the universal attachments, switch the unit
off by setting the power switch (
3
) to the
position «
O
»; if the unit is powered by the
power adapter, unplug it.
– To install the universal attachment insert its
guides into the corresponding grooves on
both sides of the hair clipper body and move
the attachment until bumping to lock it.
– To adjust the cutting length turn the
adjuster (7) counterclockwise with your
thumb (see
pic. 7
) to set the required
cutting length according to the scale
(see
pic. 6
).
Attention: Do not try to adjust the cutting
length with the adjuster (7) during the
unit operation, because when the power
switch is set to the position «I», the
adjuster (7) is blocked. It may damage
the adjuster rack mechanism.
Hair thinning function
The unit has the hair thinning function which
allows to visually improve the hairstyle by
thinning out hair. Hair thinning makes the
hairstyle lighter and accentuates the hair
texture. Due to thinning out the haircut
keeps its style for a long time. Hair thin-
ning means cutting off separate locks. It
allows achieving smooth transition between
locks of different length. Hair thinning is
performed at the final phase of hair cutting.
To extend the hair thinning comb, move the
lock (
4
) to the utmost right position. To remove
the hair thinning comb, move the lock (
4
) to
the utmost left position (see
pic. 8
).
USING THE HAIR CLIPPER
– For cordless use of the unit, charge the
battery fully following the recommenda-
tions above.
– For the corded unit operation, insert the
power adapter (
12
) jack into the socket (
1
)
on the bottom part of the unit body and con-
nect the power adapter (
12
) to the mains.
IM VT-2567.indd 6
28.09.2016 15:22:13
Содержание
- 10 ПЕРЕД ПЕРВЫМ ИСПОЛЬЗОВАНИЕМ
- 11 По окончании зарядки индикатор (; Использование сетевого адаптера; индикатор включения (; Смазка блока лезвий; ) и смажьте его маслом
- 12 Каждая из универсальных насадок (; Функция филировки волос
- 13 Стрижка волос
- 14 Шаг 4 – стрижка в области темени; » или «; Шаг 5 – заключительная часть; Установите универсальную насадку (; ЧИСТК А И УХОД; Снимите блок лезвий (
- 15 ХРАНЕНИЕ; Срок службы прибора – 3 года; Информация для связи –
- 28 RUS
Характеристики

Остались вопросы?Не нашли свой ответ в руководстве или возникли другие проблемы? Задайте свой вопрос в форме ниже с подробным описанием вашей ситуации, чтобы другие люди и специалисты смогли дать на него ответ. Если вы знаете как решить проблему другого человека, пожалуйста, подскажите ему :)


