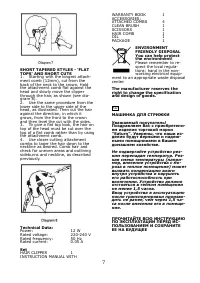
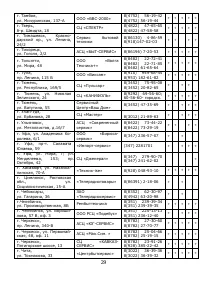
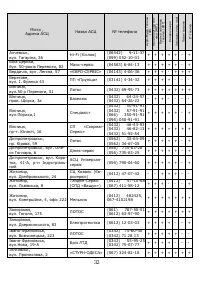
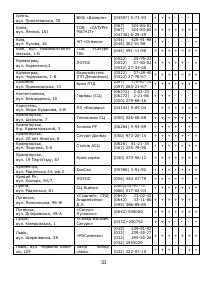
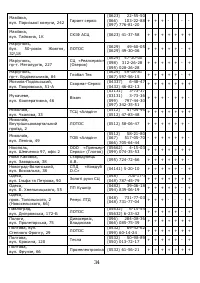
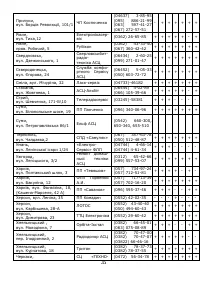
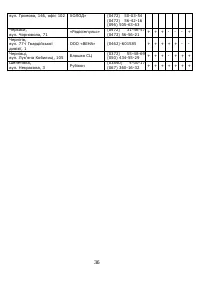
Машинки для стрижки Saturn ST-HC0365 - инструкция пользователя по применению, эксплуатации и установке на русском языке. Мы надеемся, она поможет вам решить возникшие у вас вопросы при эксплуатации техники.
Если остались вопросы, задайте их в комментариях после инструкции.
"Загружаем инструкцию", означает, что нужно подождать пока файл загрузится и можно будет его читать онлайн. Некоторые инструкции очень большие и время их появления зависит от вашей скорости интернета.


5
recommended by the manufacturer.
This appliance should never be
left unattended, when plugged in.
Close supervision is necessary,
when this appliance is used by, on or
near children or invalids.
Never operate this appliance, if it
has a damaged cord or plug, if it is not
working properly.
Keep the cord away from heated
surfaces.
Do not pull, twist or wrap line
cord around appliance.
Never drop or insert any object
into any opening on this appliance.
Before use, make certain blades
are aligned properly.
Do not place appliance on any
surface, while it is operating.
Do not use this appliance with a
damaged or broken comb nor with
teeth missing from the blades, as inju-
ry may occur.
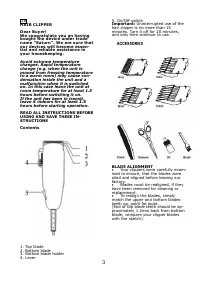
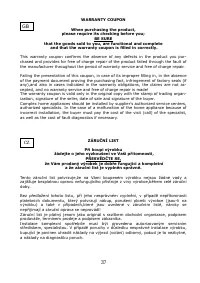
Service life – 3 years.
INSTRUCTIONS FOR HAIR CUT-
TING
Before starting the hair cut:
1.
Inspect the clipper, making sure
that it is free of oil between the cut-
ting blade teeth and turn the unit on
to distribute the oil and to make sure
it is running smoothly. Wipe off any
excess oil. This should be done after
each use. While using the unit, untwist
the cord from time to time to avoid
tangling.
2.
Seat the person so their head is
approximately at your eye level. This
allows ease of visibility, while cutting
and a relaxed control of the unit.
3.
Before cutting always first comb
the hair, so it is tangle free and as it is
naturally worn.
4.
Place a towel around the neck and
shoulders of the person having the
haircut.
REMINDERS
Cut the hair in a relaxed and slow
manner. Use short strokes only to
work gradually over the entire head.
Always take off a little hair at a
time, you can always trim off addi-
tional hair later.
As you work, comb the hair fre-
quently back into the style to which
you are cutting.
When cutting with this hair clip-
per, it is better to leave the hair dry,
not wet. With the hair dry, it is much
easier to control the amount of hair
being cut.
BEGINNING THE HAIRCUT
Cutting hair requires practice, so it is
always better to leave the hair longer
for the first few haircuts, until you
become used to the length, to which
each attachment cuts the hair.
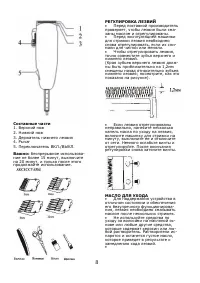
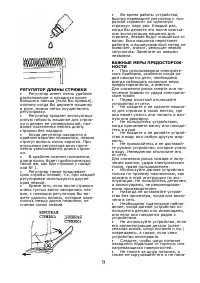
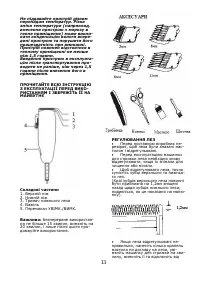
ATTACHMENT COMB
(see main dia-
gram)
Attachment Comb No. 1 leaves
3mm hair length.
Attachment Comb No. 2 leaves
6mm hair length.
Attachment Comb No. 3 leaves
9mm hair length.
Attachment Comb No. 4 leaves
12mm hair length.
Each comb attachment is marked ac-
cordingly on its outside middle sur-
face.
To attach a comb, hold it with
teeth showing, and slide it onto and
along the clipper blade, until the front
of the comb firmly rests against the
clipper blade.
To remove the comb, simply pull
the comb upward and away from the
clipper blade.
For even cutting, allow the comb
attachment / cutter to cut through the
hair. Do not force it through. Also re-
member to comb the hair frequently
to remove trimmed hair and to check
for uneven strands.
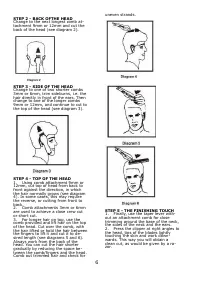
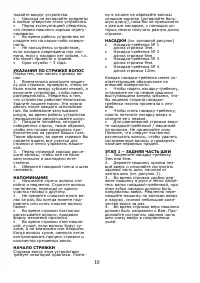
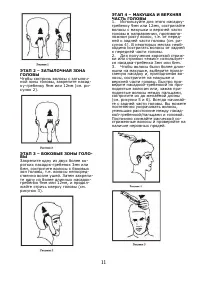
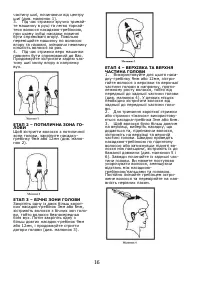
STEP 1 - NAPE OF THE NECK
1.
Attach comb attachment 3mm or
6mm.
2.
Hold the clipper cutting edge
pointed up and begin the haircut,
starting at the centre of the head at
the base of the neck (see diagram 1).
3.
Hold the clipper comfortably in
your hand and hold lightly against the
head with the comb teeth pointing
upward. Gradually and slowly lift the
clipper, working upwards and outwards
through the hair, trimming just a little
at a time.
4.
As you cut, gradually lift the hair
clipper head towards you. Continue to
cut the back area from the bottom of
the neck upwards to the top of the
ears.

