Машинки для стрижки Philips BT7210/15 - инструкция пользователя по применению, эксплуатации и установке на русском языке. Мы надеемся, она поможет вам решить возникшие у вас вопросы при эксплуатации техники.
Если остались вопросы, задайте их в комментариях после инструкции.
"Загружаем инструкцию", означает, что нужно подождать пока файл загрузится и можно будет его читать онлайн. Некоторые инструкции очень большие и время их появления зависит от вашей скорости интернета.

Electromagnetic fields (EMF)
-
This Philips appliance complies with all
applicable standards and regulations regarding
exposure to electromagnetic fields.
General
-
The appliance is suitable for mains voltages
ranging from 100 to 240 volts.
-
The supply unit transforms 100-240 volts to a
safe low voltage of less than 24 volts.
-
Maximum noise level: Lc = 75 dB(A).
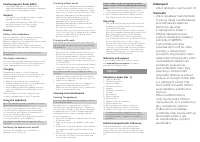
Display
Battery status indications
When the battery is almost empty, the battery
charge indicator flashes orange (Fig. 3).
When the appliance is charging, the battery charge
indicator flashes white (Fig. 4).
When the battery is fully charged, the battery
charge indicator lights up white continuously (Fig.
5).
Note: The lights switch off automatically after
30 minutes.
Hair length indications
The selected hair length setting will light up on the
front of the handle when you select the desired
length setting with the zoom wheel (Fig. 6).
Charging
Charging takes approx. 1 hour. Charge the
appliance before you use it for the first time and
when the display indicates that the battery is
almost empty.
1 Make sure the appliance is switched off.
2 Put the adapter in the wall socket and put the
small plug in the appliance (Fig. 7).
3 After charging, remove the adapter from the
wall socket and pull the small plug out of the
appliance.
When the appliance is fully charged, it has a
cordless operating time of up to 75 minutes.
Using the appliance
Note: This appliance can be used without cord or
directly from the power outlet.
You can use this appliance for a stubble and
a short beard. This appliance has an integrated
vacuum system that catches cut beard hair for
a less mess trimming experience.
The vacuum system is activated automatically as
soon as you switch on the appliance.
Note: Switch off and clean the appliance after
each use.
Switching the appliance on and off
Press the on/off button once to switch the
appliance on or off (Fig. 8).
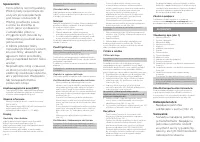
Trimming without comb
-
You can use the appliance without beard and
stubble comb to trim hair close to the skin or
to contour the neckline and sideburns. To trim
hair close to the skin, place the flat side of the
trimming head against your skin and make
strokes in the desired direction (Fig. 9).
-
For contouring hold the trimming head
perpendicular to the skin and move the
trimming head upwards or downwards with
gentle pressure (Fig. 10).
-
You can use the precision trimmer to create
fine lines and contours around your facial style,
close to the skin (Fig. 11). Simply pull the cutting
element straight off (Fig. 12) and insert the
precision trimmer (Fig. 13).
Trimming with comb
Note: When you trim for the first time, start at the
highest length setting to familiarise yourself with
the appliance.
-
You can use the beard and stubble comb
attached to the cutting element to groom your
beard and moustache in your preferred style.
For the beard and stubble comb, you can turn
the zoom wheel to choose from 20 length
settings ranging from 0.5mm to 10mm in steps
of 0.5mm (Fig. 6).
-
You can use the precision trimmer with a detail
comb attached for precision trimming of your
sideburns, moustache or beard (Fig. 14).
Note: Switch off and clean the appliance after
each use.
1 Attach the detail comb (Fig. 15) or the beard
and stubble comb onto the appliance (Fig. 16).
2 Switch on the appliance.
3 To trim most effectively, move the appliance
against the hair growth direction (Fig. 17).
Make sure that the surface of the comb always
stays in contact with the skin.
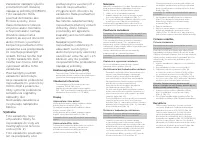
Cleaning and maintenance
Cleaning the appliance
Note: Only the cutting element and the comb can
be cleaned with water.
We advise you to empty the hair-collection
chamber after each trimming session. When you
trim long, dense beards, it may also be necessary
to empty the hair-collection chamber during the
trimming session in order to maintain optimal
suction performance.
1 Switch off the appliance and disconnect it from
the power outlet.
2 Wipe the housing of the appliance with a dry
cloth.
3 Remove the comb (Fig. 18) and clean it with the
cleaning brush and/or rinse it under the tap
(Fig. 19).
4 Remove the cutting element and clean it under
the tap (Fig. 20). Shake off excess water and
leave to dry completely.
Caution: Never dry the cutting element with a
towel or tissue, as this may damage the trimming
teeth.
5 Shake and/or brush out the hairs that have
collected in the hair chamber (Fig. 21, Fig. 22).
6 After cleaning, reattach the cutting element
(Fig. 23) and comb (Fig. 16) to the appliance.
Recycling
-
This symbol means that this product shall not
be disposed of with normal household waste
(2012/19/EU) (Fig. 24).
-
This symbol means that this product contains a
built-in rechargeable battery which shall not be
disposed of with normal household waste
(Fig. 25) (2006/66/EC). We strongly advise
you to take your product to an official collection
point or a Philips service centre to have a
professional remove the rechargeable battery.
-
Follow your country’s rules for the separate
collection of electrical and electronic products
and rechargeable batteries. Correct disposal
helps prevent negative consequences for the
environment and human health.
Warranty and support
If you need information or support, please
visit
www.philips.com/support
or read the
international warranty leaflet.
ČEŠTINA
Všeobecný popis (obr. 1)
1 Střihací jednotka
2 Podtlakový systém
3 Nastavení délky
4 Přibližovací kolečko
5 Vypínač
6 Ukazatel stavu baterie
7 Pouzdro
8 Čisticí kartáč
9 Čisticí houbička
10 Malá zástrčka
11 Napájecí jednotka (adaptér)
12 Přesný zastřihovač
13 Přesný hřebenový nástavec 5 mm (L)
14 Přesný hřebenový nástavec 3 mm (M)
15 Hřebenový nástavec na vousy a strniště
Poznámka: Dodané příslušenství se může
pro různé výrobky lišit. Příslušenství, které je
součástí výrobku, je zobrazeno na krabičce
produktu.
Důležité bezpečnostní informace
Před použitím přístroje a jeho příslušenství
si pečlivě přečtěte tuto příručku s důležitými
informacemi a uschovejte ji pro budoucí použití.
Dodané příslušenství se může pro různé výrobky
lišit.
Nebezpečí
-
Zdroj udržujte v suchu (obr. 2).
Varování
-
Zdroj obsahuje transformátor.
U zdroje nikdy neodřezávejte
a nenahrazujte zástrčku.
Mohlo by tak dojít
k nebezpečné situaci.
-
Přístroj nabíjejte pouze
pomocí dodávané napájecí
jednotky (HQ8505).
-
Tento přístroj mohou
používat děti od 8 let věku
a osoby s omezenými
fyzickými, smyslovými nebo
duševními schopnostmi nebo
nedostatkem zkušeností
a znalostí, pokud jsou
pod dohledem nebo byly
poučeny o bezpečném
používání přístroje a pokud
chápou související rizika. Děti
si s přístrojem nesmí hrát.
Děti nesmí provádět čištění
a uživatelskou údržbu bez
dozoru.
-
Před použitím přístroj
vždy zkontrolujte. Přístroj
nepoužívejte, je-li poškozený,
aby nedošlo ke zranění.
Poškozenou součástku
vyměňujte vždy za původní typ.
-
Neotvírejte přístroj, ani
se nepokoušejte vyměnit
akumulátor.


