
Кухонные комбайны Philips Viva Collection HR7769/00 - инструкция пользователя по применению, эксплуатации и установке на русском языке. Мы надеемся, она поможет вам решить возникшие у вас вопросы при эксплуатации техники.
Если остались вопросы, задайте их в комментариях после инструкции.
"Загружаем инструкцию", означает, что нужно подождать пока файл загрузится и можно будет его читать онлайн. Некоторые инструкции очень большие и время их появления зависит от вашей скорости интернета.
Register your product and get support at
HR7769
www.philips.com/welcome
Specifications are subject to change without notice
© 2013 Koninklijke Philips Electronics N.V.
All rights reserved.
HR7769_RU_UM_V1.0
3140 035 36881
1
(MAX)
5 x 1 sec
500 g
5 x 1 sec
500 g
30 sec
50 g
60 sec
250 g
45 sec
250 g
2
30 sec
200 g
2
2-3 min
360 ml
350 ml
4 pcs
1
1
1
2
P/2
P
1
30 sec
2 pcs
1
30 sec
500 g
1
30 sec
300 g
1
30 sec
200 g
1
30 sec
500 g
1
60-180 sec
60-180 sec
400 g
1 min
1
L
1 min
1 L
1 min
1 L
3 min
600 ml
P
P
x 9
6 x
30 sec
40 g
30 sec
70 g
30 sec
40 g
30 sec
50 g
2
2
2
2
2
2
2
2
5 sec
100 g
P
6
4 min
1 kg
1
20 sec
500 g
1
2
4
3
5
8
7
12
9
500 g
11
10
English
1 Important
Read this user manual carefully before you use the appliance, and save the user manual for
future reference.
Danger
•
Do not immerse the motor unit in water nor rinse it
under the tap.
Warning
• Never use your fingers or an object to push
ingredients into the feeding tube while the appliance
is running. Only use the pusher.
•
Before you connect the appliance to the power, make
sure that the voltage indicated on the bottom of the
appliance corresponds to the local power voltage.
•
Never connect this appliance to a timer switch, to
avoid a hazardous situation.
•
Do not use the appliance if the power cord, the
plug, protecting cover, or any other parts are
damaged or has visible cracks.
• If the power cord is damaged, you must have it
replaced by Philips, a service center authorized by
Philips, or similarly qualified persons to avoid a hazard.
•
This appliance shall not be used by children. Keep
the appliance and its cord out of reach of children.
•
This appliance can be used by persons with reduced
physical, sensory or mental capabilities or lack of
experience and knowledge if they have been given
supervision or instruction concerning use of the
appliance in a safe way and if they understand the
hazards involved.
•
For their safety, do not allow children to play with
the appliance.
•
Never let the appliance run unattended.
• If food sticks to the wall of the blender jar or bowl,
switch off the appliance and unplug it. Then use a
spatula to remove the food from the wall.
•
Be careful when you handle or clean the discs, the
blade unit of the food processor, and the blade unit
of the blender. The cutting edges are very sharp.
•
Do not touch the blades, especially when the
appliance is plugged in. The blades are very sharp.
• If the blades get stuck, unplug the appliance before
you remove the ingredients that block the blades.
•
Be careful if hot liquid is poured into the food
processor or blender as it can be ejected out of the
appliance due to a sudden steaming.
•
This appliance is intended for household only.
Caution
• Never switch off the appliance by turning the
blender jar, the bowl, or their lids. Always switch off
the appliance by turning the speed selector to
0
.
• Unplug the appliance immediately after use.
• Always wait until the moving parts stop running,
then switch off and unplug the appliance before
opening the lid and reaching into any of the parts
that move in use.
• Before you remove, clean or change the accessories,
switch off and unplug the appliance.
• Thoroughly clean the parts that come into contact
with food before you use the appliance for the first
time.
•
Never use any accessories or parts from other
manufacturers or that Philips does not specifically
recommend. If you use such accessories or parts,
your guarantee becomes invalid.
•
Do not exceed the maximum level indication on the
bowl or the jar. Follow the quantities, processing
time nd speed as indicated in the user manual.
• Let hot ingredients cool down (< 80ºC) before
processing them.
• Always let the appliance cool down to room
temperature after each batch that you process.
• Certain ingredients may cause discolorations on the
surface of the parts. This does not have a negative
effect on the parts. The discolorations usually
disappear after some time.
• Noise level = 83 dB (A)
Electromagnetic fields (EMF)
This Philips appliance complies with all applicable standards and regulations regarding
exposure to electromagnetic fields (EMF). If handled properly and according to the
instructions in this user manual, the appliance is safe to use based on scientific evidence
available today.
Recycling
Your product is designed and manufactured with high quality materials and components,
which can be recycled and reused.
When you see the crossed-out wheel bin symbol attached to a product, it means the
product is covered by the European Directive 2002/96/EC:
Never dispose of your product with other household waste. Please inform yourself about
the local rules on the separate collection of electrical and electronic products. The correct
disposal of your old product helps prevent potentially negative consequences on the
environment and human health.
2 Introduction
Congratulations on your purchase and welcome to Philips! To fully benefit from the support
that Philips offers, register your product at www.philips.com/welcome.
This appliance is equipped with a built-in safety lock. You can only switch on the appliance
after you correctly assemble the following parts on the motor unit:
•
the food processor bowl and its lid, or
• the blender jar and its lid, or
•
the mini chopper.
If these parts are assembled correctly, the built-in safety lock is unlocked.
For recipes, go to www.philips.com/kitchen
3 Food processor
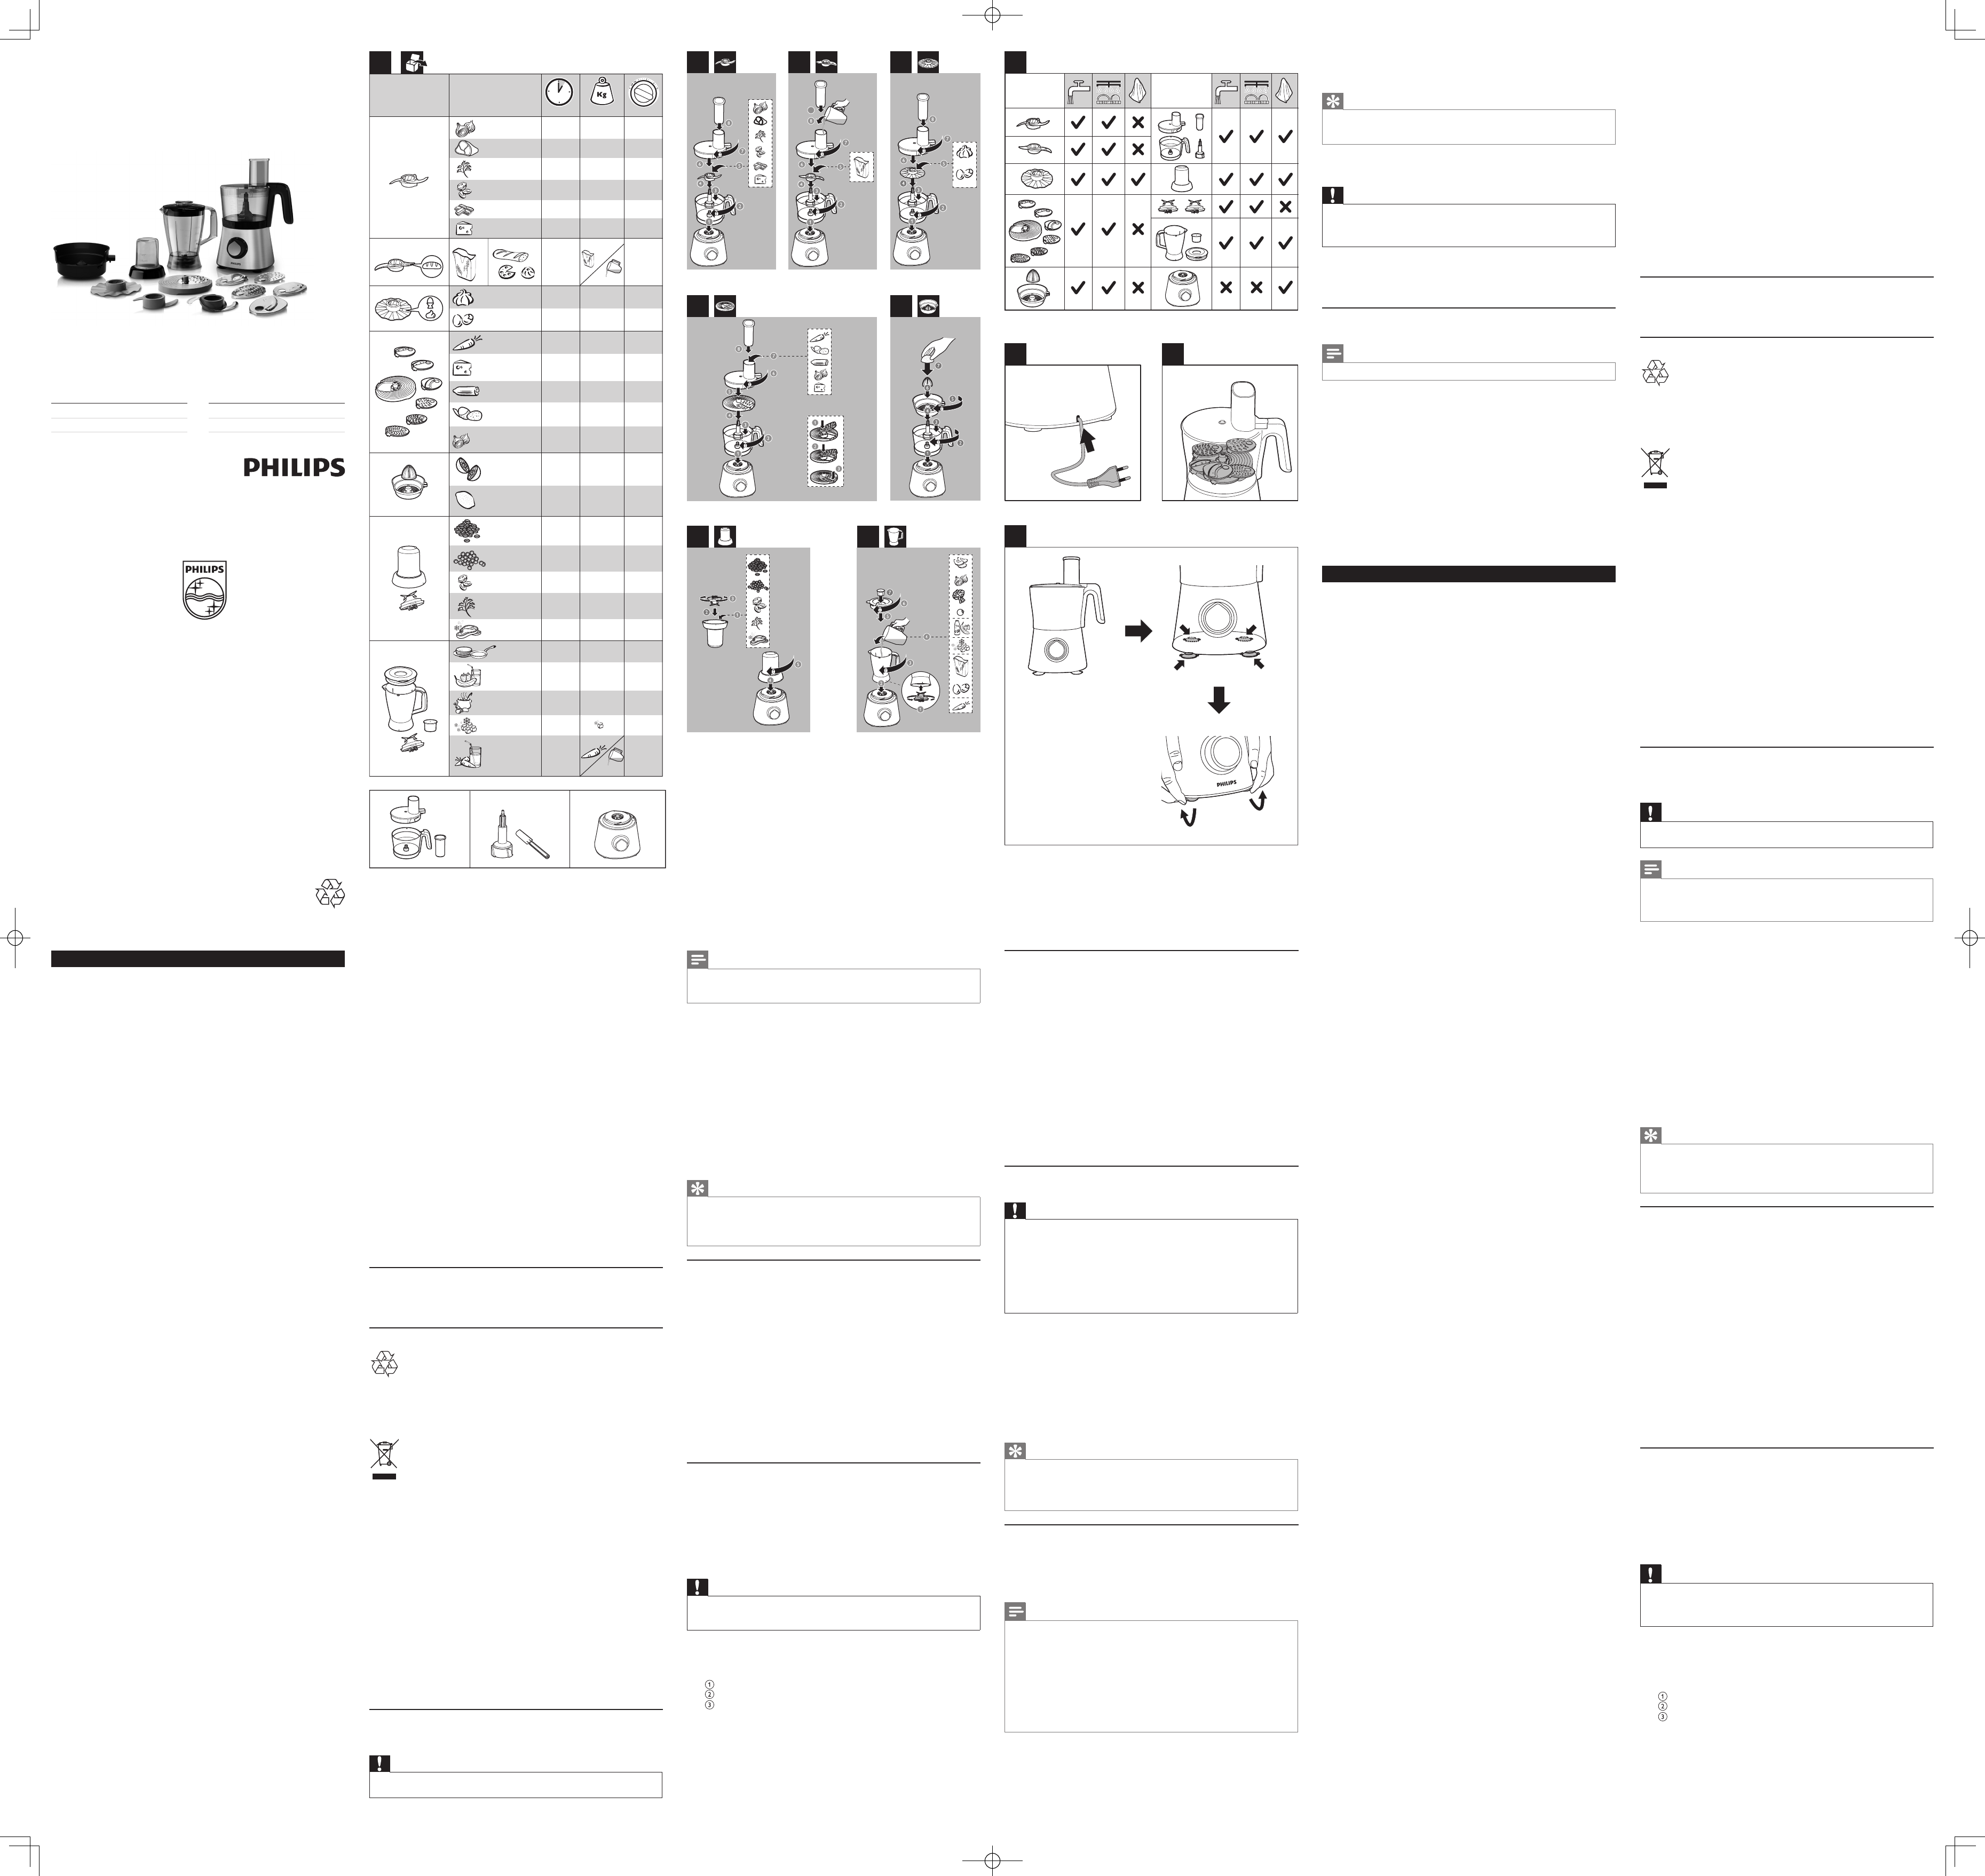
Blade unit
Before you start, make sure that you assemble according to Fig. 2.
You can use the blade unit to chop, mix, blend, or puree ingredients.
Caution
•
Do not use the blade unit to chop hard ingredients, like coffee beans, turmeric, nutmeg, and ice
cubes, as this may cause the blade to get blunt.
Note
•
Do not let the appliance run too long when you chop (hard) cheese or chocolate. Otherwise these
ingredients become too hot, star t to melt, and turn lumpy.
•
Precut large pieces of food into pieces of approx. 3 x 3 x 3 cm.
1
Turn the bowl clockwise to fix it on the motor unit, and then put the shaft in the bowl.
»
When the bowl is fixed correctly, you hear a click.
2
Take the blade unit out of the protective cover.
3
Put the blade unit on the shaft.
4
Put the ingredients in the bowl.
5
Put the lid on the bowl, and then turn the lid clockwise to fix it.
»
When the lid is assembled correctly, you hear a click and the lid is fixed to the
bowl handle.
6
Put the pusher into the feeding tube.
7
Connect the power plug to the power supply.
8
Follow the processing speed and do not exceed the processing time and maximum
amount for the ingredients as indicated in Table 1.
9
After use, turn the speed selector to
0
, and then unplug the appliance.
Tip
•
When you chop onions, turn the speed selector to
P
a few times to prevent the onions from
becoming too finely chopped.
•
How to remove food that sticks to the blade or to the inside of the bowl? 1. Switch off the appliance,
and then unplug it. 2. Remove the lid from the bowl. 3. Remove the ingredients from the blade or
from the side of the bowl with a spatula.
Kneading accessory
Before you start, make sure that you assemble according to Fig. 3.
You can use the kneading accessory to knead yeast dough for bread and pizzas. You need to adjust
the amount of liquid to form the dough according to the humidity and temperature condition.
1
Turn the bowl clockwise to fix it on the motor unit, and then put the shaft in the bowl.
»
When the bowl is fixed correctly, you hear a click.
2
Put the kneading accessory on the shaft.
3
Put the ingredients in the bowl.
4
Put the lid on the bowl, and then turn the lid clockwise to fix it.
»
When the lid is assembled correctly, you hear a click and the lid is fixed to the
bowl handle.
5
Connect the power plug to the power supply.
6
Follow the processing speed and do not exceed the processing time and maximum
amount for the ingredients as indicated in Table 1.
• Depending on the recipe, pour liquid ingredient into the feeding tube while the
device is turned on.
7
After use, turn the speed selector to
0
, and then unplug the appliance.
Discs and Inserts
Before you start, make sure that you pick your desired disc from following and assemble
according to Fig. 4 and Fig. 5:
•
Emulsifying disc
•
Insert for fine slicing
•
Insert for coarse slicing
•
Insert for fine shredding
•
Insert for coarse shredding
•
Insert for granulating
•
Insert for fine julienne
Caution
•
Be careful when you handle the slicing blade of disc. It has a ver y sharp cutting edge.
•
Never use the disc to process hard ingredients, like ice cubes.
•
Do not exer t too much pressure on the pusher when you press ingredients into the feed tube.
1
Turn the bowl clockwise to fix it on the motor unit, and then put the shaft in the bowl.
»
When the bowl is fixed correctly, you hear a click.
2
Put the disc on the shaft. For inserts, place an insert in the insert holder as indicated
below, then place the insert holder with insert on the shaft.
Place the opening of the insert over the shaft of the insert holder.
Push the opening of the insert over the projection on the shaft.
Press the insert onto the insert holder until it locks in position with a click.
3
Put the lid on the bowl, and then turn the lid clockwise to fix it.
»
When the lid is assembled correctly, you hear a click and the lid is fixed to the
bowl handle.
4
Put the ingredients into the feeding tube with the pusher. Fill the feeding tube evenly
for the best results. When you have to process a large amount of ingredients, process
small batches and empty the bowl between batches.
5
Connect the power plug to the power supply.
6
Follow the processing speed and do not exceed the processing time and maximum
amount for the ingredients as indicated in Table 1.
7
After use, turn the speed selector to
0
, and then unplug the appliance.
Citrus press
Before you start, make sure you assemble according to Fig. 6.
You can use the citrus press to squeeze citrus fruits.
1
Turn the the bowl clockwise to fix it on the motor unit, and then put the tool holder
in the bowl.
»
When the bowl is fixed correctly, you can hear a click .
2
Put the sieve for citrus press on the tool holder in the bowl. Make sure that the
projection on the sieve is locked in the slot of the bowl handle.
»
When the sieve is fixed correctly, you can hear a click .
3
Put the cone on the sieve.
4
Connect the power plug to the power supply.
5
Check the maximum amount required for the ingredients in Table 1. Turn the knob to
speed
1
.
»
The cone starts rotating.
6
Press the citrus fruit onto the cone.
7
Stop pressing from time to time to remove the pulp from the sieve. When you finish
pressing or when you want to remove the pulp, turn the knob to
0
and remove the
bowl from the appliance with the sieve and cone on it.
Mini chopper
Before you start, make sure you assemble according to Fig. 7.
Caution
•
Do not use the mini chopper to chop hard ingredients, like nutmeg, Chinese rock sugar, or ice cubes.
•
Never use the mini chopper for more than 30 seconds without interruption.
•
Assemble the sealing ring onto the blade unit before you attach the blade unit to the mini chopper,
to avoid leakage.
•
Always process cloves, star anise, and aniseed together. If processed separately, these ingredients may
attack the plastic materials of the appliance.
•
The mini chopper beaker may become discolored when you use the mill to process ingredients, like
cloves, anise, and cinnamon.
•
Do not use the mini chopper to process liquids like fruit juice.
•
Let hot ingredients cool down (< 80ºC) before processing them.
1
Put the ingredients in the mini chopper beaker within the maximum indication.
2
Turn the blade unit anticlockwise on the mini chopper beaker until it is fixed properly.
3
Turn the mini chopper clockwise onto the motor unit until you hear a click.
4
Connect the power plug to the power supply.
5
Follow the processing speed and do not exceed the processing time and maximum
amount for the ingredients as indicated in Table 1.
6
After use, turn the speed selector to
0
, and then unplug the appliance.
7
Turn the mini chopper anticlockwise to take it off from the motor unit.
8
Turn the blade unit clockwise to take it off from the mini chopper beaker.
Tip
•
For best results when processing beef, please use refrigerated beef cubes. Use max of 100g beef
cubes at speed P for 5 sec.
•
How to remove the ingredients that stick to the side of the mini chopper? 1. Switch off the appliance,
and then unplug it. 2. Remove the beaker from the blade unit. 3. Remove the ingredients from the
blade or from the side of the beaker with a spoon.
Blender
Before you start, make sure you assemble according to Fig. 8.
The blender is intended for:
•
Blending fluids, like dairy products, sauces, fruit juices, soups, mixed drinks, and shakes,
•
Mixing soft ingredients, like pancake batter,
•
Pureeing cooked ingredients, like baby food.
Note
•
Do not exer t too much pressure on the handle of the blender jar.
•
Never open the lid to put your hand or any object in the jar while the blender is running.
•
Always assemble the sealing ring onto the blade unit before you attach the blade unit to the blender jar.
•
To add liquid ingredients during processing, pour them into the blender jar through the feeding hole.
•
Precut solid ingredients into small pieces before you process them.
•
If you want to prepare a large quantity, process small batches of ingredients instead of a large
quantity at once.
•
Use cooked ingredients when you blend a soup.
•
To avoid spillage: When you process a liquid that is hot or tends to foam (for example, milk), do not
put more than 1 liter of liquid in the blender jar.
•
If you are not satisfied with the result, switch off the appliance and stir the ingredients with a spatula.
Remove some of the contents to process a smaller quantity or add some liquid.
1
Turn the blade unit on the blender jar.
2
Place the blender jar on the motor unit and turn it clockwise to fix it.
»
When the jar is fixed correctly, you hear a click.
3
Put the ingredients in the blender jar within the maximum level indication.
4
Place the lid on the blender jar, and then turn it clockwise to fix it.
5
Connect the power plug to the power supply.
6
Follow the processing speed and do not exceed the processing time and maximum
amount for the ingredients as indicated in Table 1.
7
After use, turn the speed selector to
0
, and unplug the appliance.
Tip
•
How to remove the ingredients that stick to the side of the blender jar? 1. Switch off the appliance,
and then unplug it. 2. Open the lid, and then use a spatula to remove the ingredients from the side of
the jar. 3. Keep the spatula at least 2 cm from the blade.
4 Cleaning and storage
Caution
•
Before you clean the appliance, unplug it.
•
Make sure that the cutting edges of the blades, discs, and the inser ts do not come into contact with
hard objects. This may cause the blade to get blunt.
•
The cutting edges are sharp. Be careful when you clean.
1
Clean the motor unit with a moist cloth.
2
Clean the other parts in hot water (< 60ºC) with some washing-up liquid or in a
dishwasher.
3
Store the product in a dry place.
Quick cleaning
You can follow the following steps to clean the food processor bowl and blender jar easier.
Note
•
Make sure that the blade is assembled in the bowl if you clean the food processor bowl.
1
Pour lukewarm water (not more than 0.5 liters) and some washing-up liquid into the
food processor bowl or blender jar.
2
Place the lid on the food processor bowl or blender jar, and then turn it clockwise to
fix it.
3
Turn the speed selector to
P
until the bowl or jar is clean.
4
Let the appliance run for 30 seconds or until the food processor bowl or blender
jar is clean.
5
Detach the blender jar or food processor bowl and rinse it with clean water.
5 Guarantee and service
If you have a problem, need service, or need information, see www.philips.com/support or
contact the Philips Consumer Care Center in your country. The phone number is in the
worldwide guarantee leaflet. If there is no Consumer Care Center in your country, go to
your local Philips dealer.
Русский
1 Внимание
Перед эксплуатацией прибора внимательно ознакомьтесь с настоящим руководством и
сохраните его для дальнейшего использования в качестве справочного материала.
Опасно!
• Запрещается погружать блок электродвигателя в
воду и промывать его под струей воды.
Предупреждение
• Во время работы прибора запрещается
проталкивать продукты в камеру подачи
пальцами или какими-либо предметами.
Пользуйтесь только толкателем.
• Перед подключением прибора к источнику
питания убедитесь, что напряжение, указанное
на нижней панели прибора, соответствует
напряжению местной электросети.
• Для безопасной эксплуатации прибора
запрещается подключать его к таймеру
отключения.
• Не пользуйтесь прибором, если сетевой шнур,
сетевая вилка, защитная крышка или другие
детали повреждены.
• В случае повреждения сетевого шнура его
необходимо заменить. Чтобы обеспечить
безопасную эксплуатацию прибора, заменяйте
шнур только в авторизованном сервисном
центре Philips или в сервисном центре с
персоналом аналогичной квалификации.
• Не разрешайте детям пользоваться прибором.
Храните прибор и шнур в недоступном для
детей месте.
• Лица с ограниченными физическими или
интеллектуальными возможностями, а также
лица с недостаточным опытом и знаниями
могут пользоваться этим прибором только под
присмотром или после получения инструкций
по безопасному использованию прибора и при
условии понимания потенциальных опасностей.
• Для безопасности детей не позволяйте им
играть с прибором.
• Запрещается оставлять включенный прибор без
присмотра.
• Если продукты налипли на стенки кувшина
блендера или чаши, выключите прибор и
отключите его от электросети. Затем снимите
продукты со стенок лопаточкой.
• Будьте осторожны во время эксплуатации и
очистки дисков, ножевого блока кухонного
комбайна и ножевого блока блендера. Режущие
края очень острые.
• Не прикасайтесь к ножам, если прибор
подключен к электросети. Лезвия очень острые!
• В случае заедания ножевого блока отключите
прибор от сети, прежде чем извлечь продукты,
препятствующие движению лезвий.
• Во избежание ожога горячим паром соблюдайте
особую осторожность, наливая горячую
жидкость в кухонный комбайн или блендер.
• Прибор предназначен только для домашнего
использования.
Внимание!
• Не пытайтесь выключить прибор, поворачивая
кувшин блендера, чашу или их крышки.
Выключайте прибор, установив переключатель
скорости в положение
0
.
• После завершения работы отключайте прибор
от розетки электросети.
• Перед тем как открыть крышку и выполнять какие-
либо операции с движущимися частями прибора,
дождитесь их полной остановки, затем выключите
прибор и отключите его от электросети.
• Перед извлечением, очисткой и заменой
аксессуаров выключите прибор и отключите его
от розетки электросети.
• Перед первым применением прибора
тщательно промойте все детали, которые будут
соприкасаться с пищевыми продуктами.
• Запрещается пользоваться какими-
либо аксессуарами или деталями других
производителей, не имеющих специальной
рекомендации Philips. При использовании
таких аксессуаров и деталей гарантийные
обязательства теряют силу.
• Не заполняйте чашу или кувшин выше отметки
максимального уровня. Количество продуктов
и время их обработки не должны превышать
значения, указанные в руководстве по
эксплуатации.
• Перед измельчением дайте горячим
ингредиентам остыть (< 80 °C).
• Всегда давайте прибору остыть до комнатной
температуры перед обработкой следующей
порции продуктов.
• Некоторые ингредиенты могут вызвать
изменение цвета поверхности деталей. Это не
оказывает на детали отрицательного эффекта.
Обычно со временем цвет восстанавливается.
• Уровень шума = 83 дБ (A)
Электромагнитные поля (ЭМП)
Этот прибор Philips соответствует всем применимым стандартам и нормам по
воздействию электромагнитных полей (ЭМП). При правильной эксплуатации в
соответствии с инструкциями в данном руководстве прибор абсолютно безопасен в
использовании, что подтверждается имеющимися на сегодня научными данными.
Утилизация
Данное изделие изготовлено из высококачественных материалов и компонентов,
которые подлежат повторной переработке и вторичному использованию.
Если изделие маркировано значком с изображением перечеркнутого мусорного бака,
это означает, что изделие подпадает под действие Директивы ЕС 2002/96/EC:
Никогда не выбрасывайте отслужившие изделия вместе с бытовым мусором. Для
утилизации электрических и электронных изделий необходимы сведения о местной
системе отдельной утилизации отходов. Правильная утилизация отработавшего
изделия поможет предотвратить возможные негативные последствия для окружающей
среды и здоровья человека.
2 Введение
Поздравляем с покупкой и приветствуем в клубе Philips! Чтобы воспользоваться всеми
преимуществами поддержки Philips, зарегистрируйте приобретенное устройство на
сайте www.philips.com/welcome.
Данный прибор оснащен встроенной системой защиты. Включение прибора возможно
только после правильной установки на блоке электродвигателя следующих деталей:
• чаши кухонного комбайна и ее крышки;
• чаши кувшина блендера и ее крышки;
• мини-измельчителя.
Если перечисленные детали установлены должным образом, встроенная система
защиты будет разблокирована.
Рецепты см. на веб-сайте www.philips.com/kitchen
3 Кухонный комбайн
Ножевой блок
Перед включением убедитесь, что сборка произведена согласно рис. 2.
Ножевой блок используется для измельчения, смешивания и приготовления
однородных масс.
Внимание!
•
Не пользуйтесь ножевым блоком для измельчения твердых ингредиентов, таких как кофейные
зерна, куркума, мускатный орех и кубики льда. Нож может затупиться.
Примечание
•
При измельчении твердого сыра или шоколада не включайте прибор на продолжительное
время. В противном случае ингредиенты могут слишком сильно нагреться, расплавиться и
сбиться комками.
•
Нарежьте крупные продукты на кусочки размером приблизительно 3 x 3 x 3 см.
1
Поверните чашу по часовой стрелке, чтобы закрепить ее на блоке
электродвигателя, затем установите в чашу вал.
»
При правильной установке чаши прозвучит щелчок.
2
Извлеките ножевой блок из защитного футляра.
3
Установите ножевой блок на вал.
4
Поместите ингредиенты в чашу.
5
Накройте чашу крышкой, затем поверните крышку по часовой стрелке для
фиксации.
»
Если крышка собрана верно, прозвучит щелчок, и крышка будет надежно
прикреплена к ручке чаши.
6
Установите толкатель в камеру подачи.
7
Подключите сетевую вилку к источнику питания.
8
Не превышайте максимальное количество ингредиентов, а также скорость и
время обработки, указанные в таблице 1.
9
После использования установите переключатель скорости в положение
0
, затем
отключите прибор от электросети.
Совет
•
Во время измельчения лука несколько раз поверните переключатель скорости в положение
P
,
чтобы предотвратить слишком сильное измельчение.
•
Как удалить продукты, налипшие на нож или внутреннюю поверхность чаши? 1. Выключите
прибор и отключите его от электросети. 2. Снимите с чаши крышку. 3. С помощью лопатки
очистите прилипшие продукты с лезвия ножа или со стенок чаши.
Насадка для теста
Перед включением убедитесь, что сборка произведена согласно рис. 3.
Насадка для теста используется для замешивания дрожжевого теста для хлеба и
пиццы. Объем жидкости для теста следует подбирать в соответствии с уровнем
влажности и температурой.
1
Поверните чашу по часовой стрелке, чтобы закрепить ее на блоке
электродвигателя, затем установите в чашу вал.
»
При правильной установке чаши прозвучит щелчок.
2
Установите насадку для теста на вал.
3
Поместите ингредиенты в чашу.
4
Накройте чашу крышкой, затем поверните крышку по часовой стрелке для
фиксации.
»
Если крышка собрана верно, прозвучит щелчок, и крышка будет надежно
прикреплена к ручке чаши.
5
Подключите сетевую вилку к источнику питания.
6
Не превышайте максимальное количество ингредиентов, а также скорость и
время обработки, указанные в таблице 1.
• В зависимости от рецепта налейте жидкий ингредиент в камеру подачи,
когда прибор включен.
7
После использования установите переключатель скорости в положение
0
, затем
отключите прибор от электросети.
Диски и вставки
Прежде чем приступить, выберите подходящий диск (перечислены далее) и выполните
сборку согласно рис. 4 и рис. 5:
•
Диск для приготовления эмульсий
•
Насадка для нарезки тонкими ломтиками
•
Насадка для нарезки толстыми ломтиками
•
Насадка для мелкой шинковки
•
Насадка для крупной шинковки
•
Насадка для измельчения
•
Насадка для нарезки мелкой соломкой
Внимание!
•
Будьте осторожны при обращении с лезвием для нарезки на диске. Режущий край лезвия
очень острый.
•
Не используйте диски для обработки твердых ингредиентов, таких как кубики льда.
•
При проталкивании ингредиентов в камеру подачи не нажимайте на толкатель слишком сильно.
1
Поверните чашу по часовой стрелке, чтобы закрепить ее на блоке
электродвигателя, затем установите в чашу вал.
»
При правильной установке чаши прозвучит щелчок.
2
Установите диск на вал. Насадки: установите насадку в держатель насадок, как
показано ниже, а затем установите держатель с насадкой на вал.
Расположите отверстие в насадке над валом держателя насадок.
Протолкните насадку, чтобы выступ вала вошел в отверстие.
Нажмите на установленную в держатель насадку до щелчка.
3
Накройте чашу крышкой, затем поверните крышку по часовой стрелке для
фиксации.
»
Если крышка собрана верно, прозвучит щелчок, и крышка будет надежно
прикреплена к ручке чаши.
4
Опустите ингредиенты в камеру подачи с помощью толкателя. Для получения
наилучших результатов заполняйте камеру подачи равномерно. Если вам
необходимо обработать большое количество продуктов, разделите их на
небольшие порции и освобождайте чашу после обработки каждой порции.
5
Подключите сетевую вилку к источнику питания.
EN
User manual
RU
Руководство пользователя
KK
Қолданушының нұсқасы
UK
Посібник користувача


