
Кухонные комбайны Philips HR 7761/00 - инструкция пользователя по применению, эксплуатации и установке на русском языке. Мы надеемся, она поможет вам решить возникшие у вас вопросы при эксплуатации техники.
Если остались вопросы, задайте их в комментариях после инструкции.
"Загружаем инструкцию", означает, что нужно подождать пока файл загрузится и можно будет его читать онлайн. Некоторые инструкции очень большие и время их появления зависит от вашей скорости интернета.

English
1 Important
Congratulations on your purchase and welcome to Philips! To fully benefit from the suppor t
that Philips offers, register your product at www.philips.com/welcome.
Read this user manual carefully before you use the appliance, and save the user manual
forfuture reference.”
Danger
• Do not immerse the motor unit in water nor rinse
it under the tap.
Warning
•
Never use your fingers or an object to push
ingredients into the feeding tube while the appliance
is running. Only use the pusher.
• Before you connect the appliance to the power,
make sure that the voltage indicated on the bottom
of the appliance corresponds to the local power
voltage.
• Never connect this appliance to a timer switch, to
avoid a hazardous situation.
• Do not use the appliance if the power cord, the
plug, protecting cover, rotating sieve or any other
par ts are damaged or has visible cracks.
• If the power cord is damaged, you must have it
replaced by Philips, a ser vice center authorized
by Philips, or similarly qualified persons to avoid a
hazard.
• This appliance shall not be used by children. Keep
the appliance and its cord out of reach of children.
• This appliance can be used by persons with reduced
physical, sensor y or mental capabilities or lack of
experience and knowledge if they have been given
super vision or instruction concerning use of the
appliance in a safe way and if they understand the
hazards involved.
• For their safety, do not allow children to play with
the appliance.
• Never let the appliance run unattended.
•
If food sticks to the wall of the blender jar or bowl,
switch off the appliance and unplug it. Then use a
spatula to remove the food from the wall.
• Be careful when you are emptying the bowl, handle
or clean the discs, the blade units and the juicer
sieve. The cutting edges are ver y sharp.
• Do not touch the blades, especially when the
appliance is plugged in. The blades are ver y sharp.
• If the blades get stuck, unplug the appliance before
you remove the ingredients that block the blades.
• Be careful if hot liquid is poured into the food
processor or blender as it can be ejected out of the
appliance due to a sudden steaming.
• This appliance is intended for household use only.
Caution
• Never switch off the appliance by turning the
blender jar, the bowl, or their lids. Always switch off
the appliance by turning the speed selector to 0 or
OFF.
• Unplug the appliance immediately after use.
•
Always wait until the moving par ts stop running,
then switch off and unplug the appliance before
opening the lid and reaching into any of the par ts
that move in use.
•
Always switch off and unplug the appliance if it is left
unattended, and before assembling, disassembling,
cleaning and changing accessories, or approaching
par ts that move in use.
• Thoroughly clean the par ts that come into contact
with food before you use the appliance for the first
time. Refer to the instructions and table for cleaning
given in this manual.
• Never use any accessories or par ts from other
manufacturers that Philips does not specifically
recommend. If you use such accessories or par ts,
your guarantee becomes invalid.
• Do not exceed the maximum level indication on
the bowl or the jar. Follow the quantities, processing
time and speed as indicated in the user manual.
• Let hot ingredients cool down (< 80ºC) before
processing them.
•
Always let the appliance cool down to room
temperature after each batch that you process.
• Cer tain ingredients such as carrots may cause
discolorations on the surface of the par ts. This
does not have a negative effect on the par ts. The
discolorations usually disappear after some time.
•
Noise level: Lc = 78 dB [A]
Electromagnetic fields (EMF)
This Philips appliance complies with all applicable standards and regulations regarding
exposure to electromagnetic fields (EMF). If handled properly and according to the
instructions in this user manual, the appliance is safe to use based on scientific evidence
available today.
Recycling
This symbol means that this product shall not be disposed of with normal household
waste (2012/19/EU).
Follow your countr y’s rules for the separate collection of electrical and electronic
products. Correct disposal helps prevent negative consequences for the environment
and human health.
2 Introduction
Congratulations on your purchase and welcome to Philips! To fully benefit from the suppor t
that Philips offers, register your product at www.philips.com/welcome.
This appliance is equipped with a built-in safety lock. You can only switch on the appliance
after you correctly assemble the following par ts on the motor unit:
• the food processor bowl and its lid, or
•
the blender jar and its lid, or
• the mini chopper.
If these par ts are assembled correctly, the built-in safety lock is unlocked.
For recipes, go to www.philips.com/kitchen
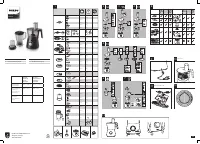
3 Food processor
Blade unit
Before you star t, make sure that you assemble according to Fig. 2.
You can use the blade unit to chop, mix, blend, or puree ingredients.
Caution
•
Do not use the blade unit to chop hard ingredients, like coffee beans, turmeric, nutmeg, and ice
cubes, as this may cause the blade to get blunt.
Note
•
Do not let the appliance run too long when you chop (hard) cheese or chocolate. Otherwise these
ingredients become too hot, star t to melt, and turn lumpy.
•
Precut large pieces of food into pieces of approx. 3 x 3 x 3 cm.
1
Turn the bowl clockwise to fix it on the motor unit, and then put the shaft in the bowl.
»
When the bowl is fixed correctly, you hear a click.
2
Take the blade unit out of the protective cover.
3
Put the blade unit on the shaft.
4
Put the ingredients in the bowl.
5
Put the lid on the bowl, and then turn the lid clockwise to fix it.
»
When the lid is assembled correctly, you hear a click and the lid is fixed to the
bowl handle.
6
Put the pusher into the feeding tube.
7
Connect the power plug to the power supply.
8
Select the speed that matches the color of the accessor y - speed
1
.
9
After use, turn the speed selector to
0
, and then unplug the appliance.
Tip
•
When you chop onions, turn the speed selector to
P
a few times to prevent the onions from
becoming too finely chopped.
•
How to remove food that sticks to the blade or to the inside of the bowl? 1. Switch off the appliance,
and then unplug it. 2. Remove the lid from the bowl. 3. Remove the ingredients from the blade or
from the side of the bowl with a spatula.
Kneading accessory
Before you star t, make sure that you assemble according to Fig. 3.
You can use the kneading accessor y to knead yeast dough for bread and pizzas. You need to
adjust the amount of liquid to form the dough according to the humidity and temperature
condition.
1
Turn the bowl clockwise to fix it on the motor unit, and then put the shaft in the bowl.
»
When the bowl is fixed correctly, you hear a click.
2
Put the kneading accessor y on the shaft.
3
Put the ingredients in the bowl.
4
Put the lid on the bowl, and then turn the lid clockwise to fix it.
»
When the lid is assembled correctly, you hear a click and the lid is fixed to the
bowl handle.
5
Connect the power plug to the power supply.
6
Select the speed that matches the color of the accessor y - speed
1
.
• Depending on the recipe, pour liquid ingredient into the feeding tube while the
device is turned on.
7
After use, turn the speed selector to
0
, and then unplug the appliance.
Discs and Inserts
Before you star t, make sure that you pick your desired disc from following and assemble
according to Fig. 4 and Fig. 5:
•
Emulsifying disc
•
Reversible slicing / shredding disc (fine) (HR7762 and HR7763 only)
•
Reversible slicing / shredding disc (coarse) (HR7762 and HR7763 only)
•
French fr y disc (HR7762 and HR7763 only)
•
Granulating disc (HR7762 only)
•
Julienne disc (HR7763 only)
Caution
•
Be careful when you handle the slicing blade of disc. It has a ver y sharp cutting edge.
•
Never use the disc to process hard ingredients, like ice cubes.
•
Do not exer t too much pressure on the pusher when you press ingredients into the feed tube.
1
Turn the bowl clockwise to fix it on the motor unit, and then put the shaft in the bowl.
»
When the bowl is fixed correctly, you hear a click.
2
Put the disc on the shaft. For inser ts (HR7761 only), place an inser t in the inser t holder
as indicated below, then place the inser t holder with inser t on the shaft.
Place the opening of the inser t over the shaft of the inser t holder.
Push the opening of the inser t over the projection on the shaft.
Press the inser t onto the inser t holder until it locks in position with a click.
3
Put the lid on the bowl, and then turn the lid clockwise to fix it.
»
When the lid is assembled correctly, you hear a click and the lid is fixed to the
bowl handle.
4
Put the ingredients into the feeding tube with the pusher. Fill the feeding tube evenly for
the best results. When you have to process a large amount of ingredients, process small
batches and empty the bowl between batches.
5
Connect the power plug to the power supply.
6
Check the preparation time, the maximum amount and the speed setting required for
the ingredients in Table 1. Select the speed that matches the color of the accessor y.
7
After use, turn the speed selector to
0
, and then unplug the appliance.
4 Mini chopper
Before you star t, make sure you assemble according to Fig. 6.
Caution
•
Do not use the mini chopper to chop hard ingredients, like nutmeg, Chinese rock sugar, or ice cubes.
•
Never use the mini chopper for more than 30 seconds without interruption.
•
Assemble the sealing ring onto the blade unit before you attach the blade unit to the mini chopper,
to avoid leakage.
•
Always process cloves, star anise, and aniseed together. If processed separately, these ingredients may
attack the plastic materials of the appliance.
•
The mini chopper beaker may become discolored when you use the mill to process ingredients, like
cloves, anise, and cinnamon.
•
Do not use the mini chopper to process liquids like fruit juice.
•
Let hot ingredients cool down (< 80ºC) before processing them.
1
Put the ingredients in the mini chopper beaker within the maximum indication.
2
Turn the blade unit anticlockwise on the mini chopper beaker until it is fixed properly.
3
Turn the mini chopper clockwise onto the motor unit until you hear a click.
4
Connect the power plug to the power supply.
5
Select the speed that matches the color of the accessor y - speed
2
. Let it run for about
10-30 seconds until the ingredients are fine enough.
6
After use, turn the speed selector to
0
, and then unplug the appliance.
7
Turn the mini chopper anticlockwise to take it off from the motor unit.
8
Turn the blade unit clockwise to take it off from the mini chopper beaker.
Tip
•
For best results when processing beef, please use refrigerated beef cubes.
•
How to remove the ingredients that stick to the side of the mini chopper? 1. Switch off the appliance,
and then unplug it. 2. Remove the beaker from the blade unit. 3. Remove the ingredients from the
blade or from the side of the beaker with a spoon.
5 Blender
Before you star t, make sure you assemble according to Fig. 7.
The blender is intended for :
•
Blending fluids, like dair y products, sauces, fruit juices, soups, mixed drinks, and shakes,
•
Mixing soft ingredients, like pancake batter,
•
Pureeing cooked ingredients, like baby food.
Note
•
Do not exer t too much pressure on the handle of the blender jar.
•
Never open the lid to put your hand or any object in the jar while the blender is running.
•
Always assemble the sealing ring onto the blade unit before you attach the blade unit to the blender
jar.
•
To add liquid ingredients during processing, pour them into the blender jar through the feeding hole.
•
Precut solid ingredients into small pieces before you process them.
•
If you want to prepare a large quantity, process small batches of ingredients instead of a large
quantity at once.
•
Use cooked ingredients when you blend a soup.
•
To avoid spillage: When you process a liquid that is hot or tends to foam (for example, milk), do not
put more than 1 liter of liquid in the blender jar.
•
If you are not satisfied with the result, switch off the appliance and stir the ingredients with a spatula.
Remove some of the contents to process a smaller quantity or add some liquid.
1
Turn the blade unit on the blender jar.
2
Place the blender jar on the motor unit and turn it clockwise to fix it.
»
When the jar is fixed correctly, you hear a click.
3
Put the ingredients in the blender jar within the maximum level indication.
4
Place the lid on the blender jar, and then turn it clockwise to fix it.
5
Connect the power plug to the power supply.
6
Select the speed that matches the color of the accessor y - speed
2
.
7
After use, turn the speed selector to
0
, and unplug the appliance.
Tip
•
How to remove the ingredients that stick to the side of the blender jar? 1. Switch off the appliance,
and then unplug it. 2. Open the lid, and then use a spatula to remove the ingredients from the side of
the jar. 3. Keep the spatula at least 2 cm from the blade.


