
Кофеварка VITEK VT-1510 BK - инструкция пользователя по применению, эксплуатации и установке на русском языке. Мы надеемся, она поможет вам решить возникшие у вас вопросы при эксплуатации техники.
Если остались вопросы, задайте их в комментариях после инструкции.
"Загружаем инструкцию", означает, что нужно подождать пока файл загрузится и можно будет его читать онлайн. Некоторые инструкции очень большие и время их появления зависит от вашей скорости интернета.
CAFETIER
Cafetiera este destinat pentru prepararea b uturii
din cafeaua m cinat sau cafeaua în cialda, pre
-
cum şi pentru infuzarea ceaiului. Pentru transporta
-
rea b uturii preparate utiliza i cana-termos (inclus
în setul de livrare).
Descriere
1.
Rezervor pentru ap
2.
Capac
3.
Mâner capac
4.
Loc pentru instalarea suportului
5.
Capac can -termos
6.
Can -termos
7.
Platform pentru can
8.
Buton pornire «Start»
9.
Suport filtru
10.
Filtru
11.
Lingur de m sur
Aten ie!
Pentru o protec ie suplimentar instala i în cir
-
cuitul de alimentare un dispozitiv pentru curent
rezidual (RCD) al c rui curent nominal de declan
-
şare sa nu dep şeasc 30 mA. Pentru instalarea
RCD apela i la un specialist.
Instruc iune de exploatare şi m suri de
siguran
Citi i cu aten ie prezenta instruc iune de exploatare
înainte de utilizarea aparatului electric şi p stra i-o
pentru consult ri ulterioare.
Utiliza i dispozitivul doar în scopul pentru care a fost
creat, aşa cum este descris în aceast instruc iune.
Operarea greşit a aparatului poate duce la defec
-
tarea acestuia, cauzarea de prejudicii utilizatorului
şi propriet ii lui.
•
Înainte de a porni pentru prima dat cafetiera
asigura i-v c voltajul re elei electrice cores
-
punde cu voltajul indicat pe carcasa aparatului.
•
Nu utiliza i aparatul în afara înc perilor.
•
Plasa i cafetiera pe o suprafa uscat , plan şi
stabil , nu o plasa i pe marginea mesei.
•
Nu utiliza i cafetiera în apropiere imediat de
surse generatoare de c ldur , umezeal sau
foc deschis.
•
Nu l sa i cablul de alimentare s atârne de pe
mas şi feri i de contactul cu suprafe ele ascu
-
ite şi fierbin i.
•
Pentru a preveni electrocutarea nu introduce i
cafetiera, fişa cablului de alimentare, cablul de
alimentare în ap sau alte lichide.
•
Nu porni i cafetiera f r ap .
•
Utiliza i cafetiera numai cu cana-termos furniza
-
t împreun cu aparatul.
•
Pute i utiliza cafetiera doar în cazul în care cana-
termos este instalat pe platform . Înainte de
instalare scoate i capacul de pe can .
•
Niciodat nu l sa i cafetiera s func ioneze
nesupravegheat .
•
Nu atinge i carcasa cafetierei cu mâinile ude.
•
Pentru a preveni arsurile nu atinge i suprafe e
-
le fierbin i ale cafetierei în procesul de prepara
-
re a cafelei şi imediat dup oprirea aparatului.
Permite i cafetierei s se r ceasc .
•
În timpul prepar rii cafelei apa sub presiunea
aburului trece prin cafeaua m cinat , de ace
-
ea este interzis s v apleca i de asupra cafeti
-
erei, s deschide i capacul şi s extrage i filtrul
detaşabil.
•
Utiliza i doar ap curat şi rece.
•
Înainte de a prepara o nou por ie de cafea
l sa i aparatul s se r ceasc timp de 5 minute.
•
Nu scoate i cana-termos de pe platform în tim
-
pul prepar rii cafelei.
•
Nu utiliza i cana-termos în alte scopuri, nu o pla
-
sa i pe plite electrice şi de gaz, nu o utiliza i în
cuptoare cu microunde.
•
Cafetiera trebuie deconectat de la re eaua
electric înainte de cur are şi în cazul în care
nu o utiliza i.
•
Nu trage i de cablu atunci când scoate i fişa din
priz , pentru deconectare trage i de fiş .
•
Copiii trebuie supraveghea i pentru a nu se juca
cu cafetiera.
•
Acest aparat nu este destinat pentru folosire de
c tre copii sau persoane cu abilit i reduse. În
cazuri de excep ie, persoana responsabil de
securitatea acestora, trebuie s le dea instruc
-
iuni corespunz toare şi clare cu privire la folo
-
sirea sigur a aparatului şi despre riscurile care
pot ap rea în caz de folosire inadecvat .
•
Din motive de siguran a copiilor nu l sa i pun
-
gile de polietilen , folosite în calitate de ambalaj,
f r supraveghere.
•
Aten ie!
Nu permite i copiilor s se joace cu
pungile de polietilen sau pelicula pentru amba
-
lare.
Pericol de asfixiere!
•
În caz de depistare a defec iunilor în aparat sau
în caz de deteriorare a cablului de alimentare
deconecta i aparatul de la re eaua electric şi
apela i la un centru service autorizat. Nu repa
-
ra i singuri aparatul.
•
Pentru a evita deteriorarea transporta i aparatul
doar în ambalajul produc torului.
•
P stra i aparatul în locuri inaccesibile pentru
copii.
APARATUL ESTE DESTINAT NUMAI UZULUI
CASNIC
ÎNAINTE DE PRIMA UTILIZARE
Dup transportarea sau p strarea aparatului la
temperaturi sc zute acesta trebuie inut la tem
-
peratura camerei minim dou ore
.
–
Desface i complet ambalajul aparatului şi înde
-
p rta i orice etichete care ar împiedica func io
-
narea acestuia.
–
Verifica i integritatea aparatului, în caz de defec
-
iuni nu îl utiliza i.
–
Înainte de a porni cafetiera asigura i-v c tensi
-
unea re elei de alimentare corespunde cu tensi
-
unea de lucru a aparatului.
–
Sp la i în ap cald şi cu un agent de cur are
neutru toate accesoriile detaşabile: cana-termos
(6) şi capacul (5), suportul (9), filtrul (10). Cl ti i-
le şi usca i-le.
–
Instala i suportul (9) astfel, încât mânerul supor
-
tului s se afle în partea dreapt (fig. 1).
–
Instala i filtrul (10) în suport (9) astfel, încât mâne
-
rul filtrului s se afle pe partea dreapt (fig. 1).
–
Umple i cana (6) cu ap curat .
–
Deschide i capacul (2) şi turna i apa din can (6)
în rezervorul pentru ap (1). Nivelul apei nu tre
-
buie s dep şeasc grada ia «MAX».
–
Instala i cana (6) pe platforma (7). Utiliza i cana
f r capac (5).
–
Introduce i fişa cablului de alimentare în priza
electric .
–
Ap sa i butonul (8) «Start».
–
Atunci când cana (6) se va umple cu ap , scoa
-
te i-o de pe platform (7) şi goli i-o de ap .
–
Permite i aparatului s se r ceasc timp de 5
minute.
Prepararea cafelei
B utura de cafea se ob ine în procesul trecerii unice
a apei fierbin i prin stratul de cafea m cinat sau a
ceaiului din frunze care se afl în filtru. Gustul b u
-
turii preparate depinde de calitatea ini ial a produ
-
sului, de aceea se recomand s utiliza i boabe de
cafea bine pr jite şi proasp t m cinate, precum şi
un ceai din frunze de calitate.
–
Deschide i capacul (2), instala i suportul (9) ast
-
fel, încât mânerul suportului s se afle pe partea
stâng (fig. 1).
–
Instala i filtrul (10) astfel, ca mânerul filtrului s
se afle pe partea dreapt (fig. 1).
–
M sura i cantitatea necesar de cafea m cinat
sau de ceai din frunze şi turna i-o în filtru (10).
–
Umple i cana (6) cu ap , apoi turna i apa din
can (6) în rezervorul de ap (1). Nivelul apei nu
trebuie s dep şeasc grada ia «MAX».
–
Închide i capacul (2).
–
Instala i cana (6) pe suportul (7). Utiliza i cana
f r capac (5).
–
Introduce i fişa cablului de alimentare în priza
electric . Porni i cafetiera, ap sând pe butonul
(8) «Start», se va aprinde indicatorul luminos
al butonului.
–
De îndat ce cafeaua va fi preparat , indicatorul
butonului (8) «Start» se va stinge.
–
Asigura i-v c toat apa a trecut prin filtru, apoi
scoate i cana (6) de pe platform (7).
–
Pentru ca cafeaua s r mân fierbinte, închide i
cana (6) cu capacul (5). Strânge i etanş capacul
şi închide i clapa capacului.
–
Deconecta i aparatul de la re eaua electric şi
permite i aparatului s se r ceasc .
–
Efectua i cur area aparatului.
Aten ie!
•
Apa fierbinte trece prin cafeaua m cinat , de
aceea în timpul prepar rii cafelei este interzis
s v apleca i de asupra cafetierei şi s des
-
chide i capacul (2).
•
Pentru a evita arsurile deschide i capacul (2)
numai de mâner (3), deconectând aparatul de
la re eaua electric .
•
Gustul b uturii preparate depinde numai de
calitatea produsului ini ial, de aceea se reco
-
mand s utiliza i cafeaua proasp t m cina
-
t din boabe bine pr jite şi un ceai din frunze
de calitate. Pentru a preveni arsurile muta i
cana-termos cu b utura fierbinte strict pe
vertical , deoarece b utura fierbinte poate
s se scurg chiar în cazul în care capacul şi
clapa sunt închise.
Cur are şi între inere
–
De fiecare dat înainte de cur are deconecta i
aparatul de la re eaua electric .
–
Permite i cafetierei s se r ceasc complet şi
şterge i suprafe ele exterioare cu un material
moale, uşor umezit, apoi şterge i pân la uscare.
–
Pentru înl turarea murd riei utiliza i agen i de
cur are delica i, nu utiliza i perii metalice şi
agen i de cur are abrazivi.
–
Sp la i toate accesoriile detaşabile în ap cald
cu un agent de cur are neutru, cl ti i-le, usca i-
le şi instala i-le în pozi ia ini ial .
–
Nu scufunda i cafetiera în ap sau alte lichide.
–
Nu introduce i cafetiera în maşina de sp lat
vase.
Înl turarea depunerilor minerale
–
Cur a i cu regularitate cafetiera de depunerile
minerale (minim o dat pe lun ).
–
Turna i în rezervor (1) solu ie de a ap cu o et de
mas în propor ie 2:1. Porni i cafetiera f r ap .
Asigura i-v c cana (6) este instalat pe platfor
-
m (7). Utiliza i cana (6) f r capac (5)
–
Dup înl turarea depunerilor minerale sp la i
bine cafetiera. Pentru aceasta turna i în rezer
-
vor (1) ap curat şi, f r a turna cafeaua, porni i
aparatul. Repeta i ciclul de câteva ori.
–
Pute i utiliza, de asemenea, solu ii speciale, pe
care le pute i procura în re eaua comercial .
Respecta i cu stricte e indica iile de pe ambalaj.
P strare
–
Înainte de a stoca dispozitivul pentru p strare
deconecta i-l de la re eaua electric şi permite i-
i s se r ceasc complet.
–
Efectua i cur area aparatului.
–
P stra i dispozitivul la un loc uscat, r coros şi
inaccesibil pentru copii.
Con inut pachet
Cafetier – 1 buc.
Can -termos cu capac – 1 buc.
Lingur de m sur – 1 buc.
Instruc iune – 1 buc.
Specifica ii tehnice
Alimentare: 230 V ~ 50 Hz
Putere: 650 W
Capacitate: 0,4 l
Produc torul îşi rezerv dreptul de a modifica desig
-
nul şi caracteristicile aparatului f r preaviz.
Termenul de func ionare a aparatului - 5 ani
Garan ie
În leg tur cu oferirea garan iei pentru produsul
dat, rug m s V adresa i la distribuitorul regional
sau la compania, unde a fost procurat produsul dat.
Serviciul de garan ie se realizeaz cu condi ia pre
-
zent rii bonului de plat sau a oric rui alt document
financiar, care confirm cump rarea produsului dat.
Acest produs corespunde cerin elor
EMC, întocmite în conformitate cu Di
-
rectiva 2004/108/
i Directiva cu pri
-
vire la electrosecuritate/joas tensiune
(2006/95/
).
romÂnĂ /
Moldoveneasc
6
,
.
-
-
(
).
1.
2.
3.
4.
5.
-
6.
-
7.
8.
«
»
9.
10.
11.
!
30
-
(
)
-
.
-
.
-
.
-
.
-
,
.
•
-
.
•
.
•
,
.
•
,
.
•
-
,
.
•
,
-
.
•
.
•
-
.
•
-
.
.
•
.
•
.
•
.
.
•
,
,
-
.
•
.
•
,
5
.
•
-
.
•
-
,
,
.
•
.
-
.
•
,
,
.
•
.
•
.
,
,
-
.
•
,
.
•
!
-
.
!
•
(
)
.
.
•
.
•
-
.
.
–
,
-
.
–
,
,
.
–
,
-
,
.
–
:
-
(6)
(5),
(9),
(10).
.
–
(9)
(
. 1).
–
(10)
,
(9)
(
. 1).
–
(6)
.
–
(2)
(6)
(1)
.
«MAX»
.
–
(6)
(7)
.
(5)
.
–
.
–
(8) «
»
.
–
(6)
,
(7)
.
–
5
.
-
.
,
,
.
–
(2)
,
,
(9)
(
. 1).
–
,
(10)
(
. 1).
–
(10)
.
–
(6)
,
(6)
(1)
.
«MAX»
.
–
(2)
.
–
(6)
(7)
.
(5)
.
–
. «
»
(8)
,
.
–
, «
»
(8)
.
–
,
(6)
(7)
.
–
(6)
(5)
.
.
–
.
–
.
!
•
,
(2)
.
•
(2)
(3)
,
.
•
,
.
-
-
,
.
–
.
–
-
,
.
–
-
,
.
–
,
,
.
–
.
–
.
–
(
1
).
–
(1)
2:1
.
.
(6)
(7)
.
(6)
(5)
–
.
(1)
,
.
.
–
.
.
–
,
.
–
.
–
,
.
– 1 .
-
– 1 .
– 1 .
– 1 .
: 230 B ~ 50
: 650
: 0,4
.
- 5
i
i i i
i
i.
i
i i i
i
-
i
.
5
КОФЕВАРК А
Кофеварка предназначена для приготовления
напитка из молотого кофе или кофе в чалдах, а
также для заваривания чая. Для переноски гото-
вого напитка используйте кружку-термос (входит
в комплект поставки).
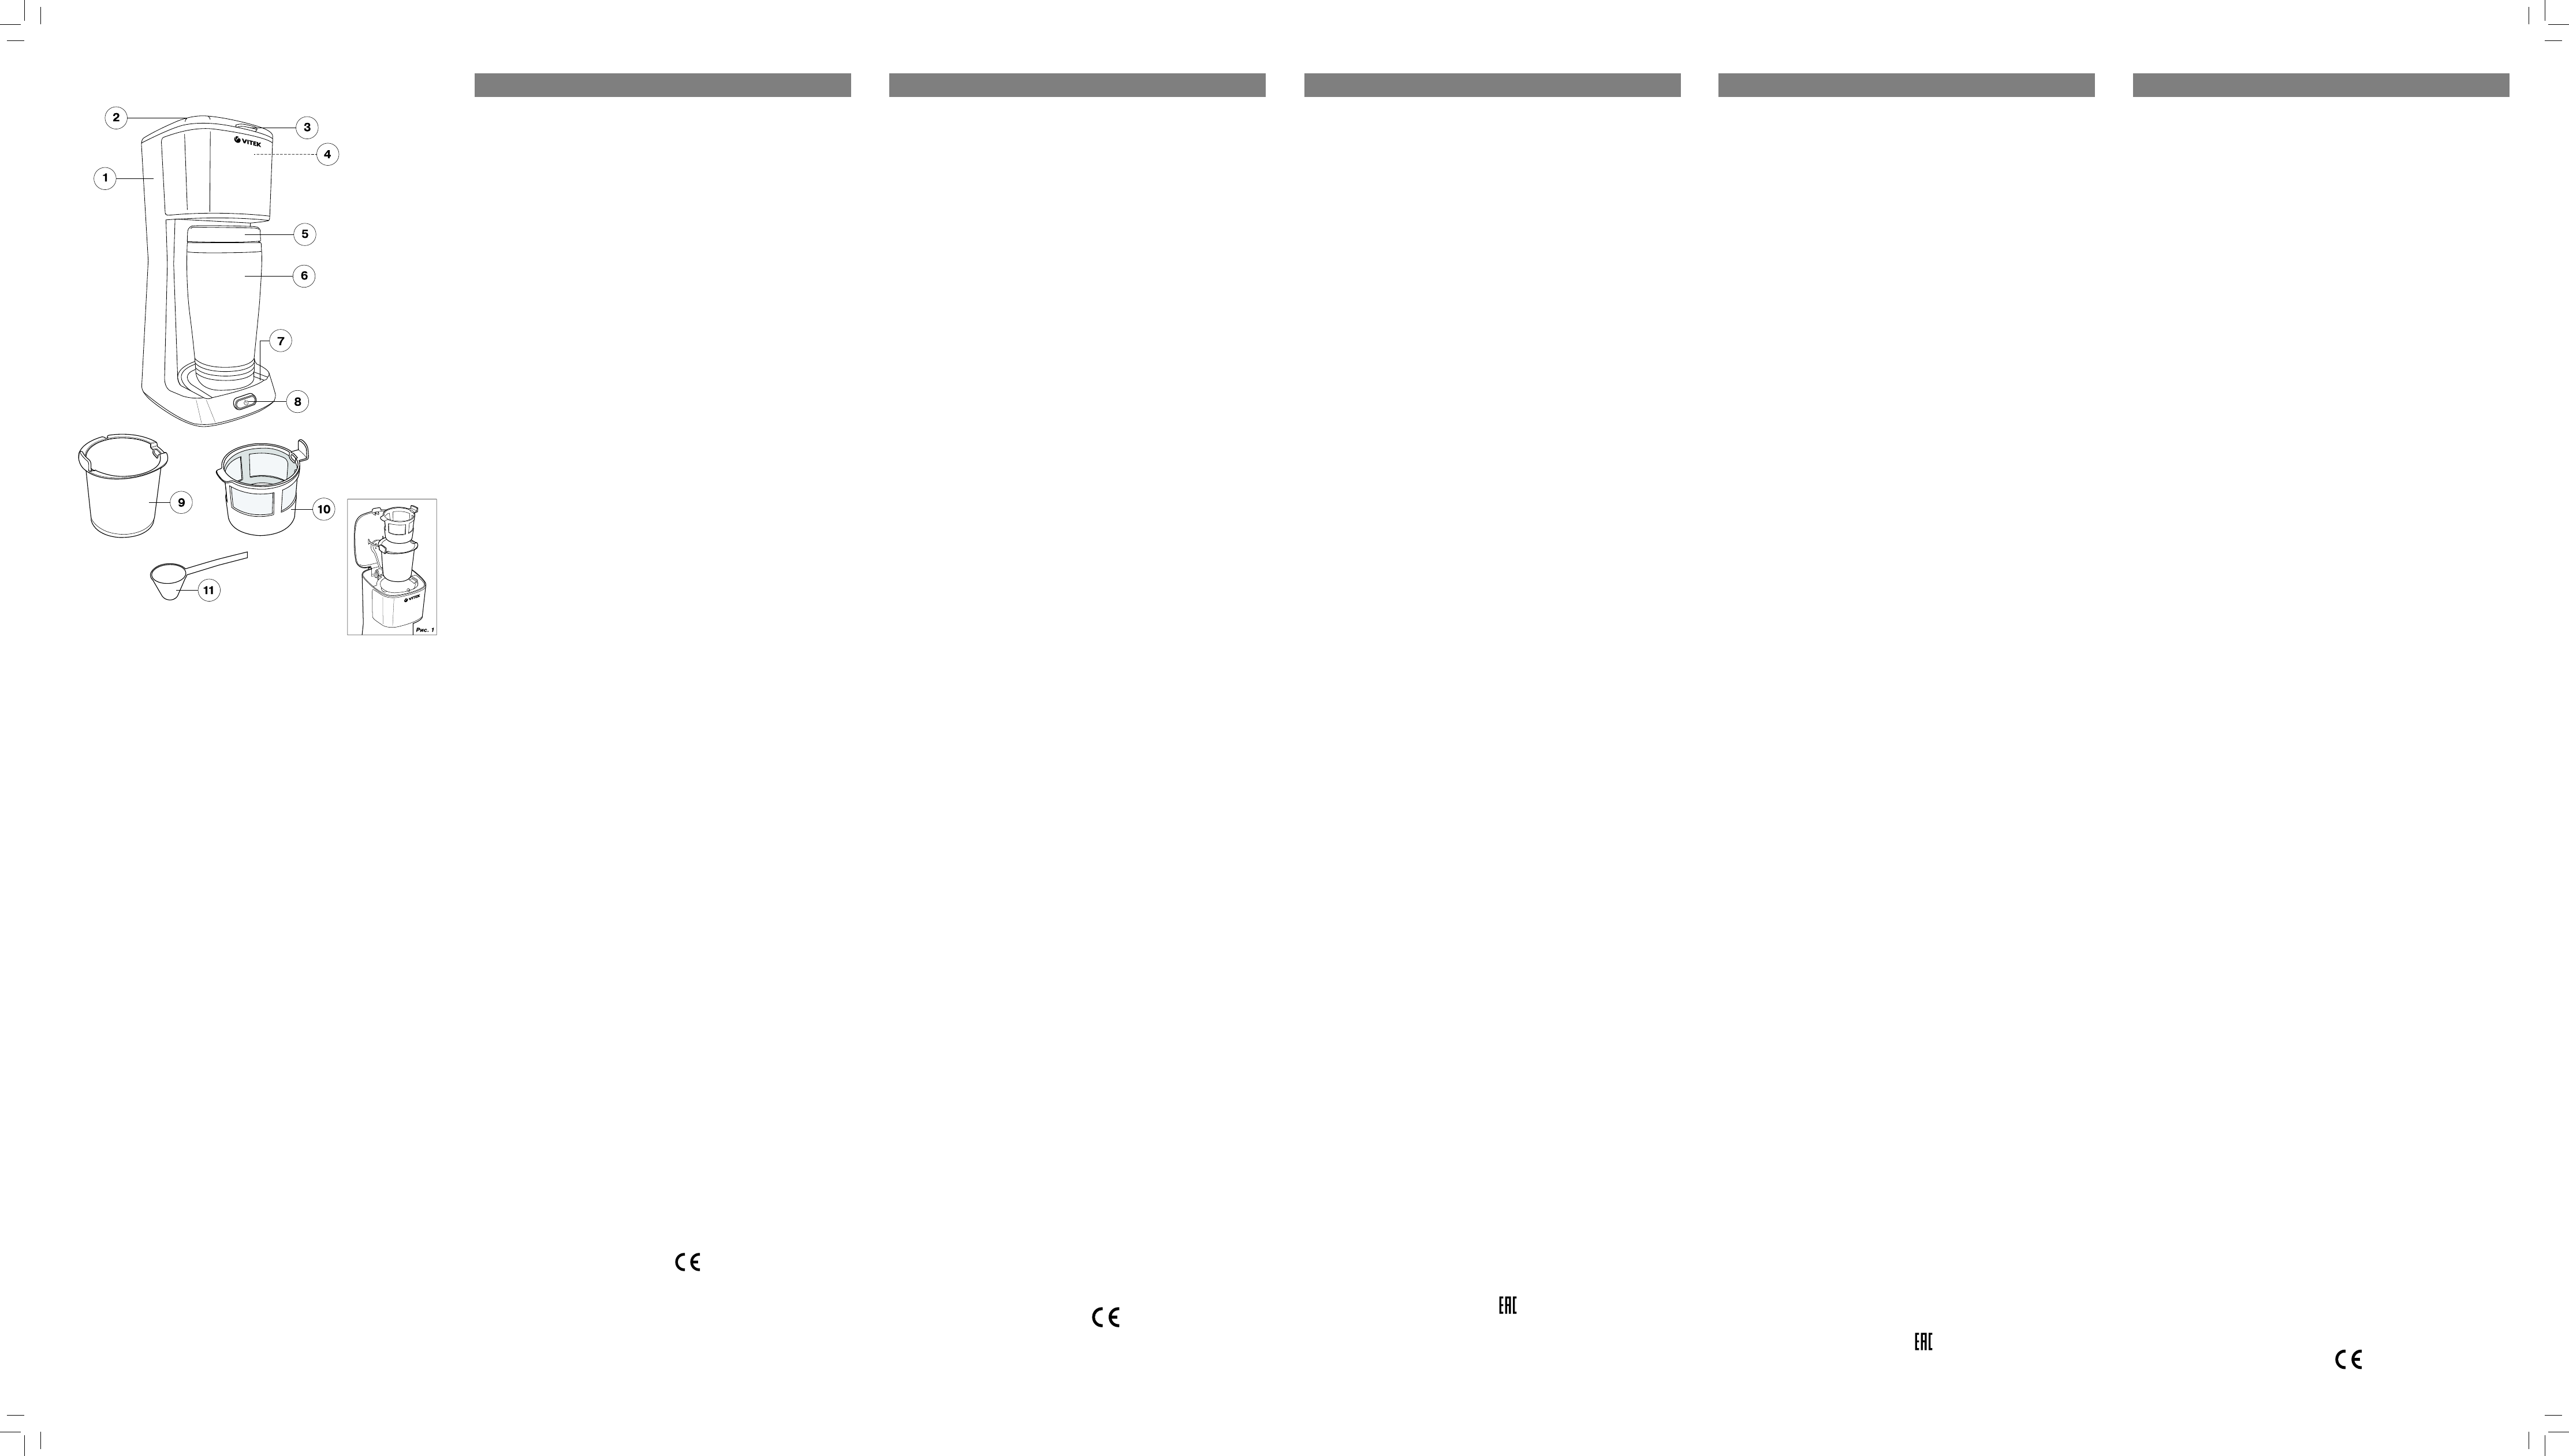
Описание
1. Резервуар для воды
2. Крышка
3. Ручка крышки
4. Место установки держателя
5. Крышка кружки-термоса
6. Кружка-термос
7. Площадка для кружки
8. Кнопка включения «Старт»
9. Держатель фильтра
10. Фильтр
11. Мерная ложка
Внимание!
Для дополнительной защиты целесообразно
в цепи питания установить устройство защит-
ного отключения (УЗО) с номинальным током
срабатывания, не превышающим 30 мА. Для
установки УЗО обратитесь к специалисту.
Инструкция по эксплуатации и мерам безо-
пасности
Перед началом эксплуатации электроприбора
внимательно прочитайте настоящую инструкцию
по эксплуатации и сохраните её для использова-
ния в качестве справочного материала.
Используйте устройство только по его прямому
назначению, как изложено в данном руководстве.
Неправильное обращение с прибором может при-
вести к его поломке, причинению вреда пользова-
телю или его имуществу.
•
Перед первым включением убедитесь в том,
что рабочее напряжение кофеварки соответ-
ствует напряжению в электрической сети.
•
Не используйте устройство вне помещений.
•
Устанавливайте кофеварку на сухой ровной
устойчивой поверхности, не ставьте её на край
стола.
•
Не используйте кофеварку в непосредствен-
ной близости от источников тепла, влаги или
открытого пламени.
•
Не допускайте, чтобы электрический шнур све-
шивался со стола и следите, чтобы он не касал-
ся острых и горячих поверхностей.
•
Во избежание удара электрическим током не
погружайте кофеварку, сетевой шнур или вил-
ку сетевого шнура в воду или в любые другие
жидкости.
•
Не включайте кофеварку без воды.
•
Используйте кофеварку только с кружкой-тер-
мосом, входящей в комплект поставки.
•
Использовать кофеварку можно только в том
случае, если кружка-термос установлена на
площадке. Перед установкой снимите с круж-
ки крышку.
•
Никогда не оставляйте работающую кофеварку
без присмотра.
•
Не дотрагивайтесь до корпуса кофеварки
мокрыми руками.
•
Во избежание ожога не дотрагивайтесь до
горячих поверхностей кофеварки в процессе
приготовления кофе и сразу после выключения
устройства. Дайте кофеварке остыть.
•
Во время приготовления кофе вода под дав-
лением пара проходит через молотый кофе,
поэтому запрещается наклоняться над кофе-
варкой, открывать крышку и вынимать съём-
ный фильтр.
•
Используйте только чистую холодную воду.
•
Перед приготовлением новой порции кофе
должно пройти не менее 5 минут для охлажде-
ния устройства.
•
Не снимайте кружку-термос с площадки в про-
цессе приготовления кофе.
•
Не используйте кружку-термос для иных целей,
не ставьте её на электрические и газовые пли-
ты, не используйте в микроволновых печах.
•
Кофеварка должна быть отключена от электри-
ческой сети перед чисткой, а также в тех случа-
ях, когда вы ею не пользуетесь.
•
Отключая устройство от электрической сети,
не тяните за сетевой шнур, а держитесь за вил-
ку сетевого шнура.
•
Не разрешайте детям использовать кофеварку
в качестве игрушки.
•
Данное устройство не предназначено для
использования детьми и людьми с ограничен-
ными возможностями. В исключительных слу-
чаях лицо, отвечающее за их безопасность,
должно дать соответствующие и понятные
им инструкции о безопасном использовании
устройства и тех опасностях, которые могут
возникать при его неправильном использова-
нии.
•
Из соображений безопасности детей не остав-
ляйте полиэтиленовые пакеты, используемые
в качестве упаковки, без надзора.
•
Внимание!
Не разрешайте детям играть с
полиэтиленовыми пакетами или упаковочной
плёнкой.
Опасность удушья!
•
При обнаружении неисправностей в устрой-
стве или в случае повреждения сетевого шнура
отключите устройство от электрической сети и
обратитесь в авторизованный (уполномочен-
ный) сервисный центр. Запрещается самосто-
ятельно ремонтировать устройство.
•
Во избежание повреж дений перевозите
устройство только в заводской упаковке.
•
Храните устройство в местах, недоступных для
детей.
УСТРОЙСТВО ПРЕ ДНАЗНАЧЕНО ТОЛЬКО ДЛЯ
БЫТОВОГО ИСПОЛЬЗОВАНИЯ
ПЕРЕД ПЕРВЫМ ИСПОЛЬЗОВАНИЕМ
После транспортировки или хранения устрой-
ства при пониженной температуре необходи-
мо выдержать его при комнатной температуре
не менее двух часов
.
–
Полностью распакуйте устройство и удалите
любые наклейки, мешающие работе устрой-
ства.
–
Проверьте целостность устройства, при нали-
чии повреждений не пользуйтесь устройством.
–
Перед включением убедитесь в том, что напря-
жение электрической сети соответствует рабо-
чему напряжению устройства.
–
Промойте тёплой водой с нейтральным мою-
щим средством все съёмные детали: круж-
ку-термос (6) с крышкой (5), держатель (9),
фильтр (10). Ополосните их и просушите.
–
Установите держатель (9) так, чтобы ручка дер-
жателя находилась слева (рис. 1).
–
Установите фильтр (10) в держатель (9) так,
чтобы ручка фильтра находилась справа (рис.
1).
–
Наполните кружку (6) чистой водой.
–
Откройте крышку (2) и перелейте воду из круж-
ки (6) в резервуар для воды (1). Уровень воды
не должен быть выше отметки «MAX».
–
Установите кружку (6) на площадку (7).
Используйте кружку без крышки (5).
–
Вставьте вилку сетевого шнура в электриче-
скую розетку.
–
Нажмите кнопку (8) «Старт».
–
Когда кружка (6) наполнится водой, снимите её
с площадки (7) и слейте воду.
–
Дайте устройству остыть в течение 5 минут.
Приготовление кофе
Готовый напиток кофе получается в процессе
однократного прохождения горячей воды через
слой молотого кофе или листового чая, который
находится в фильтре. Вкус готового напитка зави-
сит от качества исходного продукта, поэтому реко-
мендуется использовать хорошо прожаренные и
свежемолотые зерна кофе, а также качественный
листовой чай.
–
Откройте крышку (2), установите держатель (9)
так, чтобы ручка держателя находилась сле-
ва (рис. 1).
–
Установите фильтр (10) так, чтобы ручка филь-
тра находилась справа (рис. 1).
–
Отмерьте необходимое количество молото-
го кофе или листового чая и засыпьте его в
фильтр (10).
–
Наполните кружку (6) водой, затем перелейте
воду из кружки (6) в резервуар для воды (1).
Уровень воды не должен быть выше отметки
«MAX».
–
Закройте крышку (2).
–
Кружку (6) установите на подставку (7).
Используйте кружку без крышки (5).
–
Вставьте вилку сетевого шнура в электриче-
скую розетку. Включите кофеварку, нажав на
кнопку (8) «Старт», при этом загорится свето-
вой индикатор кнопки.
–
Кода кофе будет готов, индикатор кнопки (8)
«Старт» погаснет.
–
Убедитесь в том, что вся вода прошла через
фильтр, затем снимите кружку (6) с площад-
ки (7).
–
Чтобы кофе оставался горячим, закройте круж-
ку (6) крышкой (5). Плотно закрутите крышку и
закройте клапан крышки.
–
Отключите устройство от электрической сети и
дайте устройству остыть.
–
Произведите чистку устройства.
Внимание!
•
Горячая вода проходит через молотый
кофе, поэтому во время приготовления
кофе запрещается наклоняться над кофе-
варкой и открывать крышку (2).
•
Во избежание ожога открывайте крышку (2)
только за ручку (3), отключив устройство от
электрической сети.
•
Вкус готового напитка зависит от качества
исходного продукта, поэтому рекоменду -
ется использовать свежемолотый кофе из
хорошо прожаренных зерен и качествен-
ный листовой чай. Во избежание ожо-
га переносите кружку -термос с горячим
напитком строго вертикально, так как горя-
чий напиток может вытечь даже в тех слу -
чаях, когда крышка и клапан закрыты.
Чистка и уход
–
Всякий раз перед чисткой отключайте прибор
от электросети.
–
Дайте кофеварке полностью остыть и протрите
внешние поверхности слегка влажной мягкой
тканью, затем вытрите насухо.
–
Для удаления загрязнений используйте мягкие
чистящие средства, не используйте металли-
ческие щётки и абразивные моющие средства.
–
Промойте тёплой водой с нейтральным мою-
щим средством все съёмные детали, ополос-
ните их, вытрите насухо и установите на место.
–
Не погружайте кофеварку в воду или в другие
жидкости.
–
Не помещайте кофеварку в посудомоечную
машину.
Удаление накипи
–
Регулярно очищайте кофеварку от накипи (не
реже 1 раза в месяц).
–
Залейте в резервуар (1) раствор воды со столо-
вым уксусом в пропорции 2:1. Включите кофе-
варку без кофе. Убедитесь в том, что кружка
(6) установлена на площадке (7). Используйте
кружку (6) без крышки (5).
–
После удаления накипи тщательно промой-
те кофеварку. Для этого залейте в резервуар
(1) чистую воду и, не засыпая кофе, включи-
те устройство. Повторите цикл несколько раз.
–
Вы также можете использовать специальные
средства, которые можно приобрести в тор-
говой сети. Строго следуйте указаниям на их
упаковке.
Хранение
–
Перед тем, как убрать устройство на хранение,
отключите его от электросети и дайте ему пол-
ностью остыть.
–
Произведите чистку устройства.
–
Храните устройство в сухом прохладном месте,
недоступном для детей.
Комплект поставки
Кофеварка – 1 шт.
Кружка-термос с крышкой – 1 шт.
Мерная ложка – 1 шт.
Инструкция – 1 шт.
Технические характеристики
Электропитание: 230 B ~ 50 Гц
Мощность: 650 Вт
Объём воды: 0,4 л
Производитель сохраняет за собой право изме-
нять дизайн и технические характеристики прибо-
ра без предварительного уведомления.
Срок службы кофеварки – 5 лет
Данное изделие соответствует всем
требуемым европейским и российским
стандартам безопасности и гигиены.
АН-ДЕР ПРОДАКТС ГмбХ, Австрия
Нойбаугюртель 38/7А, 1070 Вена, Австрия
Сделано в Китае
РУССКИй
4
KAFFEEMASCHINE
Die Kaffemaschine ist für die Getränkezubereitung
aus gemahlenem Kaffee oder Kaffeepads sowie fürs
Aufbrühen von Tee bestimmt. Zum Tragen des fertigen
Getränks benutzen Sie den Thermosbecher (mitgelie-
fert).
Beschreibung
1.
Wasserbehälter
2.
Deckel
3.
Deckelgriff
4.
Aufstellplatz für Halter
5.
Deckel des Thermosbechers
6.
Thermosbecher
7.
Becherplatte
8.
"Start"-Einschalttaste
9.
Filterhalter
10.
Filter
11.
Messlöffel
Achtung!
Als zusätzlicher Schutz ist es zweckmäßig, den
FI-Schalter mit Nennstrom maximal bis 30 mA im
Stromversorgungskreis aufzustellen. Wenden Sie sich
dafür an einen Spezialisten.
Bedienungsanleitung und Sicherheitsmaßnahmen
Vor der ersten Inbetriebnahme des Elektrogeräts lesen
Sie diese Bedienungsanleitung aufmerksam durch und
bewahren Sie sie für weitere Referenz auf.
Benutzen Sie das Gerät nur bestimmungsgemäß, wie
es in dieser Bedienungsanleitung beschrieben ist. Nicht
ordnungsgemäße Nutzung des Geräts kann zu seiner
Störung führen, einen gesundheitlichen oder materiellen
Schaden beim Nutzer hervorrufen.
•
Vergewissern Sie sich vor dem ersten Einschalten
des Geräts, dass die Betriebsspannung der
Kaffeemaschine und die Netzspannung überein-
stimmen.
•
Es ist nicht gestattet, das Gerät draußen zu benut-
zen.
•
Stellen Sie die Kaffeemaschine auf eine trockene,
ebene und standfeste Oberfläche auf, stellen Sie sie
an den Tischrand nicht auf.
•
Benutzen Sie die Kaffeemaschine in direkter Nähe
von Wärme- und Feuchtigkeitsquellen oder offe-
nem Feuer nicht.
•
Achten Sie darauf, dass das Netzkabel vom Tisch
nicht frei hängt und scharfe und heiße Oberflächen
nicht berührt.
•
Tauchen Sie die Kaffeemaschine, das Netzkabel
oder den Netzstecker ins Wasser oder andere
Flüssigkeiten nicht, um Stromschlagrisiko zu ver-
meiden.
•
Schalten Sie die Kaffeemaschine ohne Wasser nicht
ein.
•
Benutzen Sie die Kaffeemaschine nur mit dem mit-
gelieferten Thermosbecher.
•
Die Kaffeemaschine kann nur dann in Betrieb
genommen werden, wenn der Thermosbecher auf
der Platte aufgestellt ist. Vor dem Aufstellen nehmen
Sie den Deckel vom Becher ab.
•
Lassen Sie die laufende Kaffeemaschine nie unbe-
aufsichtigt.
•
Berühren Sie das Gehäuse der Kaffeemaschine mit
nassen Händen nicht.
•
Um Verbrennung zu vermeiden, berühren Sie die
heißen Oberflächen der Kaffeemaschine wäh-
rend der Kaffeezubereitung und gleich nach der
Ausschaltung des Geräts nicht. Lassen Sie die
Kaffeemaschine abkühlen.
•
Während der Kaffeezubereitung fließt das Wasser
durch den gemahlenen Kaffee unter Dampfdruck
durch, deshalb ist es verboten, sich über der
Kaffeemaschine zu beugen, den Deckel zu öffnen
und das Filter herauszuziehen.
•
Benutzen Sie nur sauberes Kaltwasser.
•
Vor der Zubereitung einer neuen Kaffeeportion
machen Sie eine Pause von nicht weniger als 5
Minuten, um das Gerät abkühlen zu lassen.
•
Nehmen Sie den Thermosbecher von der Platte
während der Kaffeezubereitung nicht ab.
•
Benutzen Sie den Thermosbecher zu keinen anderen
Zwecken, stellen Sie ihn auf Elektro- und Gasherde
nicht auf, benutzen Sie ihn in den Mikrowellenöfen
nicht.
•
Trennen Sie die Kaffeemaschine vom Stromnetz
immer ab, wenn Sie sie nicht benutzen oder
Reinigung vornehmen möchten.
•
Wenn Sie das Gerät vom Stromnetz abtrennen, zie-
hen Sie das Netzkabel nicht, sondern halten Sie den
Netzstecker.
•
Es ist nicht gestattet, Kindern die Kaffeemaschine
als Spielzeug zu geben.
•
Dieses Gerät darf von Kindern und behinderten
Personen nicht genutzt werden. In Ausnahmefällen
soll die Person, die für ihre Sicherheit verantwortlich
ist, entsprechende und verständliche Anweisungen
über die sichere Nutzung des Geräts und über die
Gefahren geben, die bei seiner falschen Nutzung
entstehen können.
•
Aus Kindersicherheitsgründen lassen Sie die
Plastiktüten, die als Verpackung verwendet werden,
nie ohne Aufsicht.
•
Achtung!
Lassen Sie Kinder mit Plastiktüten
o d e r
V e r p a c k u n g s f o l i e n
n i c h t
s p i e l e n .
Erstickungsgefahr!
•
Bei der Feststellung von Beschädigungen des
Geräts oder bei Beschädigung des Netzkabels tren-
nen Sie das Gerät vom Stromnetz ab und wenden
Sie sich an einen autorisierten (bevollmächtigten)
Kundendienst. Es ist nicht gestattet, das Gerät selb-
ständig zu reparieren.
•
Um Beschädigungen zu vermeiden, transportieren
Sie das Gerät nur in der Fabrikverpackung.
•
Bewahren Sie das Gerät an einem für Kinder unzu-
gänglichen Ort auf.
DAS GERÄT IST NUR FÜR DEN GEBRAUCH IM
HAUSHALT GEEIGNET
VOR DER ERSTEN INBETRIEBNAHME
Falls das Gerät unter niedrigen Temperaturen trans-
portiert oder aufbewahrt wurde, lassen Sie es vor der
Nutzung bei der Raumlufttemperatur nicht weniger als
zwei Stunden bleiben.
–
Packen Sie das Gerät vollständig aus und entfernen
Sie alle Aufkleber, die den Betrieb des Geräts stören.
–
Prüfen Sie die Ganzheit des Geräts; wenn das Gerät
beschädigt ist, benutzen Sie es nicht.
–
Vor dem Einschalten des Geräts vergewis -
sern Sie sich, dass die Netzspannung und die
Betriebsspannung des Geräts übereinstimmen.
–
Waschen Sie alle abnehmbaren Teile: den
Thermosbecher (6) mit dem Deckel (5), den Halter
(9), das Filter (10) mit Warmwasser und einem neu-
tralen Waschmittel ab. Spülen Sie und trocknen Sie
diese ab.
–
Stellen Sie den Halter (9) so auf, dass sich der Griff
des Halters links befindet (Abb. 1).
–
Stellen Sie das Filter (10) in den Halter (9) so auf,
dass sich der Griff des Filters rechts befindet (Abb.
1).
–
Füllen Sie den Becher (6) mit sauberem Wasser auf.
–
Öffnen Sie den Deckel (2) und gießen Sie das
Wasser aus dem Becher (6) in den Wasserbehälter
(1) um. Der Wasserstand soll nicht über der «MAX»-
Marke liegen.
–
Stellen Sie den Becher (6) auf die Platte (7) auf.
Benutzen Sie den Becher ohne Deckel (5).
–
Stecken Sie den Netzstecker in die Steckdose.
–
Drücken Sie die "Start"-Taste (8).
–
Wenn der Becher (6) mit Wasser aufgefüllt ist, neh-
men Sie ihn von der Platte (7) ab und gießen Sie
Wasser aus.
–
Lassen Sie das Gerät innerhalb von 5 Minuten
abkühlen
Kaffeezubereitung
Das fer tige Kaf feegetränk wird beim einmaligen
Durchgehen des Heißwassers durch die Schicht des
gemahlenen Kaffees oder Blattees, der sich im Filter
befindet, erzeugt. Der Geschmack des fertigen Getränks
hängt von der Qualität des Ausgangsprodukts ab, des-
halb ist es empfohlen, gut durchgebratene und frisch-
gemahlene Kaffeebohnen, sowie den Blattee von hoher
Qualität zu benutzen.
–
Öffnen Sie den Deckel (2), stellen Sie den Halter (9)
so auf, dass sich der Griff des Halters links befin-
det (Abb. 1).
–
Stellen Sie das Filter (10) so auf, dass sich der Griff
des Filters rechts befindet (Abb. 1).
–
Messen Sie die notwendige Menge des gemahlenes
Kaffees oder des Blattees ab und schütten Sie ihn
ins Filter (10) ein.
–
Füllen Sie den Becher (6) mit Wasser auf und
gießen Sie Wasser aus dem Becher (6) in den
Wasserbehälter (1) um. Der Wasserstand soll nicht
über der «MAX»-Marke liegen.
–
Schließen Sie den Deckel (2) zu.
–
Stellen Sie den Becher (6) auf die Platte (7) auf.
Benutzen Sie den Becher ohne Deckel (5).
–
Stecken Sie den Netzstecker in die Steckdose.
Schalten Sie die Kaffeemaschine ein, indem Sie
die "Start"-Taste (8) drücken, dabei leuchtet die
Tastenanzeige auf.
–
Wenn der Kaffee fertig ist, erlischt die Anzeige der
"Start"-Taste (8).
–
Vergewissern Sie sich, dass alles Wasser durch das
Filter durchgeflossen ist, danach nehmen Sie den
Becher (6) von der Platte (7) ab.
–
Schließen Sie den Becher (6) mit dem Deckel (5),
damit der Kaffee heiß bleibt. Drehen Sie den Deckel
fest zu und schließen Sie das Deckelventil.
–
Trennen Sie das Gerät vom Stromnetz ab und lassen
Sie es abkühlen.
–
Reinigen Sie das Gerät.
Achtung!
•
Das Heißwasser geht durch den gemahle-
nen Kaf fee durch, deshalb ist es verboten,
sich während der Kaffezubereitung über der
Kaffeemaschine zu beugen und den Deckel (2)
zu öffnen.
•
Um Verbrennung zu vermeiden, öffnen Sie den
Deckel (2) nur an den Griff (3), indem Sie das
Gerät vom Stromnetz vorher abtrennt haben.
•
Der Geschmack des fer tigen Getränks hängt
von der Qualität des Ausgangsproduktes ab,
deshalb ist es empfohlen, frischgemahlenen
Kaffee aus gut durchgebratenen Kaffeebohnen,
sowie den Blattee von hoher Qualität zu benut-
zen. Um Verbrennung zu vermeiden, tragen Sie
den Thermosbecher mit heißem Getränk nur
senkrecht, weil das heiße Getränk sogar dann
ausfließen kann, wenn der Deckel und das Ventil
geschlossen sind.
Reinigung und Pflege
–
Trennen Sie das Gerät vor der Reinigung vom
Stromnetz immer ab.
–
Lassen Sie die Kaffeemaschine vollständig abküh-
len und wischen Sie die Außenoberfläche mit einem
leicht angefeuchteten Tuch, danach trocknen Sie
sie ab.
–
Für Entfernung von Verschmutzungen nutzen Sie
weiche Reinigungsmittel, aber keine Metallbürsten
und Abrasivmittel.
–
W a s c h e n S i e a l l e a b n e h m b a re n Te i l e m i t
Warmwasser und einem neutralen Waschmittel, spü-
len, trocknen und stellen Sie sie zurück auf.
–
Tauchen Sie die Kaffeemaschine ins Wasser oder
andere Flüssigkeiten nicht ein.
–
Es ist nicht gestattet, die Kaffeemaschine in der
Geschirrspülmaschine zu waschen.
Kalkentfernung
–
Reinigen Sie die Kaffeemaschine vom Kalk regelmä-
ßig (nicht seltener als einmal im Monat).
–
Gießen Sie Wasser mit darin aufgelöstem
Speiseessig im Verhältnis 2:1 in den Behälter (1) ein.
Schalten Sie die Kaffeemaschine ohne Kaffee ein.
Vergewissern Sie sich, dass der Becher (6) auf der
Platte (7) aufgestellt ist. Benutzen Sie den Becher
(6) ohne Deckel (5).
–
Nach der Kalkentfernung waschen Sie die
Kaffeemaschine sorgfältig ab. Gießen Sie dafür
sauberes Wasser in den Behälter (1) ein und, ohne
Kaffee einzuschütten, schalten Sie das Gerät ein.
Wiederholen Sie den Zyklus mehrmals.
–
Sie können auch spezielle Mittel, die Sie im
Handelsnetz kaufen können, benutzen. Befolgen
Sie die Anweisungen an deren Verpackung strikt.
Aufbewahrung
–
Bevor Sie das Gerät zur Aufbewahrung wegpacken,
trennen Sie es vom Stromnetz ab und lassen Sie es
abkühlen.
–
Reinigen Sie das Gerät.
–
Bewahren Sie das Gerät an einem trockenen, kühlen
und für Kinder unzugänglichen Ort auf.
Lieferumfang
Kaffeemaschine – 1 St.
Thermosbecher mit Deckel – 1 St.
Messlöffel – 1 St.
Bedienungsanleitung – 1 St.
Technische Eigenschaften
Stromversorgung: 230 V ~ 50 Hz
Leistung: 650 W
Wasserfassungsvermögen: 0,4 l
Der Hersteller behält sich das Recht v or, Design
und technische Eigenschaf ten des Geräts ohne
Vorbenachrichtigung zu verändern.
Die Nutzungsdauer der Kaffeemaschine beträgt
5 Jahre
Gewährleistung
Ausführliche Bedingungen der Gewährleistung kann
man beim Dealer, der diese Geräte verkauft hat, bekom-
men. Bei beliebiger Anspruchserhebung soll man wäh-
rend der Laufzeit der vorliegenden Gewährleistung den
Check oder die Quittung über den Ankauf vorzulegen.
Das vorliegende Produkt entspricht den
Forderungen der elektromagnetischen
Verträglichkeit, die in 2004/108/EC -
Richtlinie des Rates und den Vorschriften
2006/95/EC über die Niederspannungs-
geräte vorgesehen sind.
DEUTSCH
3
COFFEE MAKER
The coffee maker is intended for making drinks of
ground coffee or coffee pods and for making tea.
Use the thermal mug to carry the ready drink (sup-
plied with the unit).
Description
1. Water tank
2. Lid
3. Lid handle
4. Holder installation place
5. Thermal mug lid
6. Thermal mug
7. Mug tray
8. On button «Start»
9. Filter holder
10. Filter
11. Measuring spoon
Attention!
For additional protection it is reasonable to
install a residual current device (RCD) with
nominal operation current not exceeding
30 mA. To install RCD contact a specialist.
Instruction manual and safety measures
Before using the unit, read these instructions
carefully. Keep these instructions for further ref-
erence.
Use the unit for intended purposes only, as speci-
fied in this manual. Mishandling the unit can lead
to its breakage and cause harm to the user or
damage to his/her property.
•
Before switching the unit on for the first time,
make sure that the operating voltage of the
coffee maker corresponds to voltage of your
mains.
•
Do not use the unit outdoors.
•
Place the coffee maker on a dry flat stable sur-
face; do not place it on the edge of the table.
•
Do not use the coffee maker near heat sources
and open flame.
•
Do not let the power cord hang from the edge
of a table, and make sure it does not touch
sharp edges and hot surfaces.
•
To avoid electric shock, do not immerse the
coffee maker, power cord or power plug into
water or other liquids.
•
Do not switch the coffee maker on if the water
tank is empty.
•
Use the coffee maker only with the supplied
thermal mug.
•
You can use the coffee maker only if the ther-
mal mug is placed on the tray. Before setting,
remove the lid from the mug.
•
Never leave the operating coffee maker unat-
tended.
•
Do not touch the coffee maker body with wet
hands.
•
To avoid burns, do not touch hot surfaces of
the coffee maker during coffee making and
right after switching the unit off. Let the coffee
maker cool down.
•
During the coffee making process, water
passes through ground coffee under steam
pressure, so do not bend over the coffee mak-
er, do not open the lid and do not remove the
removable filter.
•
Use only pure cold water.
•
Before making a new coffee portion, wait for
no less than 5 minutes to let the unit cool down.
•
Do not remove the thermal mug from the tray
during coffee making.
•
Do not use the thermal mug for other purpos-
es, do not place it on electric and gas ovens
and do not use it in microwave ovens.
•
Unplug the coffee maker before cleaning, as
well as in cases when you do not use it.
•
When unplugging the unit pull the plug but
not cord.
•
Do not allow children to use the unit as a toy.
•
This device is not intended for usage by chil-
dren or disabled persons. In exceptional situ-
ations the person who is responsible for their
safety must give them all the necessary and
understandable instructions on safety mea-
sures and information about danger that can
be caused by improper usage of the unit.
•
For children safety reasons do not leave poly-
ethylene bags, used as a packaging, unat-
tended.
•
Attention!
Do not allow children to play with
polyethylene bags or packaging film.
Danger
of suffocation!
•
If you find any damages of the unit or the pow-
er cord, unplug the unit and apply to an autho-
rized service center. Do not repair the unit by
yourself.
•
To avoid damages, transport the unit in origi-
nal package only.
•
Keep the unit out of reach of children.
THE UNIT IS INTENDED FOR HOUSEHOLD USAGE
ONLY
BEFORE THE FIRST USE
After unit transpor tation or storage at low
temperature it is necessary to keep it for at
least two hours at room temperature before
switching on.
–
Unpack the unit completely and remove any
stickers that can prevent unit operation.
–
Check the unit for damages, do not use it in
case of damages.
–
Before switching the unit on, make sure that
your home mains voltage corresponds to unit
operating voltage.
–
Wash all removable parts: the thermal mug (6)
with the lid (5), the holder (9), the filter (10)
with warm water and neutral detergent. Rinse
them and dry.
–
Install the holder (9) in such way that the hold-
er handle is on the left (pic. 1).
–
Install the filter (10) into the holder (9) in such
way that the filter handle is on the right (pic. 1).
–
Fill the mug (6) with pure water.
–
Open the lid (2) and pour the water from the
mug (6) into the water tank (1). The water level
should not exceed the «MAX» mark.
–
Put the mug (6) on the tray (7). Use the mug
without the lid (5).
–
Insert the power plug into the mains socket.
–
Press the «Start» button (8).
–
When the mug (6) is filled with water, remove it
from the tray (7) and pour out the water.
–
Let the unit cool down for 5 minutes.
Making coffee
The ready coffee drink is made by one-time pass-
ing of hot water through a layer of ground coffee or
loose tea in the filter. The taste of the ready drink
depends on the quality of raw products, that’s why
we recommend using well-fried and fresh-ground
coffee beans and high-quality loose leaf tea.
–
Open the lid (2), install the holder (9) in such
way that the holder handle is on the left (pic.
1).
–
Install the filter (10) in such way that the filter
holder is on the right (pic. 1).
–
Measure the required amount of ground coffee
or loose tea and put it into the filter (10).
–
Fill the mug (6) with water and then pour the
water from the mug (6) into the water tank (1).
The water level should not exceed the «MAX»
mark.
–
Close the lid (2).
–
Put the mug (6) on the tray (7). Use the mug
without the lid (5).
–
Insert the power plug into the mains sock-
et. Switch the coffee maker on by pressing
the «Start» button (8), the button indicator will
light up.
–
When the coffee is ready, the «Start» button (8)
indicator will go out.
–
Make sure that all the water has passed
through the filter, and then remove the mug
(6) from the tray (7).
–
To keep coffee warm, cover the mug (6) with
the lid (5). Close the lid tightly and close the
lid valve.
–
Unplug the unit and let it cool down.
–
Clean the unit.
Attention!
•
Hot water passes through ground coffee,
so do not bend over the coffee maker and
do not open the lid (2).
•
To avoid burns, open the lid (2) only by the
handle (3) after unplugging the unit.
•
The taste of the ready drink depends on
the quality of the raw products, that’s why
we recommend to use fresh-ground coffee
made of well-fried beans and high-quality
loose leaf tea. To avoid burns, carry the
thermal mug with a hot drink strictly in ver-
tical position, since the hot drink may flow
out even if the lid and valve are closed.
Cleaning and care
–
Unplug the unit every time before cleaning.
–
Let the coffee maker cool down completely
and clean the outer surfaces with a slightly
damp soft cloth, then wipe dry.
–
Use soft detergents to remove dirt; do not use
metal brushes and abrasives.
–
Wash all removable parts with warm water and
neutral detergent, rinse them, wipe dry and
install back to their places.
–
Do not immerse the coffee maker into water
or other liquids.
–
Do not wash the unit in a dishwashing machine.
Descaling
–
Clean the coffee maker from scale regularly
(not less than once a month).
–
Fill the tank (1) with a mixture of one part ordi-
nary vinegar and two parts water. Switch the
coffee maker on without adding coffee. Make
sure that the mug (6) is placed on the tray (7).
Use the mug (6) without the lid (5).
–
After descaling wash the coffee maker thor-
oughly. To do this, pour pure water into the
tank (1) and switch the unit on without adding
coffee. Repeat the cycle several times.
–
You can also use special substances which
you can buy in retail stores. Strictly follow the
instructions on the package.
Storage
–
Before taking the unit away for storage, unplug
it and let the unit cool down.
–
Clean the unit.
–
Keep the unit away from children in a dry cool
place.
Delivery set
Coffee maker – 1 pc.
Thermal mug with a lid – 1 pc.
Measuring spoon – 1 pc.
Instruction manual – 1 pc.
Technical specifications
Power supply: 230 V, ~ 50 Hz
Power: 650 W
Water capacity: 0.4 L
The manufacturer preserves the right to change
the design and the specifications of the unit with-
out a preliminary notification.
Coffee maker operating life is 5 years
Guarantee
Details regarding guarantee conditions can be
obtained from the dealer from whom the appliance
was purchased. The bill of sale or receipt must be
produced when making any claim under the terms
of this guarantee.
This product conforms to the EMC-Re-
quirements as laid down by the Council
Directive 2004/108/ЕС and to the Low
Voltage Regulation (2006/95/ЕС)
ENGLISH
2
VT-1510_IM.indd 1
28.11.2013 12:22:26


