
Кофеварка BRAYER BR1121 - инструкция пользователя по применению, эксплуатации и установке на русском языке. Мы надеемся, она поможет вам решить возникшие у вас вопросы при эксплуатации техники.
Если остались вопросы, задайте их в комментариях после инструкции.
"Загружаем инструкцию", означает, что нужно подождать пока файл загрузится и можно будет его читать онлайн. Некоторые инструкции очень большие и время их появления зависит от вашей скорости интернета.


8
9
en
en
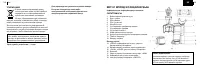
symbols ”12:00” will appear on the display (16).
•
Set the current time. Set the time in «hours» by
pressing the button (15) «HOUR». Set the time in
«minutes» by pressing the button (17) «MIN». The
current time will be shown with digital symbols on the
display (16). Time format is 24 hours.
•
Press the button (13) «PROG» once, the indicator
(14) will be flashing. The flashing symbols «12:00»
will appear on the display (16). Set the coffee maker
switch on time with the buttons (15) «HOUR» and
(17) «MIN», for example, «14:00». Press the button
(13) «PROG» again, the indicator (14) will be glowing
constantly. After some time the display (16) will show
the current time.
•
Notes:
- to cancel the setting function press the button (13)
«PROG», the indicator (14) will go out.
- to change the switch on time repeat the coffee
maker switch on time setting steps described
above.
• The coffee maker will switch on at the preset time and
the indicator (18) will light up.
• If you don’t switch the coffee maker after making
coffee by pressing the on/off button (19) «ON/OFF», it
will switch off in 40 minutes.
•
Note:
to remove the scale you can use special
descaling agents for coffee makers and coffee
machines, strictly following the instructions on their
usage.
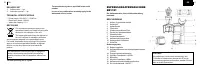
CLEANING AND CARE
• Always switch the coffee maker off and unplug it
before cleaning.
• Let the coffee maker cool down completely and clean
the outer surfaces of the unit body (9) with a soft,
slightly damp cloth, then wipe dry.
• Use soft detergents to remove dirt; do not use metal
brushes, abrasive detergents and solvents.
•
Wash the removable parts (1, 4, 5) with warm water
and a neutral detergent, then rinse and dry, insert
the filter (5) into the holder (4), install the filter holder
(4) back to its place, turn the funnel to the operating
position.
• Do not immerse the coffee maker, the power cord
and the power plug into water or any other liquids.
STORAGE
• Before taking the coffee maker away for long storage,
unplug it and let it cool down completely.
• Clean the coffee maker.
• Keep the coffee maker in a dry cool place out of
reach of children and disabled persons.
ATTENTION!
• When you don’t need to keep the flask (1) warm,
always switch the coffee maker off by pressing the
on/off button (19) «ON/OFF».
•
Water passes through ground coffee under steam
pressure, so do not bend over the coffee maker,
do not open the lid (6), do not turn the funnel and
do not remove the filter holder (4) and the filter (5)
during making coffee.
• Do not leave the empty coffee flask (1) on the flask
warming tray (10), otherwise the glass may crack.
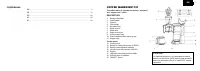
COFFEE MAKER SWITCH-ON TIME SETTING
FUNCTION
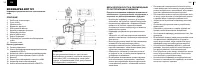
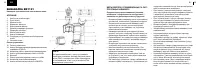
• Take the handle and turn the funnel to the left.
•
Measure the required amount of ground coffee and
put it into the filter (5). 6 grams of ground coffee per
one coffee cup is required on average; adjust the
quantity according to your taste.
•
Turn the funnel to the right until bumping.
• Open the lid (6), fill the tank (7) with cold water up to
the required level. Determine the water level using
the scale (8).
•
Close the lid (6).
• Put the flask (1) on the tray (10).
• Insert the plug into the mains socket, the digital
DESCALING
• Clean the coffee maker from scale regularly.
•
You can use «homemade descaling agent» - citric
acid solution in proportion 100 portions of water per 3
portions of citric acid.
• Open the lid (6), fill the water tank (7) with the
descaling agent up to the maximal mark on the water
level scale (8).
• Make sure that the filter holder (4) and the filter (5)
are installed to their places and there is no ground
coffee in the filter (5).
• Put the flask (1) on the tray (10).
• Switch the coffee maker on by pressing the on/off
button (19) «ON/OFF», the light indicator (18) will
light up.
• Wait until liquid appears in the flask (1). Switch the
coffee maker off by pressing the on/off button (19)
«ON/OFF».
• Wait 15-20 minutes and switch the coffee maker on.
Wait until there is no descaling agent in the water
tank (7).
• Switch the coffee maker off and pour the liquid out of
the flask (1).
• After descaling, wash the coffee maker thoroughly. To
do this, pour pure water into the tank (7) and switch
the unit on without adding ground coffee in the filter
(5).
•
Repeat the washing cycle several times.


