
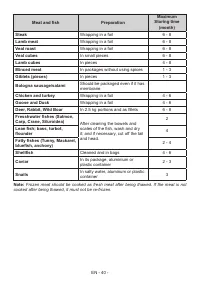
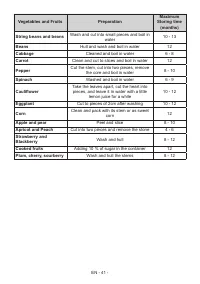
Холодильник Schaub Lorenz SLUE235W4 - инструкция пользователя по применению, эксплуатации и установке на русском языке. Мы надеемся, она поможет вам решить возникшие у вас вопросы при эксплуатации техники.
Если остались вопросы, задайте их в комментариях после инструкции.
"Загружаем инструкцию", означает, что нужно подождать пока файл загрузится и можно будет его читать онлайн. Некоторые инструкции очень большие и время их появления зависит от вашей скорости интернета.


EN - 47 -
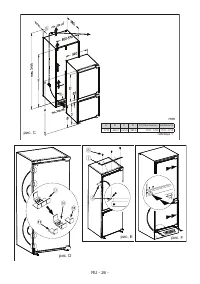
EN- Installation Instructions
!
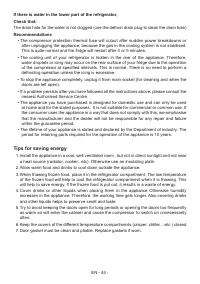
It is recommended that this installation be performed by authorized technical stuff.
!
Before installation, read the instructions carefully.
!
Fit the refrigerator/freezer in stable kitchen units only.
!
If necessary, reverse the door according to instructions.
!
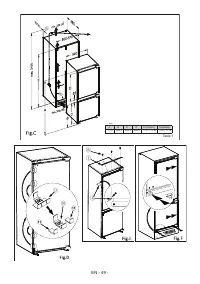
Cabinet dimensions are changed by material of trim flap
1
.
1.
If material of trim flap
1
is plastic, look at (Table.1/E1) for cabinet dimensions.
2.
If material of trim flap
1
is metal, look at (Table.1/E2) for cabinet dimensions.
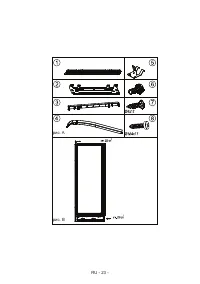
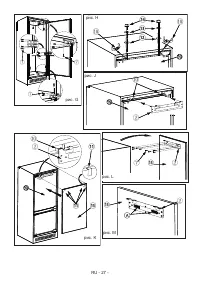
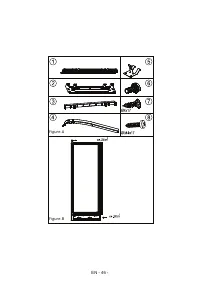
1. See fig.A for the necessary attachment components.
2. Open the package. Take gasket spacer
⑨
and brake into three as shown in figure.D. The
middle part is door hang rail
⑩
. The other two parts are unit door spacers
⑪
. (fig.D)
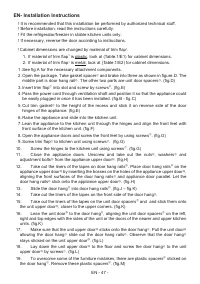
3. Insert trim flap
①
into slot and screw by screws
⑧
. (fig.E)
4.
Pass the power cord through ventilation shaft and position it so that the appliance could
be easily plugged in once it has been installed. (fig.B - fig.C)
5. Cut trim gasket
④
to the height of the recess and stick it on reverse side of the door
hinges of the appliance. (fig.E)
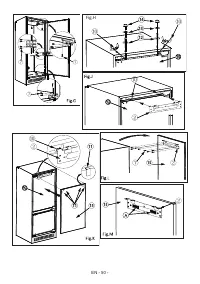
6. Raise the appliance and slide into the kitchen unit.
7.
Lean the appliance to the kitchen unit through the hinges and align the front feet with
front surface of the kitchen unit. (fig.F)
8.
Open the appliance doors and screw the front feet by using screws
⑦
. (fig.G)
9. Screw trim flap
①
to kitchen unit using screws
⑦
. (fig.G)
10.
Screw the hinges to the kitchen unit using screws
⑦
. (fig.G)
11.
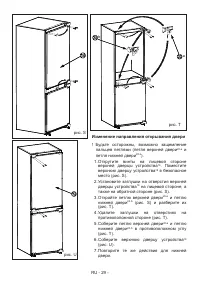
Close the appliance doors. Unscrew and take out the nuts
⑭
, washers
⑬
and
adjustment bolts
⑫
from the appliance upper door
⑲
. (fig.H)
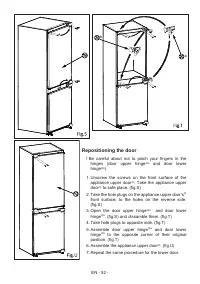
12.
Take out the liners of the tapes on door hang rails
⑩
. Place door hang rails
⑩
on the
appliance upper door
⑲
by inserting the bosses on the holes of the appliance upper door
⑲
,
aligning the front surfaces of the door hang rails
⑩
and appliance door parallel. Let the
door hang rails
⑩
stick onto the appliance upper door
⑲
. (fig.H)
13.
Slide the door hang
②
into door hang rails
⑩
. (fig.J – fig.K)
14.
Take out the liners of the tapes on the front side of the door hang
②
.
15.
Take out the liners of the tapes on the unit door spacers
⑪
and and stick them onto
the unit upper door
⑮
, closer to the upper corners. (fig.K)
16.
Lean the unit door
⑮
to the door hang
②
, aligning the unit door spacers
⑪
on the left,
right and top edges with the sides of the unit or the doors of the nearer and upper kitchen
units. (fig.K)
17.
Make sure that the unit upper door
⑮
sticks onto the door hang
②
. Pull the unit door
⑮
allowing the door hang
②
slide out the door hang rails
⑩
. Observe that the door hang
②
stays sticked on the unit upper door
⑮
. (fig.L)
18.
Lay down the unit upper door
⑮
to the floor and screw the door hang
②
to the unit
upper door
⑮
by screws
⑦
. (fig.L)
19.
To overcome some of the furniture mistakes, there are plastic spacers
Ⓐ
sticked on
the door hang
②
. Remove these plastic spacers
Ⓐ
. (fig.M)
Содержание
- 4 РУКОВОДСТВО ПО ЭКСПЛУАТАЦИИ; Предупреждения общего характера
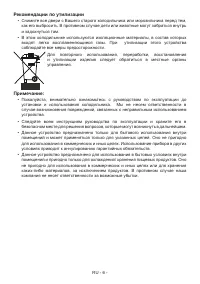
- 7 Рекомендации по утилизации
- 8 Правила и условия безопасной эксплуатации
- 9 Установка и эксплуатация холодильника
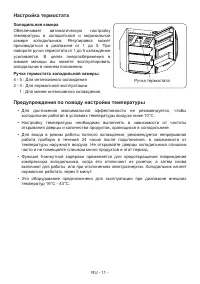
- 10 Перед началом эксплуатации холодильника
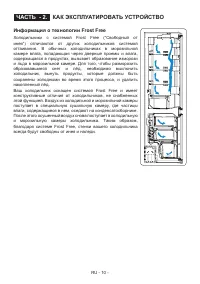
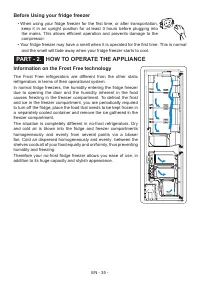
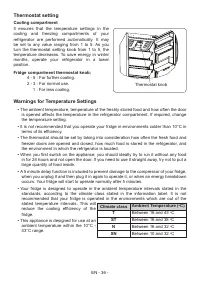
- 11 КАК ЭКСПЛУАТИРОВАТЬ УСТРОЙСТВО; Информация о технологии Frost Free
- 12 Холодильная камера
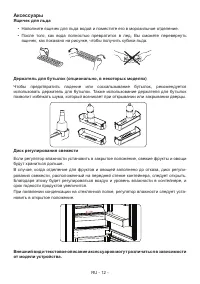
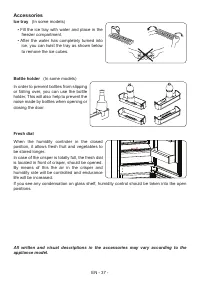
- 13 Аксессуары
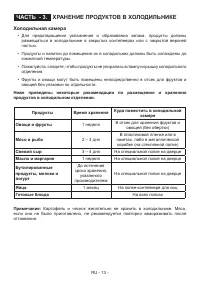
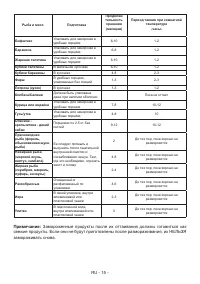
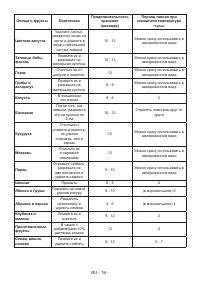
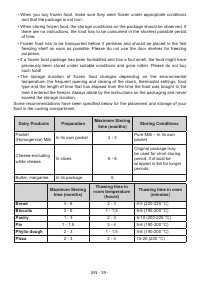
- 14 ХРАНЕНИЕ ПРОДУКТОВ В ХОЛОДИЛЬНИКЕ
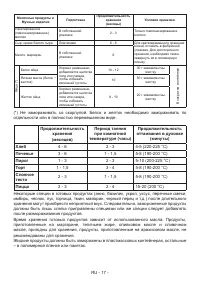
- 15 Морозильное отделение
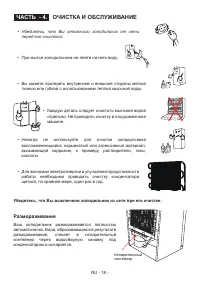
- 19 ОЧИСТКА И ОБСЛУЖИВАНИЕ; Убедитесь, что Вы выключили холодильник из сети при его очистке.; Размораживание
- 20 Замена светодиодной подсветки
- 21 Если продукты в холодильнике недостаточно охлаждаются:; Рекомендации
- 22 Советы по энергосбережению
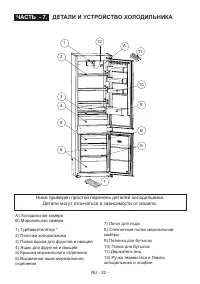
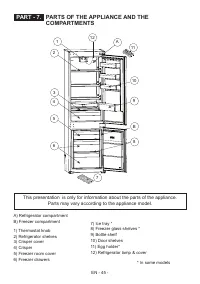
- 23 ДЕТАЛИ И УСТРОЙСТВО ХОЛОДИЛЬНИКА
- 25 ИНСТРУКЦИИ ПО УСТАНОВКЕ
- 30 Изменение направления открывания двери
Характеристики

Остались вопросы?Не нашли свой ответ в руководстве или возникли другие проблемы? Задайте свой вопрос в форме ниже с подробным описанием вашей ситуации, чтобы другие люди и специалисты смогли дать на него ответ. Если вы знаете как решить проблему другого человека, пожалуйста, подскажите ему :)


