
Холодильник Zigmund Shtain BR 02 X - инструкция пользователя по применению, эксплуатации и установке на русском языке. Мы надеемся, она поможет вам решить возникшие у вас вопросы при эксплуатации техники.
Если остались вопросы, задайте их в комментариях после инструкции.
"Загружаем инструкцию", означает, что нужно подождать пока файл загрузится и можно будет его читать онлайн. Некоторые инструкции очень большие и время их появления зависит от вашей скорости интернета.


RU - 13
Customer Helpline
0845 600 4632
7
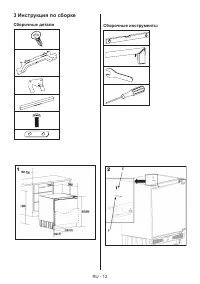
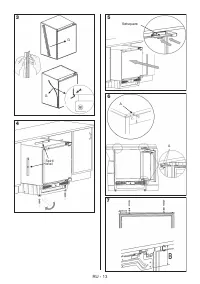
Installation
Height adjustment
Fitting the door gasket
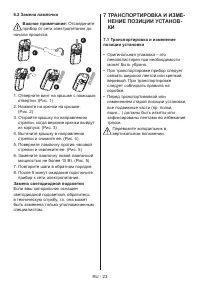
a: If necessary, the height of the freezer can be
adjusted, by loosening the locking nuts on the
adjustable feet and screwing the feet in or out to
the desired height. A wrench may be required to
undo the locking nuts.
b: When the desired height is reached, re-tighten
the locking nuts using the wrench to lock the
adjustable feet in position.
a: Take out the gasket (G) located on the side
panel, and remove the protective tape.
b:
Stick the gasket (
G) on the freezer side panel,
on the opposite side to the door hinges, as
shown (
3).
4
3
Spirit
level
G
G
Customer Helpline
0845 600 4632
7
Installation
Height adjustment
Fitting the door gasket
a: If necessary, the height of the freezer can be
adjusted, by loosening the locking nuts on the
adjustable feet and screwing the feet in or out to
the desired height. A wrench may be required to
undo the locking nuts.
b: When the desired height is reached, re-tighten
the locking nuts using the wrench to lock the
adjustable feet in position.
a: Take out the gasket (G) located on the side
panel, and remove the protective tape.
b:
Stick the gasket (
G) on the freezer side panel,
on the opposite side to the door hinges, as
shown (
3).
4
3
Spirit
level
G
G
8
Customer Helpline
0845 600 4632
Installation
Installation
Installation
Installation
Installation
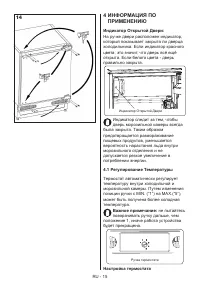
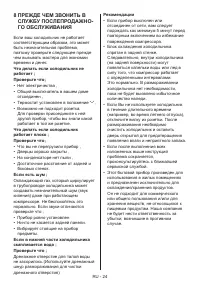
Position the freezer
Securing the freezer
Caution: The freezer may require 2 people
to handle it when pushing it into position.
a: Check behind the freezer to make sure there
are no tools or obstructions that may cause
damage.
b: Carefully slide the freezer into position until the
hinge surface is aligned with the front surface of
the kitchen unit.
c: Check that the freezer is square using
the setsquare.
a: Secure the freezer to the kitchen units
using screws (
A), through the top bracket (F) and
through both the upper and lower door hinges
as shown (
6).
5
6
A
A
Setsquare
8
Customer Helpline
0845 600 4632
Installation
Installation
Installation
Installation
Installation
Position the freezer
Securing the freezer
Caution: The freezer may require 2 people
to handle it when pushing it into position.
a: Check behind the freezer to make sure there
are no tools or obstructions that may cause
damage.
b: Carefully slide the freezer into position until the
hinge surface is aligned with the front surface of
the kitchen unit.
c: Check that the freezer is square using
the setsquare.
a: Secure the freezer to the kitchen units
using screws (
A), through the top bracket (F) and
through both the upper and lower door hinges
as shown (
6).
5
6
A
A
Setsquare
Customer Helpline
0845 600 4632
9
Installation
Installation
Installation
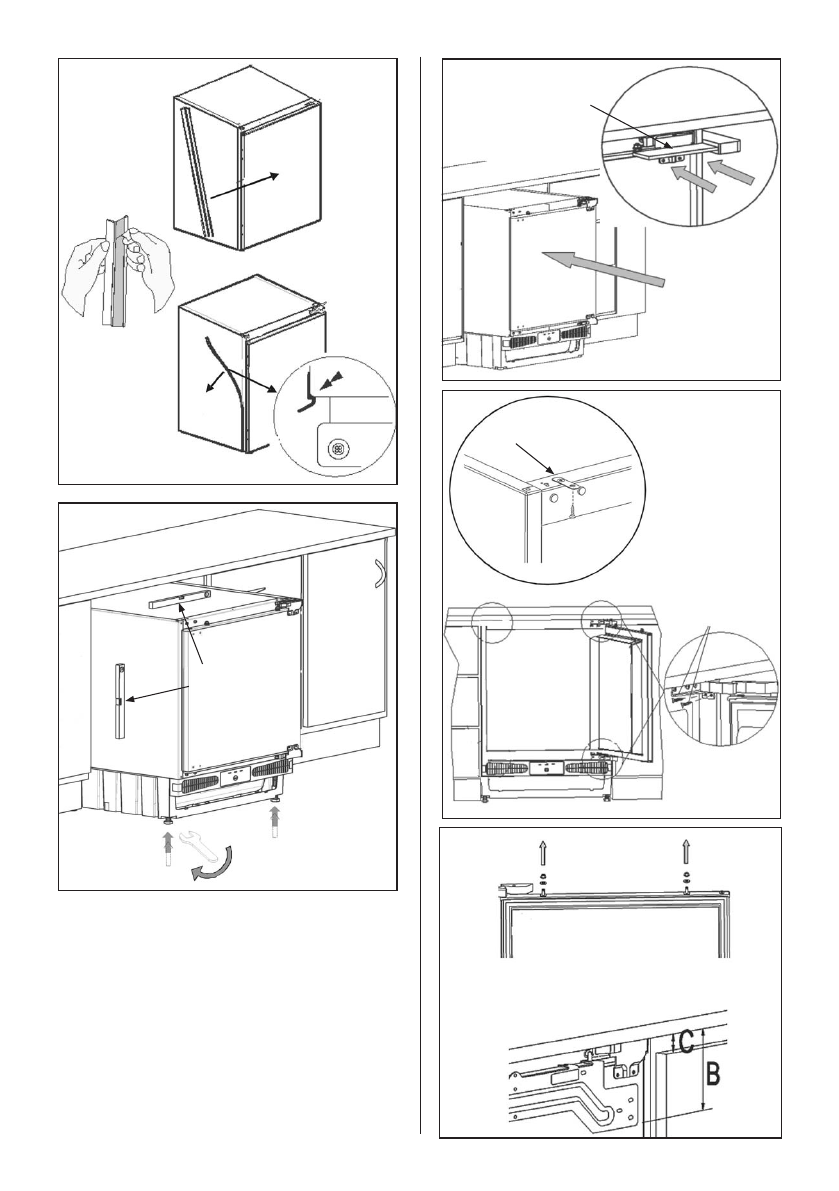
Fitting the cabinet door
a: Unscrew and remove the nuts and washers
from the appliance door.
b: Place door hang on the appliance door by
inserting the holes to adjustment bolts.
c: Dimension B= Measure from the underside
surface of kitchen unit to the bottom of door
hang.Dimension C= Measure from the underside
surface of kitchen unit to the top of next unit
door.
d: Subtract C from B and place door hang (B)
using this dimension for vertical position and
place to the centre for horizontal position.
e: Screw the door hang (B) using screws (A).
f: Place the cabinet door onto the appliance door
by inserting adjustment bolts into the slots on the
door hang.
g: Place the washers and screw the nuts onto the
adjustment bolts.
Continued on next page
7
8
9
B
A
Характеристики

Остались вопросы?Не нашли свой ответ в руководстве или возникли другие проблемы? Задайте свой вопрос в форме ниже с подробным описанием вашей ситуации, чтобы другие люди и специалисты смогли дать на него ответ. Если вы знаете как решить проблему другого человека, пожалуйста, подскажите ему :)


