
Газонокосилки Texas Razor 4610 90066071 - инструкция пользователя по применению, эксплуатации и установке на русском языке. Мы надеемся, она поможет вам решить возникшие у вас вопросы при эксплуатации техники.
Если остались вопросы, задайте их в комментариях после инструкции.
"Загружаем инструкцию", означает, что нужно подождать пока файл загрузится и можно будет его читать онлайн. Некоторые инструкции очень большие и время их появления зависит от вашей скорости интернета.


7
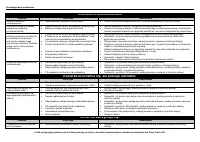
Maintenance and storage
The engine shall be stopped when carrying out
maintenance and cleaning operations, when
changing tools and when being transported by
means other than under its own power.
Check regularly that all bolts and nuts are
tightened. Retighten if necessary.
The engine must be completely cooled before
storing indoors or covered.
If the machine unused for a period of time,
please refer to the instructions in this manual.
Maintain or replace safety and instruction
labels, as necessary.
Only use orginal spare parts or accessories. If
not orginal parts or accessories is used, the
liablility is no longer applied.
Miscellaneous
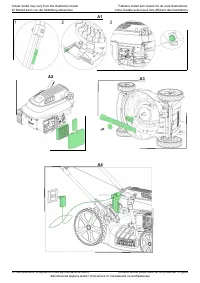
The motor is not pre-filled with oil.
Always before start check the engine oil level.
Factory-fitted control devices, such as the
handle-mounted clutch cable, must not be
removed or exposed.
Only drain the fuel tank outdoors. Gasoline is
extremely flammable and the fumes are
explosive.
Ensure that the machine is properly secured
when transported on a flatbed etc.
Waste electrical products must not be disposed
of with the household waste. This tool should
be taken to your local recycling centre for safe
treatment.
The lawnmower is manufactured according to the latest
safety requirements. These include a blade brake that
stops the motor and blade in 3 seconds when the blade
brake. Every precaution is only effective when it is
followed exactly. Use the following description when
you mount your lawnmower.
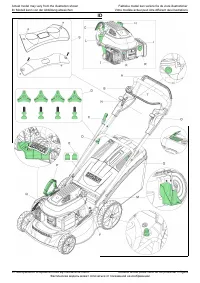
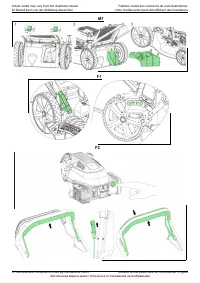
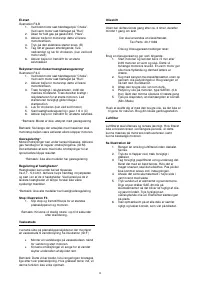
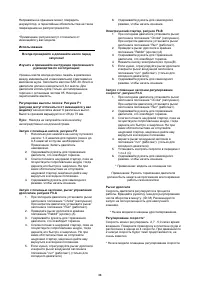
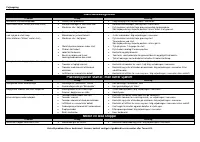
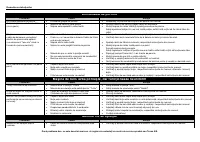
Identification of the parts
See Illustration ID
Notice: the illustrations may vary from your present
model
A. Handlebar for drive
B. Handlebar for engine brake
C. Recoil starter
D. Wing nut
E. Rear discharge guard with spacer blocks
F. Water nozzle
G. Grass collector
H. Gasoline filling cap
I. Air Filter
J. Exhaust
K. Spark plug
L. Oil cap
M. Bio plug
N. Throttle lever - Speed lever *
O. Choke*
P. Height adjustment*
Q. Side discharge guard*
R. Primer*
S. Breastplate*
T. Electric starter*
* - may vary from your actual model.
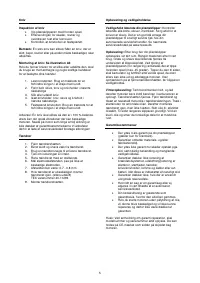
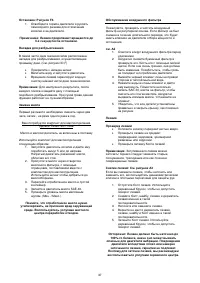
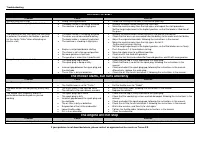
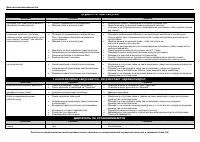
Mounting
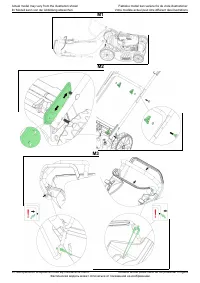
Unpacking: Illustration M1
Remove the mower from the box by pulling the machine
out form the side. The box contains:
1 pcs mower
4 pcs wing nut set consisting of wing nuts,
bolts and washers. (See ID; D)
2 pcs spacer blocks (See ID; E)
Warning: Ensure that cables are not pinched.
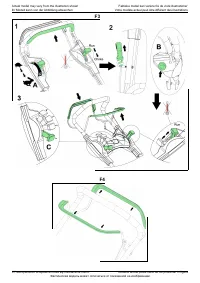
Handlebar and height adjustment: Illustration M2
The handlebars are height adjustable. This means that
they can be adjusted so that it best fits you. Before you
install the handlebar, it may be a good idea to have
decided which height is best for you.
1. Set the lower handlebar tube to the working
height that suits you.
“H” is high position and
the “L” is
low position.
2. Attach the wing nut from the inside of the side
bracket and into the lower handlebar.
3. Attach the upper handlebar on the lower.
Fasten with wing nut from the inside of the
handlebar.
4. Customize cable and secure with cable clamps
Mounting the engine brake cable: Illustration M3
1. Gently push the top handlebar ID:B forward
2. Insert the engine brake cable from the outside,
into the hole in the bracket on handlebar ID:B
and lock.
Mounting the drive cable: Illustration M3
1. Gently push the lower handlebar ID:A
downward
2. Insert the drive cable from the inside, into the
hole in the bracket on handlebar ID:A and
lock.


