
Газонокосилки Makita ELM4600 - инструкция пользователя по применению, эксплуатации и установке на русском языке. Мы надеемся, она поможет вам решить возникшие у вас вопросы при эксплуатации техники.
Если остались вопросы, задайте их в комментариях после инструкции.
"Загружаем инструкцию", означает, что нужно подождать пока файл загрузится и можно будет его читать онлайн. Некоторые инструкции очень большие и время их появления зависит от вашей скорости интернета.


21
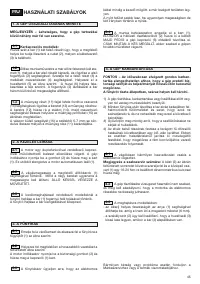
STANDARDS OF USE
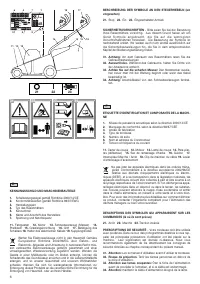
NOTE – The machine can be supplied with some of the
components already fitted.
Models with crossing lever switch:
Widen both ends of the upper part of the handle (1) in order
to fit the rod (2) and cable hook (3) in place.
Return the lower part of the handle, which is made
up of two pre-assembled elements (1), to its working posi-
tion and lock into place using the lower knobs (2).
Attach the upper part (3) using the screws (4) supplied.
Fit the cable clamps (5) as shown. The correct position for
the cable hook (6) is as shown. By loosening the knobs (2)
the handle can be set at three different heights.
With the plastic part (11) upside-down, fasten the
frame (12) to the plastic part using the screws (13).
Insert the frame (12) into the sack (14) and attach the plas-
tic profile (15) with the help of a screwdriver, as shown in
the drawing.
Fit the edge of the cloth (16) right into the groove of the
plastic part (11), starting 5-7 mm from the ends.
The engine is controlled by a dual action switch to
prevent starting it accidentally.
To start, press the button (2) and pull the lever (1). The
engine automatically stops when the lever (1) is released.
The cutting height is adjusted using the levers (1).
The four wheels must be at the same height.
MAKE THIS ADJUSTMENT ONLY WHEN THE BLADE HAS
STOPPED MOVING.
In power-driven models, draw the lever (1) towards
the handle for forward movement. The lawnmower stops
moving forward when the lever is released.
Lift the stone-guard and attach the grass-catcher
(1) correctly as shown in the drawing.
Connect the extension cable correctly as indicated.
Start the engine by pressing the safety push-button (2) and
pulling the switchgear lever (1).
While cutting, ensure that the electric cable is
3.3
3.2
3.1
3. GRASS CUTTING
2.3
2.2
2.1
2. DESCRIPTION OF CONTROLS
1.3
1.2
1.1
1. FINISH ASSEMBLY
GB
always behind you and on the area of grass already cut.
The lawn will look better if it is always cut to the same
height and in alternate directions.
When you have finishing mowing, release the lever
(1).
FIRST disconnect the cable extension from the supply
socket (2) and THEN from the side of the lawnmower’s
switchgear (3).
WAIT FOR THE BLADE TO STOP before carrying out any
type of work on the machine.
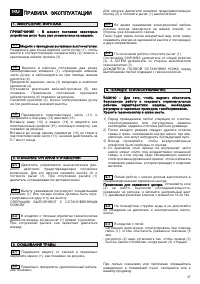
IMPORTANT – Regular, careful maintenance is essen-
tial for keeping the safety level and original perform-
ance of the machine unchanged in time.
Store the lawnmower in a dry place.
1) Wear strong working gloves during any cleaning, main-
tenance or adjustment operation on the machine.
2) Remove the grass debris after each cut and mud accu-
mulated inside the chassis to avoid their drying and thus
making the next start-up difficult.
3) Always ensure that ventilation openings are kept clear of
debris.
4) The paintwork on the inside of the chassis may peel off
in time due to the abrasive action of the cut grass; in this
case, intervene promptly by touching up the paintwork
using a rustproof paint to prevent the formation of rust
that would lead to corrosion of the metal.
All operations on the blade should be carried out at
a specialized centre.
Note for specialized centres:
Reassemble the blade (2) as
shown in the drawing and tighten the central screw (1)
using a torque wrench set to 16-20 Nm.
Do not use forced water and avoid wetting the
motor or the electrical components.
In power-driven models:
• adjust the tension of the belt with the nut (1) to get the
right measurement (6 mm).
• turn the adjusting nut (2) so that the wire (3) is slightly
loose and the lever (4) is idle.
Should you have any doubts or problems, do not hesitate
to contact your nearest Service Centre or your Dealer.
4.3
4.2
4.1
4. ROUTINE MAINTENANCE
3.4


