
Фрезеры Bosch GOF 130 - инструкция пользователя по применению, эксплуатации и установке на русском языке. Мы надеемся, она поможет вам решить возникшие у вас вопросы при эксплуатации техники.
Если остались вопросы, задайте их в комментариях после инструкции.
"Загружаем инструкцию", означает, что нужно подождать пока файл загрузится и можно будет его читать онлайн. Некоторые инструкции очень большие и время их появления зависит от вашей скорости интернета.


18
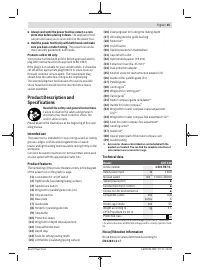
| English
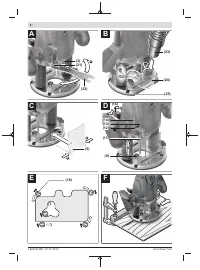
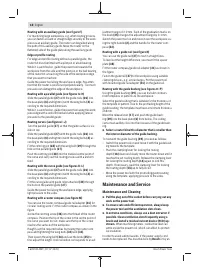
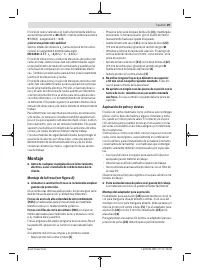
Routing with an auxiliary guide (see figure F)
For machining large workpieces, e.g. when routing grooves,
you can fasten a board or straight edge securely to the work-
piece as an auxiliary guide. The router can be guided along
the path of this auxiliary guide. Move the router on the
flattened side of the guide plate along the auxiliary guide.
Edge or profile routing
For edge and profile routing without a parallel guide, the
router bit must be fitted with a pilot pin or a ball bearing.
While it is switched on, guide the power tool towards the
workpiece from the side until the pilot pin or the ball bearing
of the router bit is touching the side of the workpiece edge
that you want to machine.
Guide the power tool along the workpiece edge. Pay atten-
tion that the router is positioned perpendicularly. Too much
pressure can damage the edge of the workpiece.
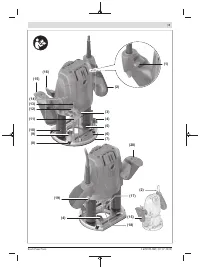
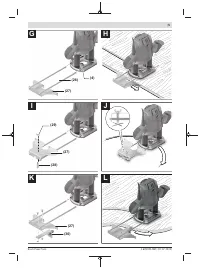
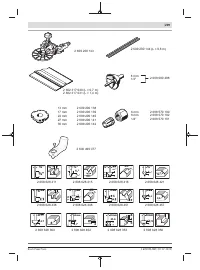
Routing with a parallel guide (see figures G–H)
Slide the parallel guide
(27)
with the guide rods
(26)
into
the base plate
(6)
and tighten it with the wing bolts
(4)
ac-
cording to the required dimension.
While it is switched on, guide the power tool along the work-
piece edge with a uniform feed and while applying lateral
pressure to the parallel guide.
Routing curves (see figures I–J)
Turn the parallel guide
(27)
so that the guide surface is vis-
ible on top.
Slide the parallel guide
(27)
with the guide rods
(26)
into
the base plate
(6)
and tighten it with the wing bolts
(4)
ac-
cording to the required dimension.
Fit the centring pin
(28)
with the wing bolt
(29)
through the
hole on the parallel guide
(27)
.
Push the centring pin
(28)
into the marked centre point of
the curve and carry out the routing process with a uniform
feed.
Routing with the curve guide (see figures K–L)
Slide the parallel guide
(27)
with the guide rods
(26)
into
the base plate
(6)
and tighten it with the wing bolts
(4)
ac-
cording to the required dimension.
Fit the curve guide with guide roller attached
(30)
through
the hole on the parallel guide
(27)
.
Guide the power tool along the workpiece edge, applying
light pressure to the sides.
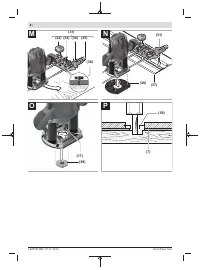
Routing with a router compass (see figure M)
You can use the router compass/guide rail adapter
(31)
for
circular routing work. Fit the router compass as shown in the
figure.
Screw the centring screw
(36)
into the thread of the router
compass. Position the tip of the screw in the centre point of
the curve you want to rout; make sure the tip of the screw
reaches the surface of the workpiece.
Roughly set the required radius by moving the router com-
pass and tightening the wing bolts
(33)
and
(34)
.
Then loosen the wing bolt
(34)
and use the knob
(35)
to
fine-adjust the length. One revolution corresponds to an ad-
justment range of 2.0 mm. Each of the graduation marks on
the knob
(35)
changes the adjustment range by 0.1 mm.
Switch the power tool on and move it over the workpiece us-
ing the right handle
(2)
and the handle for the router com-
pass
(32)
.
Routing with a guide rail (see figure N)
You can use the guide rail
(37)
to rout in straight lines.
To level out the height difference, you must fit the spacer
plate
(38)
.
Fit the router compass/guide rail adapter
(31)
as shown in
the figure.
Fasten the guide rail
(37)
to the workpiece using suitable
clamping devices, e.g. screw clamps. Put the power tool
with mounted guide rail adapter
(31)
on the guide rail.
Routing with the guide bushing (see figures O–P)
Using the guide bushing
(39)
, you can transfer contours
from templates or patterns to the workpiece.
Select the guide bushing that is suitable for the thickness of
the template or pattern. Due to the protruding height of the
guide bushing, the template must have a minimum thickness
of 8 mm.
Move the release lever
(17)
and push the guide bush-
ing
(39)
into the base plate
(6)
from below. The coding
cams must audibly click into the recesses of the guide bush-
ing.
u
Select a router bit with a diameter that is smaller than
the interior diameter of the guide bushing.
To rout with the guide bushing
(39)
, proceed as follows:
– Switch the power tool on and move it with the guide bush-
ing towards the template.
– Push the clamping lever for locking the routing
depth
(16)
down and slowly move the router down until it
reaches the set routing depth. Release the clamping lever
for locking the routing depth
(16)
again to lock this
depth. If necessary, push the clamping lever for locking
the routing depth
(16)
up to fully lock it.
– Move the power tool with the protruding guide bushing
along the template, applying pressure to the sides.
Maintenance and Service
Maintenance and Cleaning
u
Pull the plug out of the socket before carrying out any
work on the power tool.
u
To ensure safe and efficient operation, always keep
the power tool and the ventilation slots clean.
u
In extreme conditions, always use a dust extractor if
possible. Clean ventilation slots frequently using a
brush and install a residual current device (RCD) up-
stream.
When machining metals, conductive dust can
settle inside the power tool, which can affect its protect-
ive insulation.
In order to avoid safety hazards, if the power supply cord
needs to be replaced, this must be done by
Bosch
or by an
1 609 92A 5MT | (27.07.2020)
Bosch Power Tools
Содержание
- 115 Указания по технике безопасности; ЖДЕНИЕ
- 117 Описание продукта и услуг; Применение по назначению
- 118 Технические данные; Данные по шуму и вибрации
- 119 Сборка; Удаление пыли и стружки; Работа с инструментом; Включение электроинструмента
- 120 Указания по применению
- 122 Техобслуживание и сервис; Техобслуживание и очистка
- 123 Утилизация; Українська; Вказівки з техніки безпеки; ДЖЕННЯ
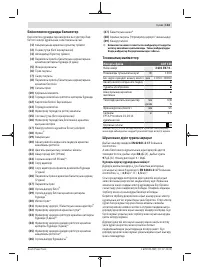
Характеристики

Остались вопросы?Не нашли свой ответ в руководстве или возникли другие проблемы? Задайте свой вопрос в форме ниже с подробным описанием вашей ситуации, чтобы другие люди и специалисты смогли дать на него ответ. Если вы знаете как решить проблему другого человека, пожалуйста, подскажите ему :)


